Blog
Everything thats going on at Mister Clipping Paths is collected here
When it comes to digital art, Adobe Photoshop remains an industry standard. Its wide array of tools and features allows creatives to produce everything from simple edits to complex, surreal artworks. In Photoshop 2026, traditional compositing tools work alongside AI-assisted features such as the Object Selection Tool, Generative Fill, and the Remove Tool, making it easier to isolate subjects, develop seamless transitions, and clean up unwanted details. One such genre of digital art is the creation of animal-human hybrids in Photoshop. This unique blend of reality and imagination introduces a new perspective to character design and portraiture. However, mastering this art requires not just creativity, but also a deep understanding of selections, layers, masks, lighting, texture, and color.
Over the years, Photoshop has evolved to become more user-friendly, with smarter workflows and tutorials available for different skill levels. Yet, for an aspiring digital artist, the wide range of tools and settings can still be overwhelming. It is not just about knowing which button to click, but also understanding how to use these tools in tandem to achieve the desired result. Modern compositing also benefits from Smart Objects, layer masks, and Adjustment Layers, which allow artists to experiment and refine their work without permanently altering the original images. Learning Photoshop is akin to learning a new language. It takes time, practice, and patience.
The fusion of digital art and photography through Photoshop opens up a world of possibilities. It allows artists to move beyond the limits of a single photograph and create pieces that push the boundaries of creativity. Features such as Generative Fill and Generative Expand can help artists explore missing image areas and compositional variations, while masks and Adjustment Layers keep the artwork flexible and editable. The creation of Photoshop animal-human hybrids is a testament to this. It blends the real and the imagined, creating a piece of art that is both striking and thought-provoking.
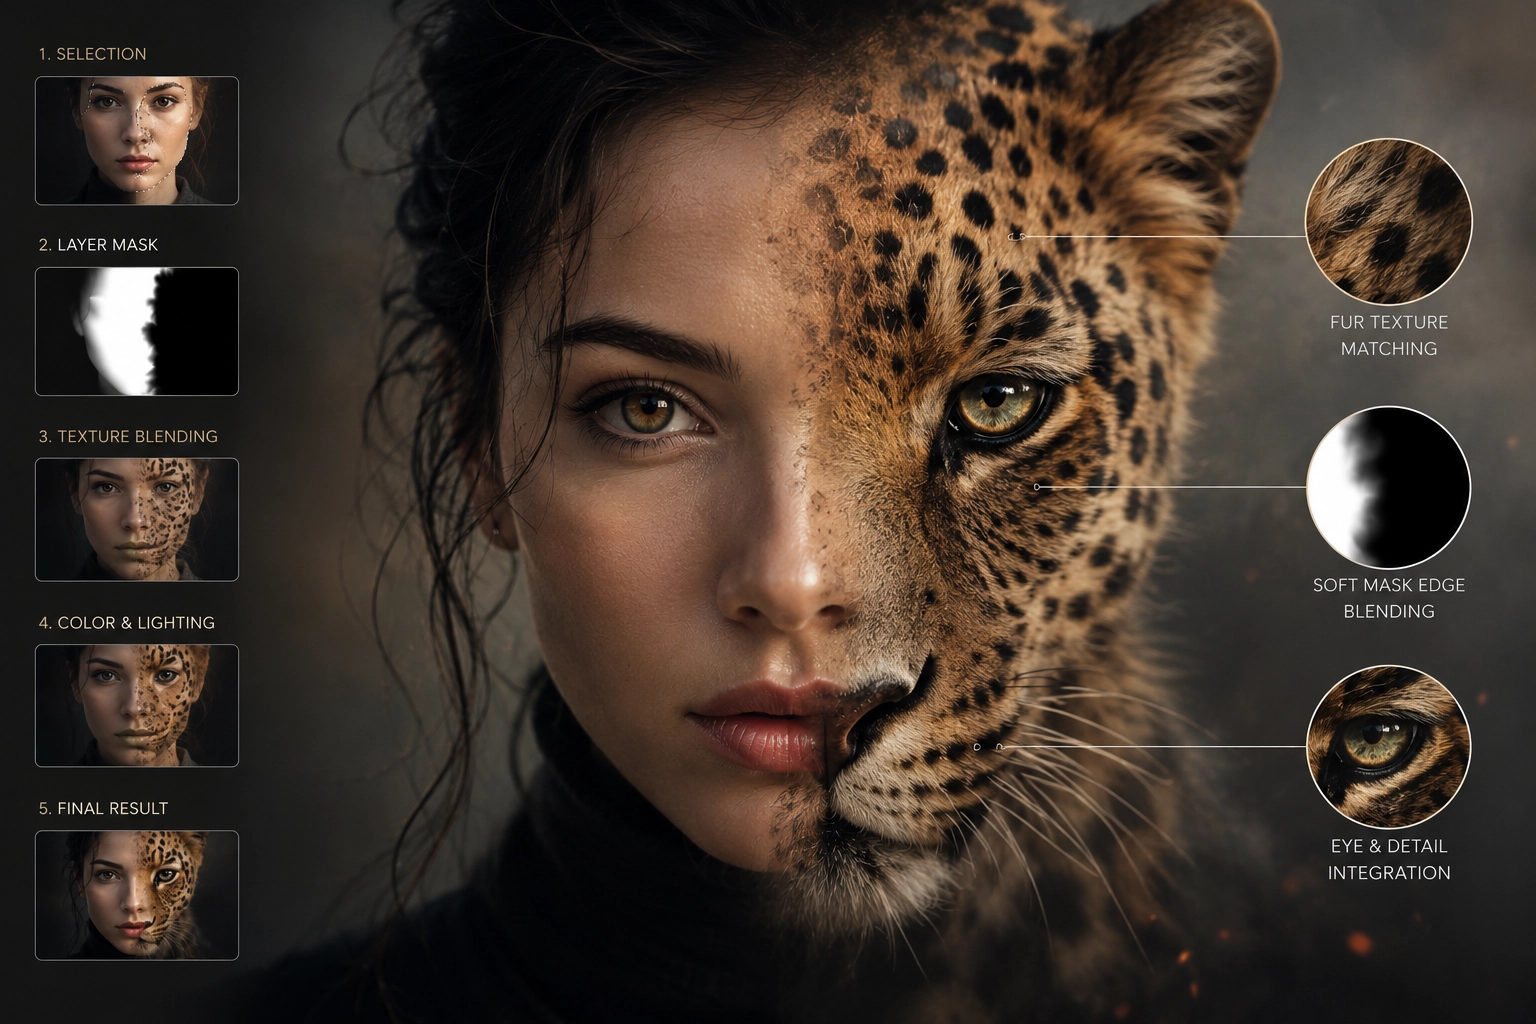
Creating a Photoshop animal-human hybrid requires a strong understanding of the software. It involves detailed selection, alignment, masking, and blending work to combine multiple photos into a single, cohesive image. In Photoshop 2026, AI-assisted features such as the Object Selection Tool can speed up the process of isolating faces, fur, and other visual elements, while layer masks allow artists to refine edges and transitions without permanently removing image pixels. Whether you are a professional artist or a hobbyist, mastering the art of creating animal-human hybrids can significantly enhance your compositing, retouching, and digital art skills.
The process of creating a Photoshop animal-human hybrid requires a deep understanding of the software’s features, from selection tools and layer masks to blending modes, Smart Objects, and Adjustment Layers. Smart Objects help preserve the original image quality when source photos are resized, transformed, or filtered, while Adjustment Layers make it easier to match color, contrast, and lighting without directly altering the original images. The Remove Tool can clean up unwanted details, and Generative Fill can assist with rebuilding small missing areas or developing smoother visual transitions. However, realistic results still depend on carefully matching lighting, shadows, perspective, and textures—elements that bring depth and credibility to the final creation.
Moreover, creating animal-human hybrids is not just about the technical aspects of Photoshop. It also involves creativity, observation, and imagination. AI-assisted tools can help artists explore variations or refine difficult areas, but the artist must still decide how the human and animal features should interact, which characteristics to emphasize, and what mood the finished character should communicate. It is about envisioning a character that does not exist in the real world and bringing it to life through digital art. This creative problem-solving ability is a valuable skill that can be applied in many areas, from professional character design and advertising artwork to personal creative projects.
Creating a Photoshop animal-human hybrid can be challenging, but with the right steps, it becomes an exciting journey of creativity and learning. The first step is to gather your resources. You will need high-resolution images of the human face and the animal features you want to incorporate. It is essential to choose photos with compatible lighting, perspective, facial angle, and image quality to ensure a natural blend. Before editing, place the source images on separate layers and convert the animal layer into a Smart Object so it can be resized, transformed, or warped without permanently changing the original image data.
The next step is to use Photoshop’s Object Selection Tool or Select Subject to isolate the parts of the animal image you wish to incorporate into the human portrait. This could be anything from the eyes, nose, or mouth to the texture of the skin or fur. Refine complex edges in the Select and Mask workspace, then apply the selection as a layer mask instead of permanently deleting pixels. Use Free Transform or Transform Warp to align the animal features with the proportions and contours of the human face. Paint carefully on the layer mask with a soft, low-opacity brush to create smooth transitions, paying close attention to the direction of the light, facial structure, and texture of the skin or fur.
The final step involves fine-tuning your creation. Use clipped Adjustment Layers to match the color, contrast, and lighting of the animal features with the original human image, and add carefully placed shadows and highlights to create depth. Photoshop 2026’s Harmonize feature can provide an initial match for lighting, color, tone, and shadows, while Generative Fill may help repair small gaps or incomplete transition areas. These AI-assisted results should be reviewed and refined manually for consistency. Instead of relying heavily on the Smudge Tool, refine harsh edges with layer masks and controlled brushwork to preserve realistic skin and fur detail. It is also advisable to zoom out frequently, flip the canvas occasionally, and review the image at different magnification levels to check the overall balance and make necessary adjustments.
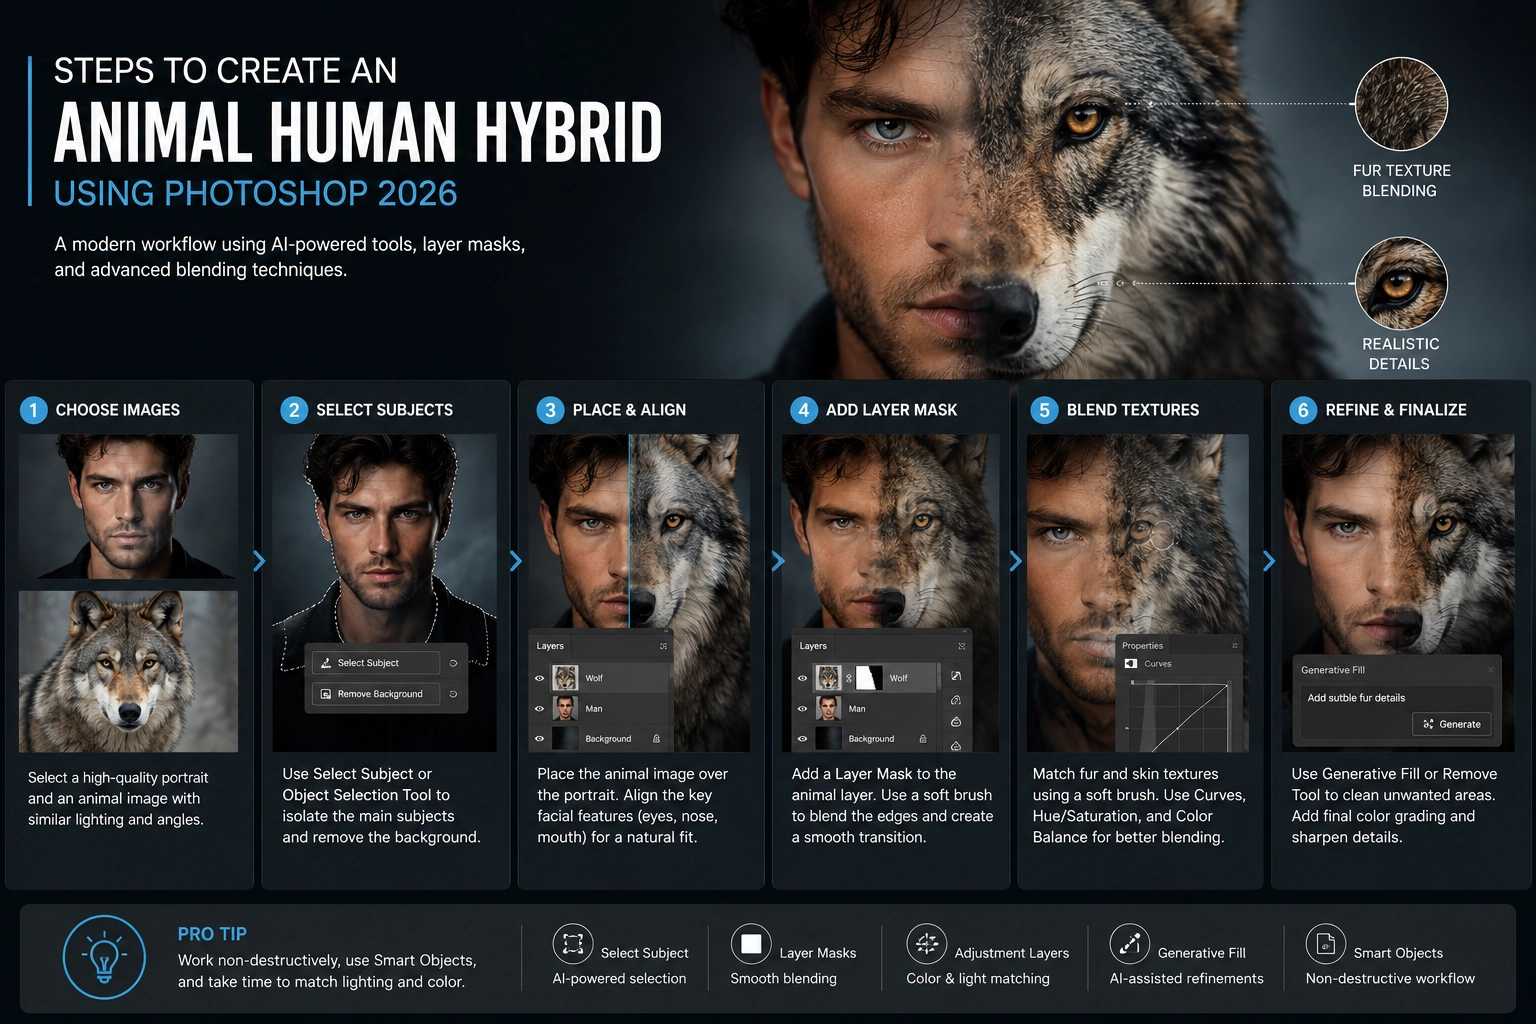
Creating a successful Photoshop animal-human hybrid involves a detailed process of face morphing. This is a critical step in the process of human-animal portrait creation, and it requires careful attention to detail and patience. Photoshop 2026 combines precise selection, transformation, and masking tools with optional AI-assisted features, but the quality of the result still depends on careful alignment and manual refinement. Let’s dive into a step-by-step tutorial to understand this process better.
Firstly, open the human and animal images in Photoshop and place them in the same document on separate layers. Use the Object Selection Tool or Select Subject to create an initial selection, then isolate the animal features you want to morph into the human face. This may include the eyes, nose, muzzle, ears, or sections of fur. Refine the selection in the Select and Mask workspace, copy the selected features onto a new layer above the human portrait, and convert that layer into a Smart Object before transforming it. This preserves the original image data and makes later adjustments easier.
Next, reduce the opacity of the copied layer so you can see the underlying human face. This will help you align key landmarks such as the eyes, nose, mouth, cheekbones, and jawline. Use Free Transform to scale, rotate, and reposition the animal features until they match the shape and proportions of the human face. For more detailed adjustments, use Transform Warp to reshape the layer along the natural contours of the face without permanently altering the Smart Object’s original content.
After aligning the features, increase the layer opacity back to 100%. Now comes the blending process. Add a layer mask and use a soft, low-flow brush to paint with black, gradually hiding parts of the animal layer and revealing the human face underneath. Paint with white whenever you need to restore masked details. Work gently around the eyes, nose, hairline, and edges of the fur to create a smooth transition while preserving important texture. If a small gap or incomplete area remains after masking, Generative Fill may be used to create a starting repair, but the generated result should be reviewed and refined manually to match the surrounding anatomy, lighting, and texture. Layer masks allow areas to be hidden or restored without deleting the original pixels.
Mastering the art of creating Photoshop animal-human hybrids involves learning advanced digital art fusion techniques. These techniques take your creations to the next level by improving the relationship between facial structure, texture, color, light, and shadow. A non-destructive workflow also makes it easier to revisit individual corrections without damaging the original human or animal images.
One such technique is Dodge and Burn. This technique adds contrast and depth by selectively lightening and darkening specific areas of the image. Instead of applying the Dodge and Burn Tools directly to the image pixels, create two Curves Adjustment Layers—one to brighten and another to darken—and use their layer masks to paint the effects gradually with a soft, low-flow brush. This gives you greater control over highlights around the eyes and nose, as well as shadows beneath the muzzle, cheekbones, and fur. Another technique is Frequency Separation, which separates broad color and tonal information from fine texture detail. This is particularly useful when blending animal fur or skin texture with a human face, but it should be applied carefully so the portrait retains natural pores, fur strands, and facial detail. Curves Adjustment Layers and masks provide an editable alternative to applying permanent tonal changes directly to the source layer.
Yet another technique is the use of Adjustment Layers. These layers allow you to apply color correction, brightness, contrast, and tonal changes without permanently affecting the original image layers. Use Curves or Levels to match brightness and contrast, Hue/Saturation to control individual colors, and Color Balance to bring the human and animal elements into the same visual environment. Clip each Adjustment Layer to the animal-feature layer when you want the correction to affect only that element. Neural Filters can also assist with subtle portrait cleanup, skin-tone refinement, or minor image-quality issues, provided the result is output to an editable layer and refined manually. These methods are particularly useful when matching the color, lighting, and overall mood of the animal features with the human face.

Mastering the art of creating Photoshop animal-human hybrids is a journey of creativity, observation, and continuous learning. It allows you to push the boundaries of digital art and create unique, compelling portraits that combine reality with imagination. The process involves understanding Photoshop’s selection and masking tools, working non-destructively with Smart Objects and Adjustment Layers, matching lighting and texture, and applying advanced digital art fusion techniques. Modern AI-assisted tools can speed up certain tasks, but careful artistic decisions and manual refinement remain essential to a convincing result.
The process may seem daunting at first, but with regular practice and patience, your compositing and retouching skills will improve significantly. Begin with simple combinations, study how facial features align, and gradually experiment with more complex textures, lighting conditions, and animal characteristics. Each project will help you better understand how different Photoshop tools work together.
And remember, the journey does not stop here. Keep experimenting, learning, and refining your workflow. Explore new selection methods, non-destructive editing techniques, and AI-assisted features while continuing to strengthen your understanding of composition, anatomy, color, and light. The world of digital art is constantly evolving, and every new project offers an opportunity to develop your creative style.
If you need professional assistance with photo editing or complex digital compositing, contact Mister Clipping Paths. Their skilled editing team can support projects ranging from basic image cleanup to detailed creative artwork, helping you turn your visual concepts into polished, professional results.
Digital artistry is an ever-evolving field, and one of its most fascinating techniques is the combination of typography and photography to create stunning typography portraits in Photoshop. This unique art form allows words, letters, and creative typography to merge seamlessly with portrait photography, transforming ordinary images into expressive works of digital art. Whether you’re a beginner or an experienced Photoshop user, this tutorial will guide you through creating a professional typography portrait using modern Photoshop 2026 techniques.
Typography portraits remain a popular choice for creative posters, album covers, social media graphics, branding projects, and digital artwork. In Photoshop 2026, improved typography controls, Smart Objects, Layer Masks, and AI-assisted tools make the entire workflow more flexible while preserving complete creative control.
Throughout this tutorial, you’ll learn how to choose the right portrait, prepare your typography, create and apply displacement maps, blend text naturally with facial features, and refine the final composition for a realistic and visually striking result. By combining traditional typography techniques with Photoshop 2026’s modern editing workflow, you’ll be able to produce high-quality typography portraits suitable for both personal and commercial projects.
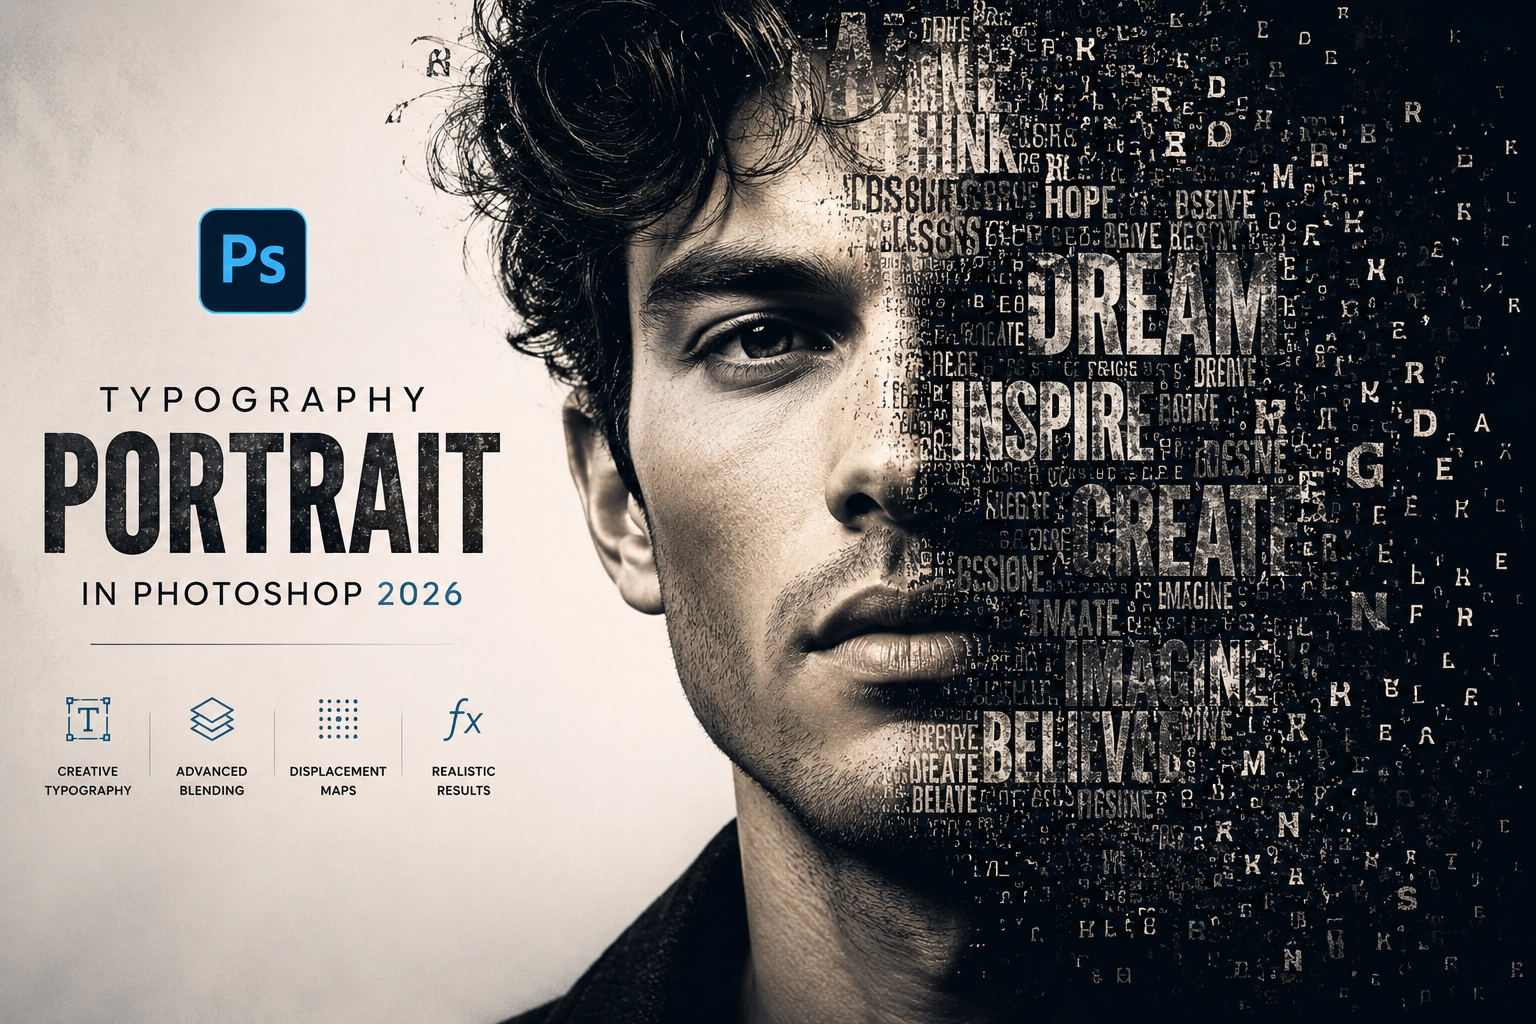
Creating a successful typography portrait begins with selecting the right image. The quality and composition of your portrait have a significant impact on the final result. Choosing a high-resolution photo with strong facial details makes it much easier to blend typography naturally into the subject.
When selecting your portrait, consider the following:
In Photoshop 2026, tools such as Select Subject, Object Selection, and improved Layer Masks make it easier than ever to isolate your subject accurately before applying typography effects. Spending a little extra time choosing the right source image will make every step of the creative process smoother and produce a far more professional final result.
Once you’ve selected your portrait, open it in Adobe Photoshop 2026. For the best editing experience, start by reviewing the image in the Camera Raw Filter if any exposure, contrast, or color adjustments are needed. Making these corrections before creating the typography effect will help achieve a cleaner and more professional result.
After opening the image, duplicate the background layer or convert it into a Smart Object. This non-destructive workflow allows you to make edits, apply filters, and refine your typography portrait without permanently affecting the original image.
Organizing your layers from the beginning is also a good practice. Keeping your portrait, typography, masks, and adjustment layers separate will make the editing process more efficient as your project becomes more complex.
Selecting the subject accurately is one of the most important steps in creating a realistic typography portrait. A clean selection ensures that the text blends naturally with the facial features while maintaining a professional appearance.
In Photoshop 2026, start by using Select Subject or the Object Selection Tool to automatically detect and isolate your portrait. These AI-powered tools can accurately identify facial details, hair, and edges, saving significant editing time compared to manual selections.
After making the initial selection, open the Select and Mask workspace to refine the edges. Adjust settings such as Smooth, Feather, Contrast, and Shift Edge to improve the selection, especially around hair and fine details. Use the Refine Edge Brush Tool where necessary to achieve clean and natural-looking edges.
Once you’re satisfied with the selection, click OK or Output to Layer Mask to continue with a non-destructive workflow. Taking the time to create a precise selection will make the typography effect blend much more seamlessly with the portrait.
After selecting your subject, the next step is to create a Layer Mask. Layer Masks are one of Photoshop’s most essential non-destructive editing tools, allowing you to hide or reveal parts of an image without permanently deleting any pixels.
With your selection active, click the Add Layer Mask button at the bottom of the Layers panel. Photoshop will automatically create a mask based on your selection, isolating the portrait from the background while keeping the original image fully editable.
If any areas need refinement, select the mask thumbnail and use a soft Brush Tool with black or white paint to hide or reveal portions of the image. This technique is especially useful for cleaning up edges around the hair, face, and shoulders while preparing the portrait for the typography effect.
In Photoshop 2026, Layer Masks work seamlessly with Smart Objects, Adjustment Layers, and Select and Mask, giving you complete flexibility to refine your composition at any stage without damaging the original image. A clean and accurate mask is the foundation of a realistic typography portrait.
A Displacement Map is what makes the typography appear naturally wrapped around the contours of the face instead of looking like flat text placed on top of the image. It uses the portrait’s highlights, shadows, and textures to distort the typography, creating a realistic engraved or wrapped effect.
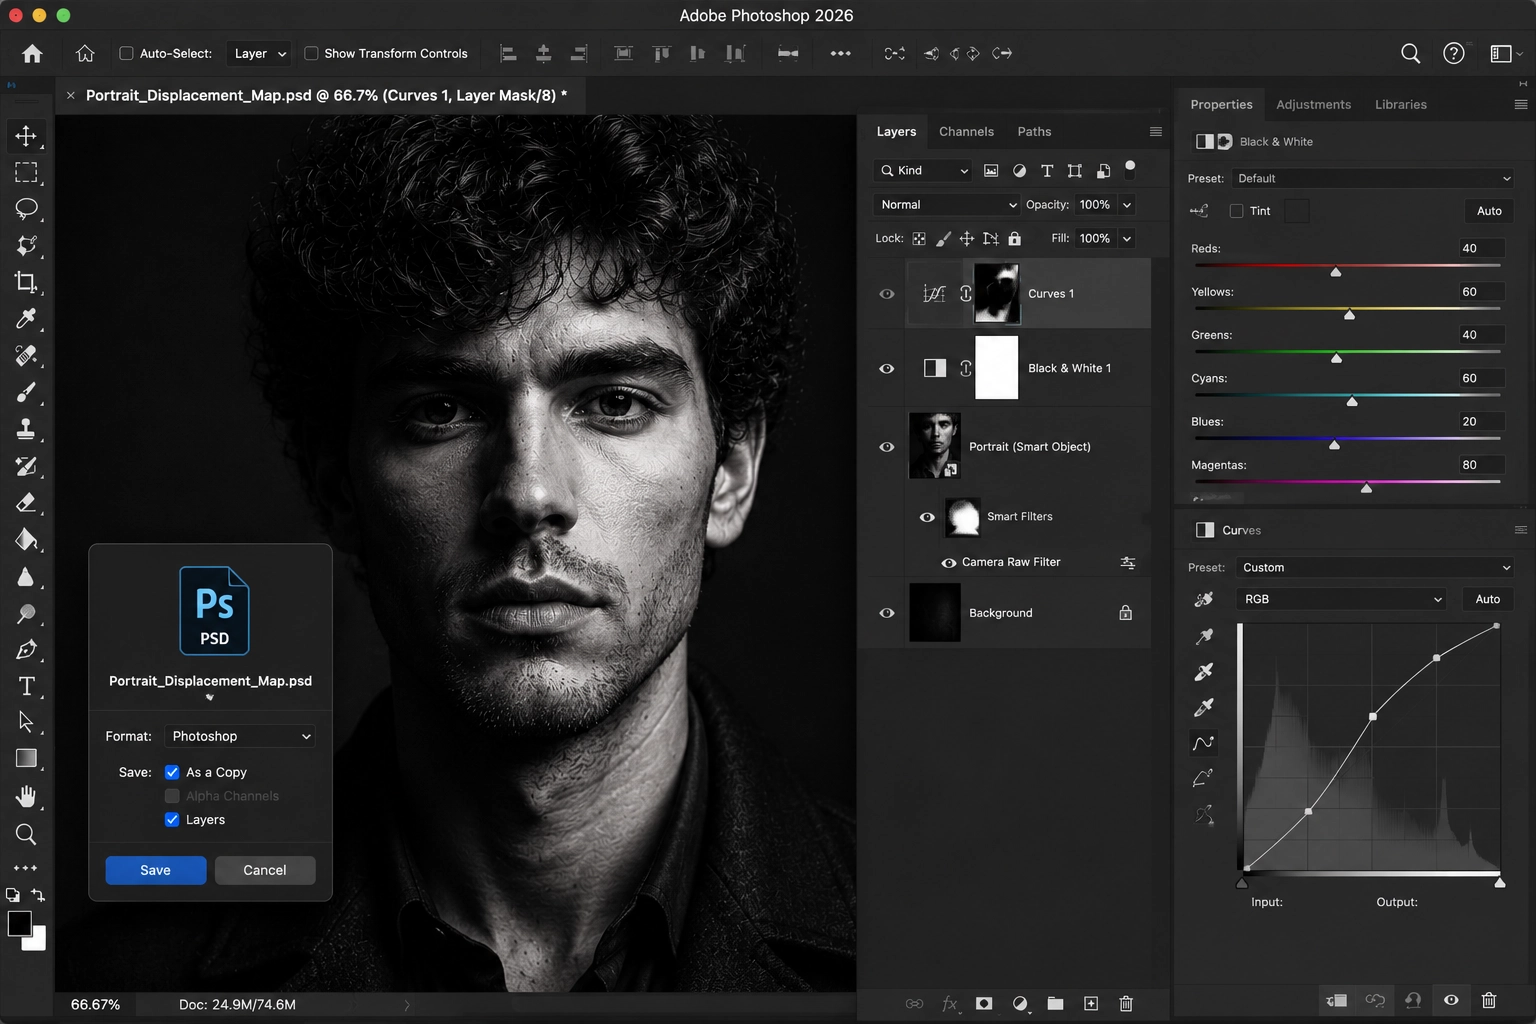
To create the displacement map, duplicate your portrait layer or create a merged copy of the visible layers (Ctrl/Cmd + Alt + Shift + E). Convert this layer into a Smart Object before making any adjustments to preserve a non-destructive workflow.
Next, remove unnecessary color information by applying a Black & White Adjustment Layer or desaturating the image. Increase the facial contrast using Levels or Curves so that important details such as the nose, eyes, lips, and skin texture become more defined. The stronger the contrast, the more accurately Photoshop can map the typography to the facial contours.
Once the image is prepared, save it as a separate PSD file (for example, Portrait_Displacement_Map.psd). This PSD file will later be used with Photoshop’s Displace Filter to automatically warp the typography so it follows the natural shape of the portrait.
A well-prepared displacement map is the key to achieving a convincing typography portrait, as it helps the text blend seamlessly with the subject’s facial structure while maintaining a realistic and professional appearance.
Now that your displacement map is ready, it’s time to apply the typography to your portrait. This is where your design begins to take shape, transforming a simple portrait into a creative typography artwork.
Begin by opening your typography design or text composition in Adobe Photoshop 2026. Instead of copying and pasting the text directly, use File > Place Embedded to import it as a Smart Object. This keeps your typography fully editable and prevents any loss of quality while resizing or transforming it.
Position the typography over the portrait using Free Transform (Ctrl/Cmd + T). Resize and rotate it until it covers the desired facial area, whether that’s the entire face or only selected regions such as the forehead, cheeks, or jawline. Lowering the typography layer’s opacity temporarily can help align the text more accurately with the facial features.
Once the typography is positioned correctly, go to Filter > Distort > Displace and select the Portrait_Displacement_Map.psd file you created in the previous step. Photoshop will automatically distort the typography based on the brightness and shadows of the portrait, allowing the text to follow the natural contours of the face.
After applying the displacement map, make any necessary refinements using Edit > Transform > Warp to better match areas around the nose, eyes, lips, and chin. Working with a Smart Object allows you to reopen and edit the typography at any time without rebuilding the entire effect.
Taking a few extra minutes to fine-tune the typography placement will produce a far more realistic and professional typography portrait.
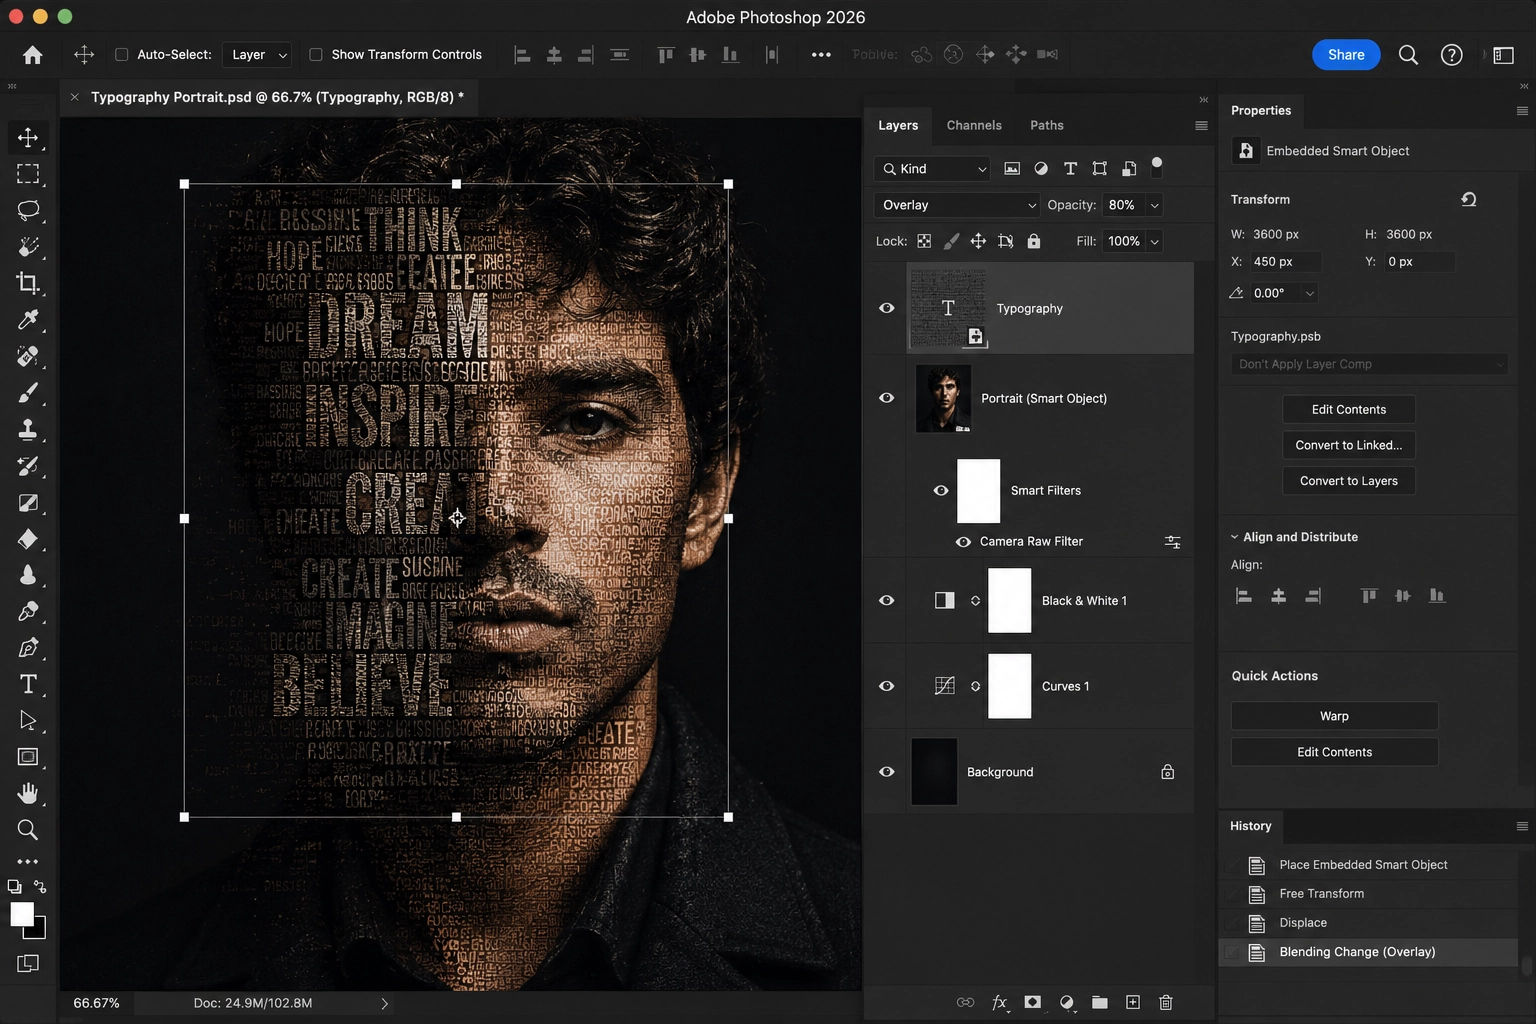
Once the typography has been applied using the displacement map, the next step is refining the effect so it looks naturally integrated with the portrait. Professional typography portraits are created through careful blending, masking, and subtle adjustments rather than relying solely on the displacement filter.
Start by experimenting with the typography layer’s Blend Mode. Options such as Overlay, Soft Light, Multiply, and Luminosity often produce the most realistic results because they allow the portrait’s natural highlights and shadows to show through the text. Reduce the layer Opacity slightly until the typography blends smoothly without overpowering the facial features.
Next, add a Layer Mask to the typography layer. Using a soft brush with low opacity, gently hide portions of the text around important facial details such as the eyes, eyelashes, lips, nostrils, eyebrows, and hairline. Preserving these features helps maintain the subject’s expression while making the typography appear wrapped around the face.
To create a cohesive look, use Curves, Levels, or Hue/Saturation Adjustment Layers clipped to the typography layer. These adjustments allow you to match the contrast, brightness, and color tones between the portrait and the typography without permanently changing either layer.
If necessary, apply a very subtle Gaussian Blur or reduce the typography’s sharpness slightly so it matches the focus of the original portrait. Small refinements like these often make the difference between a beginner’s design and a professional-quality typography portrait.
Take time to zoom in and inspect every area of the portrait. Clean masking, balanced contrast, and realistic blending will give your final artwork depth, dimension, and a polished appearance.
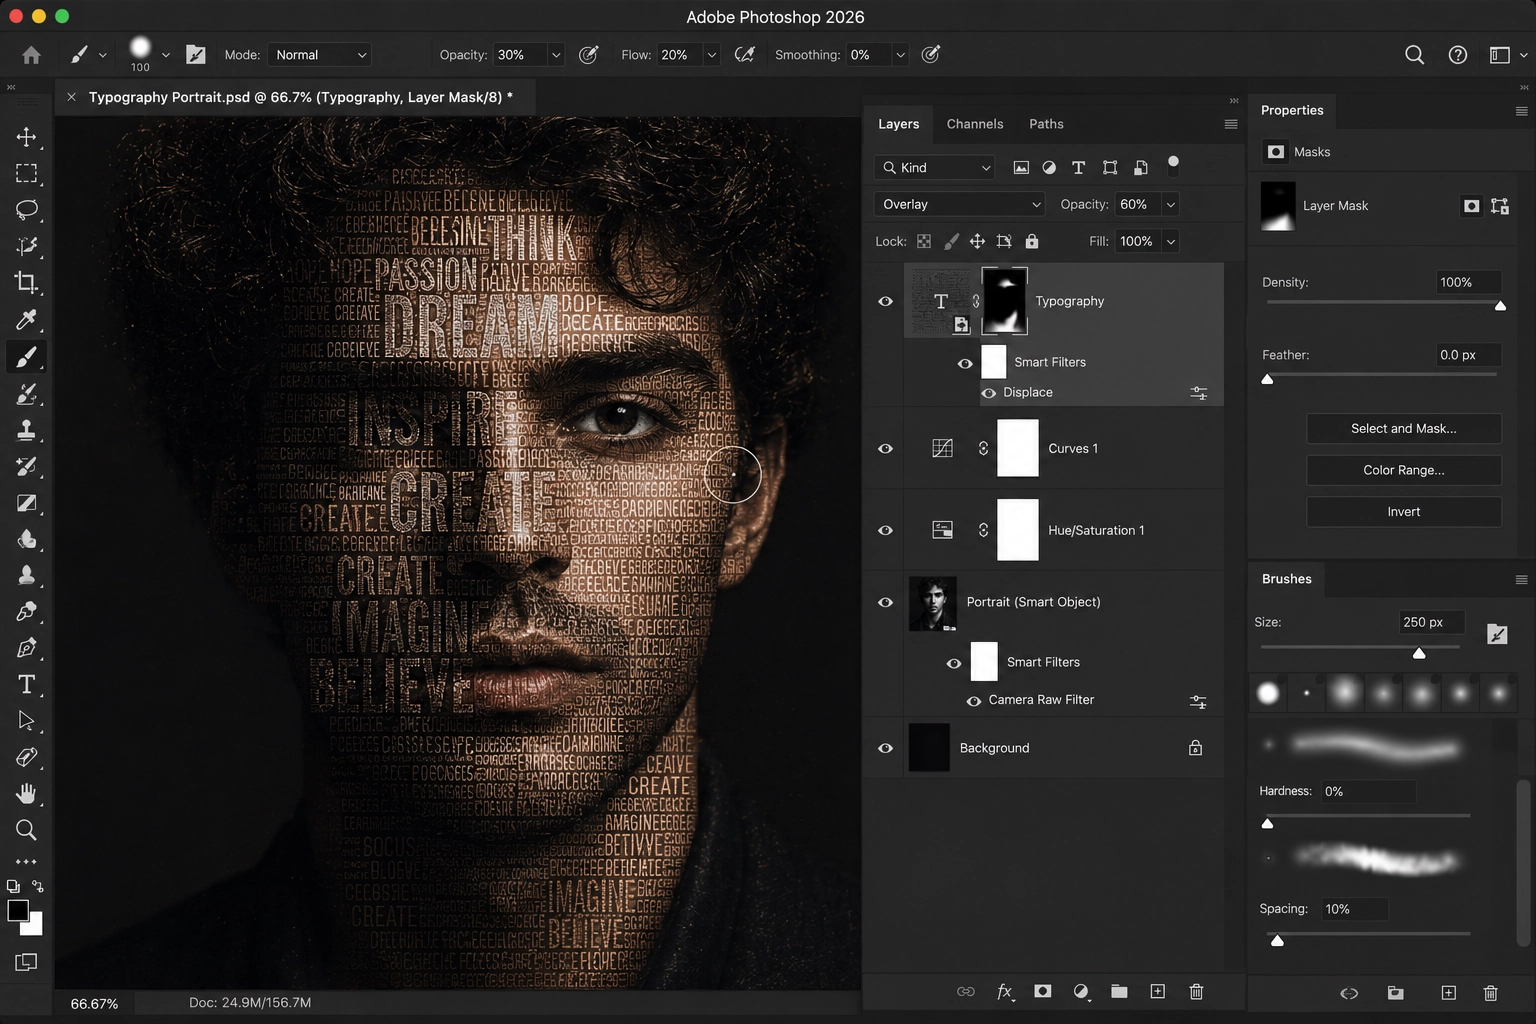
Your typography portrait is almost complete. The final stage is all about polishing the artwork and exporting it in the right format for print, social media, or your creative portfolio.
Begin by reviewing the overall composition at 100% zoom to check for any masking errors, misplaced typography, or unwanted artifacts around the facial features. Small imperfections that are difficult to notice while zoomed out often become visible during this final inspection.
If necessary, make subtle adjustments using Camera Raw Filter, Curves, or Color Balance to improve contrast, skin tones, and overall lighting. A light amount of Smart Sharpen can also help enhance facial details without making the typography appear overly sharp.
Before exporting, save a fully editable PSD version that preserves all Smart Objects, Layer Masks, and Adjustment Layers. This allows you to revisit the project later without losing flexibility.
For sharing your work online, export a high-quality JPEG or PNG using File → Export → Export As. Choose the appropriate image dimensions depending on your intended platform, and enable the sRGB color profile to ensure consistent colors across different devices and web browsers.
By combining clean typography placement, realistic blending, and careful finishing touches, you’ll create a typography portrait that looks polished, professional, and ready for publication.
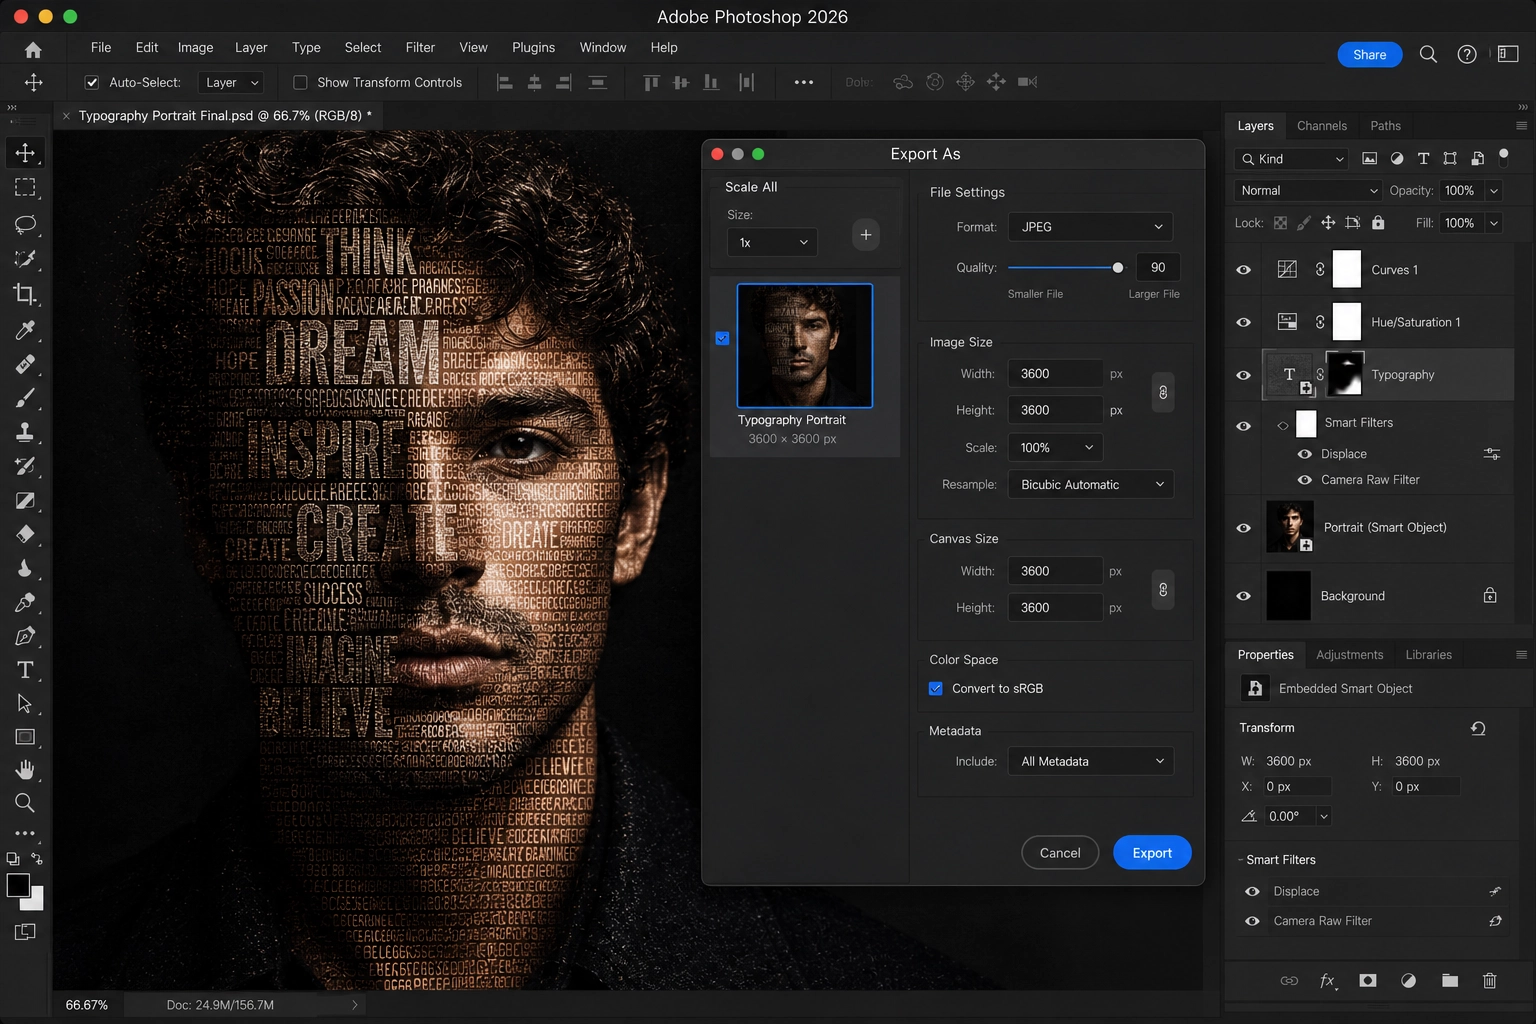
Creating a typography portrait in Adobe Photoshop 2026 is an excellent way to combine photography, typography, and digital art into a single eye-catching design. With modern tools like Smart Objects, Layer Masks, Select Subject, Adjustment Layers, and Displacement Maps, you can build realistic typography effects while maintaining a completely non-destructive workflow.
The key to achieving professional results lies in careful preparation, accurate subject selection, realistic typography placement, and subtle blending. By following the techniques covered in this tutorial, you’ll be able to create typography portraits that are suitable for social media graphics, album covers, movie posters, personal artwork, branding projects, and creative portfolios.
Like any advanced Photoshop technique, practice is essential. Experiment with different fonts, layouts, blend modes, and portrait styles to develop your own unique creative approach. As you gain experience, you’ll discover new ways to make your typography portraits even more expressive and visually engaging.
As a professional photographer or graphic designer, you understand the importance of creating visually appealing images. One of the key elements that can make or break the quality of an image is the presence of realistic shadows. Shadows add depth, dimension, and realism to photographs, making them more captivating and engaging to the viewer. In the digital era, photo shadow creation services have emerged as a valuable tool for enhancing the quality of images. These services utilize advanced techniques to create and enhance shadows, transforming ordinary images into extraordinary works of art.
Realistic shadows play a crucial role in creating a sense of realism and depth in images. They help to anchor objects to their surroundings and give them a three-dimensional appearance. When shadows are absent or poorly executed, images can appear flat and lifeless. On the other hand, well-executed shadows can make objects appear more tangible, adding a sense of depth and dimension. This can significantly enhance the overall aesthetic appeal and impact of an image.
In addition to improving the visual appeal, realistic shadows also contribute to the storytelling aspect of a photograph. Shadows can convey emotions, create a specific mood, or highlight certain elements within an image. For example, a soft, diffused shadow can evoke a sense of calm and tranquility, while a harsh, dramatic shadow can create a sense of tension or mystery. By manipulating shadows, photographers and graphic designers have the power to influence the narrative of an image and guide the viewer’s focus and interpretation.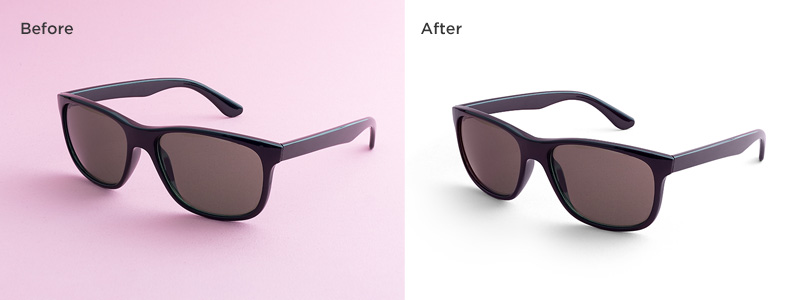
Photo shadow creation services employ various techniques to create different types of shadows, depending on the desired effect and context. Some of the commonly used shadow types include:
By understanding the different types of shadows and their applications, photo shadow creation services are able to tailor their techniques to achieve the desired visual effect and enhance the overall quality of an image.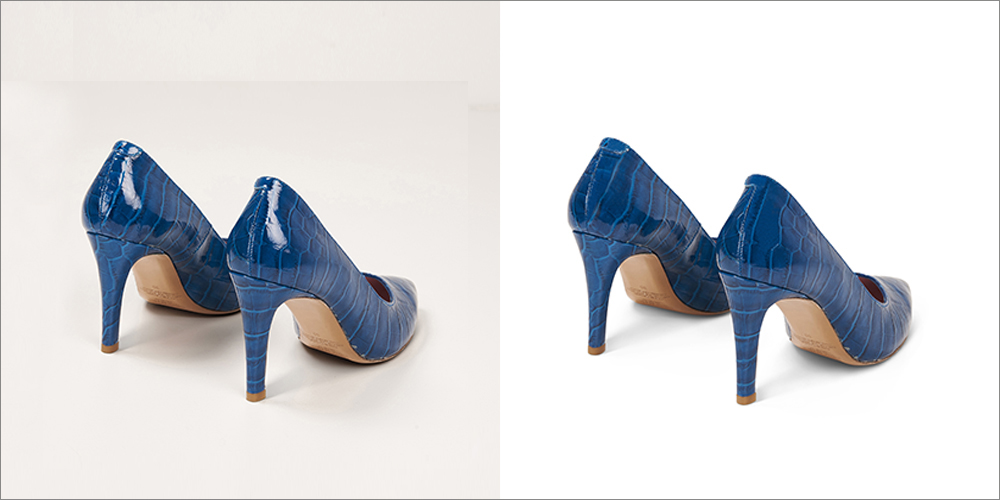
Photo shadow creation services utilize advanced software and techniques to create and enhance shadows in images. These services employ skilled professionals who understand the intricacies of light and shadow, ensuring that the shadows created are realistic and visually appealing.
The process typically involves isolating the object or subject from its background, creating a separate layer for the shadow, and then applying various techniques to manipulate the shadow’s size, shape, opacity, and direction. This meticulous attention to detail ensures that the shadow seamlessly integrates with the image, enhancing its overall visual impact.
In addition to creating shadows from scratch, photo shadow creation services also specialize in enhancing existing shadows. By refining and fine-tuning the shadows present in an image, these services can correct any imperfections or inconsistencies, resulting in a more polished and professional final product.
In the world of photography and graphic design, attention to detail is paramount. Realistic shadows are a vital component of creating high-quality, visually stunning images. They add depth, dimension, and realism, enhancing the overall aesthetic appeal and impact of an image.
Photo shadow creation services have revolutionized the way images are edited and enhanced. These services employ advanced techniques to create different types of shadows, tailored to the specific needs and context of the image. By utilizing these services, photographers and graphic designers can elevate the quality of their work, creating captivating and impactful visuals.
So, if you are looking to enhance your images with realistic shadows, consider using MisterClippingPaths. Their photo shadow creation services will transform your ordinary images into extraordinary works of art. Don’t settle for flat and lifeless images; let shadows breathe life into your visuals.
High Dynamic Range (HDR) photo editing has become an essential technique for creating visually striking and professionally balanced images. Whether you’re showcasing a luxury property, promoting products, capturing breathtaking landscapes, or producing commercial photography, HDR editing helps preserve details in both the brightest highlights and the darkest shadows that a single exposure often cannot capture.
Professional HDR photo editing services combine multiple bracketed exposures into one perfectly balanced image, resulting in natural colors, improved contrast, and enhanced clarity. Modern editing workflows also ensure that skies, interiors, reflections, and fine textures appear realistic without the overprocessed look often associated with early HDR photography.
Today, HDR editing is widely used across industries such as real estate, architecture, hospitality, automotive, interior design, and eCommerce, where high-quality visuals directly influence customer engagement and buying decisions. With advanced editing techniques and precise tone mapping, professionally edited HDR images create a more immersive viewing experience while maintaining a natural appearance.
In this guide, you’ll learn how HDR photo editing works, explore its key benefits, clear up common misconceptions, and discover why professional HDR editing services can significantly improve the quality and impact of your images.
Professional HDR photo editing services do far more than simply brighten an image. They combine multiple exposures to create balanced, high-quality photographs that preserve fine details in both bright and dark areas while maintaining a natural appearance. This makes HDR editing an essential solution for photographers, real estate professionals, architects, hotels, and businesses that rely on visually compelling images.
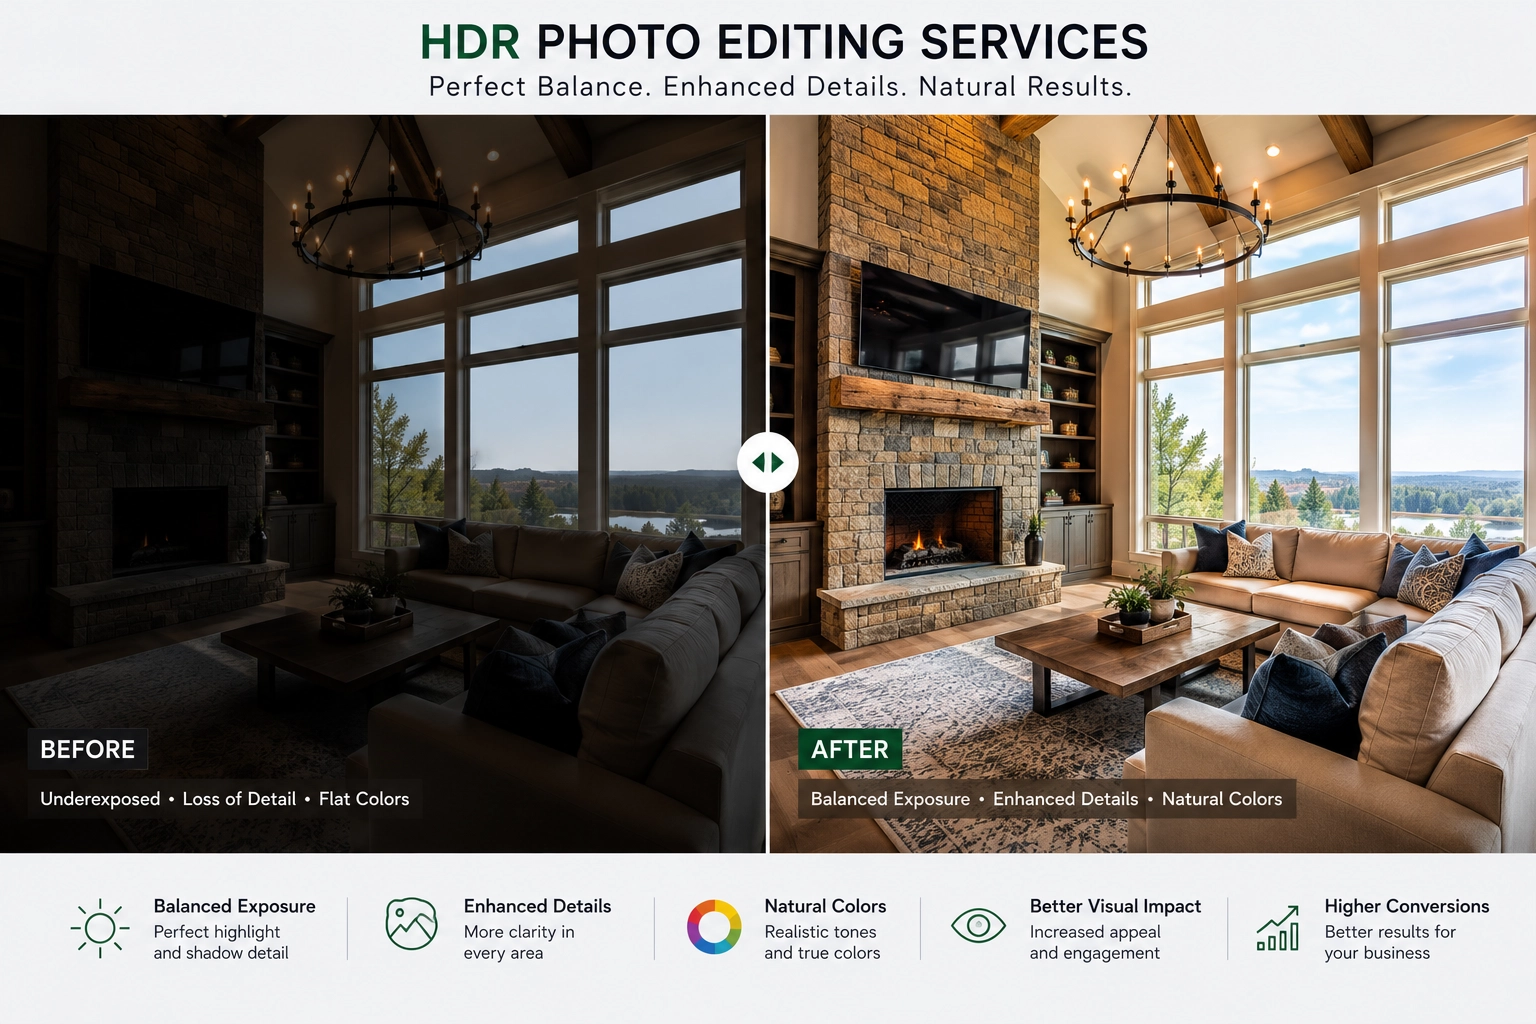
HDR (High Dynamic Range) photo editing combines multiple bracketed exposures of the same scene into a single, well-balanced image. Instead of relying on one photo, photographers typically capture three to seven exposures at different brightness levels to preserve details in both the highlights and shadows.
Modern HDR photo editing services use advanced editing software to merge these exposures while maintaining realistic colors, balanced contrast, and natural lighting. The goal is not to create an exaggerated HDR effect, but to produce an image that closely matches what the human eye sees.
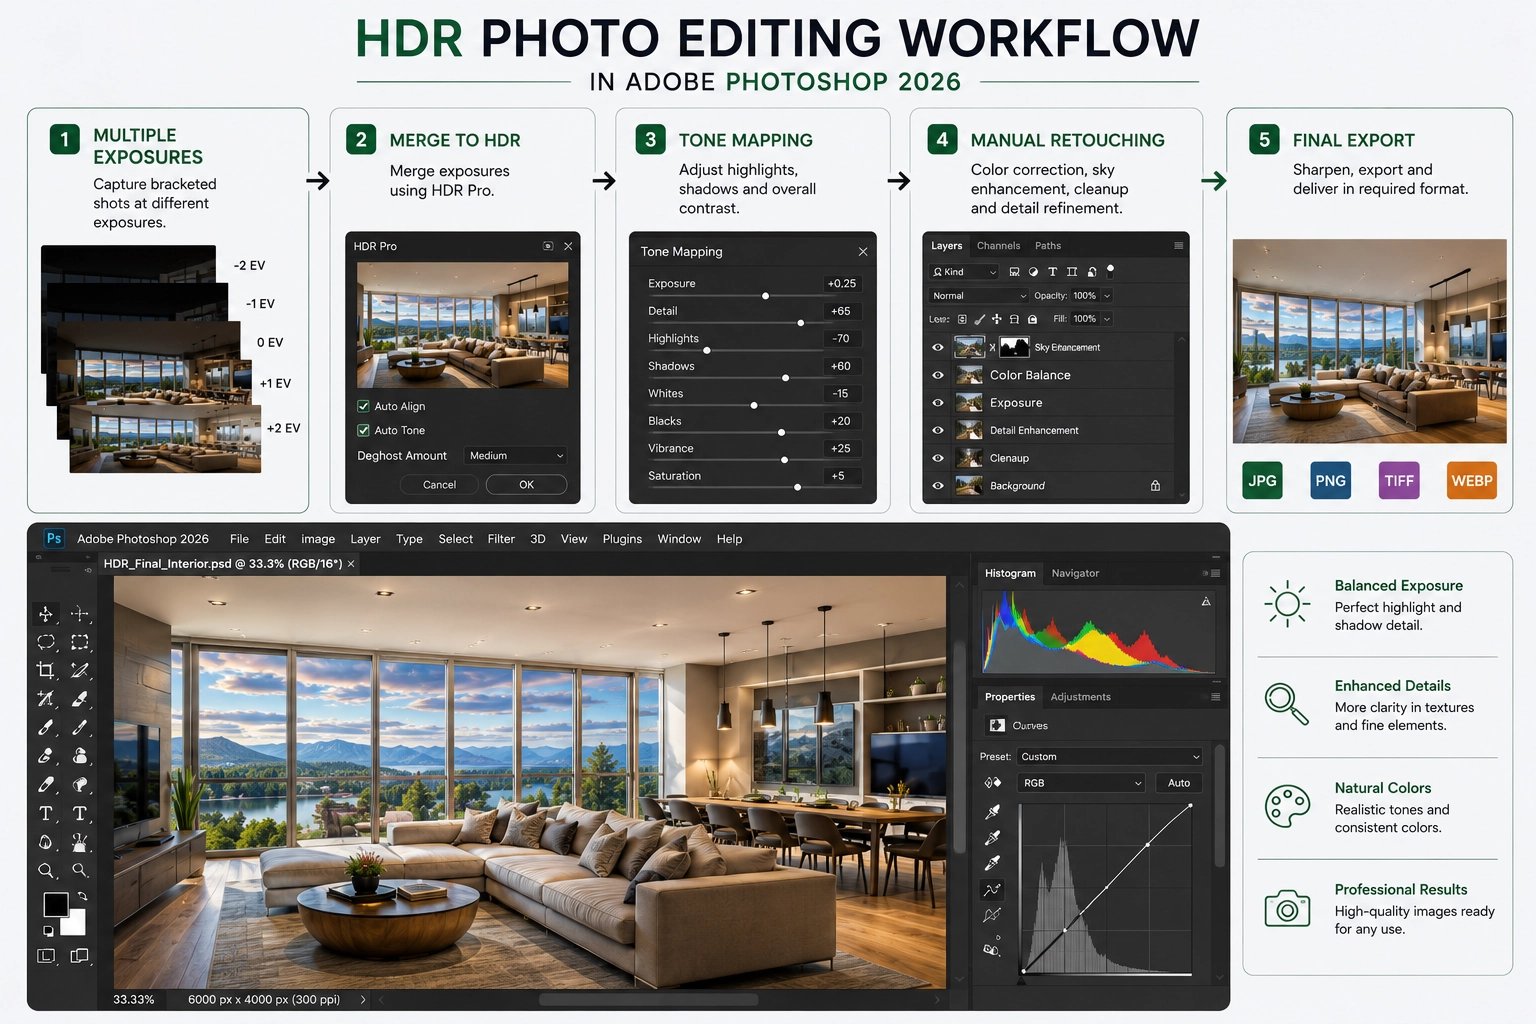
A professional HDR editing workflow generally includes the following steps:
By combining automated HDR processing with expert manual retouching, professional editors create clean, vibrant, and natural-looking images that stand out without appearing overprocessed.
Although HDR photography has become a standard technique in many industries, several misconceptions still prevent photographers and businesses from taking full advantage of professional HDR photo editing services. Let’s separate the myths from the facts.
By understanding these misconceptions, you can make better decisions about when and how to use HDR editing to create professional, high-quality photographs.
Professional HDR photo editing services are most effective when a scene contains both very bright and very dark areas that cannot be captured accurately in a single exposure. By combining multiple exposures and applying expert editing techniques, HDR creates balanced, natural-looking images with exceptional detail and clarity.
Here are some of the most common situations where HDR editing delivers the best results:
No matter the industry, professionally edited HDR images help businesses present their work with greater clarity, realism, and visual impact—making them an essential part of modern digital marketing.
High-quality visuals play a crucial role in attracting customers, showcasing properties, and building a strong brand presence. Professional HDR photo editing services help transform ordinary bracketed exposures into balanced, natural-looking images with enhanced detail, accurate colors, and realistic lighting.
Whether you’re a real estate photographer, architect, hotel owner, automotive dealer, or commercial business, HDR editing can significantly improve the visual appeal of your images while creating a more engaging experience for your audience. By combining multiple exposures with expert retouching techniques, professional editors ensure that every image looks polished without appearing overprocessed.
As HDR technology continues to evolve, the demand for clean, realistic, and high-quality imagery will only continue to grow. Investing in professional HDR photo editing not only enhances your photographs but also helps strengthen your marketing efforts, improve customer engagement, and present your brand with greater confidence.
If you’re looking for reliable, high-quality HDR photo editing services, Mister Clipping Path is ready to help. Our experienced photo editors combine advanced HDR processing with meticulous manual retouching to deliver images that look natural, vibrant, and ready for publication.
Our HDR editing services include:
Whether you need a few HDR images or thousands of professionally edited photographs every month, our team delivers consistent quality, fast turnaround times, and competitive pricing tailored to your business needs.
Contact Mister Clipping Paths today to discover how our professional HDR photo editing services can help your images stand out and leave a lasting impression.
As a professional in the digital world, I understand how important efficiency is when it comes to image editing. Whether you’re a photographer, graphic designer, eCommerce seller, or marketing professional, the quality of your visuals can make a huge difference. That’s why I want to introduce you to a smart solution—outsourcing image masking services. If you regularly work with complex images like hair, fur, transparent objects, or delicate fabrics, outsourcing can save you valuable time while ensuring professional-quality results. In this guide, I’ll explain what image masking is, the benefits of outsourcing these services, and the key factors to consider when choosing the right service provider. By the end, you’ll have a clear understanding of whether outsourcing image masking services is the right choice for your business.
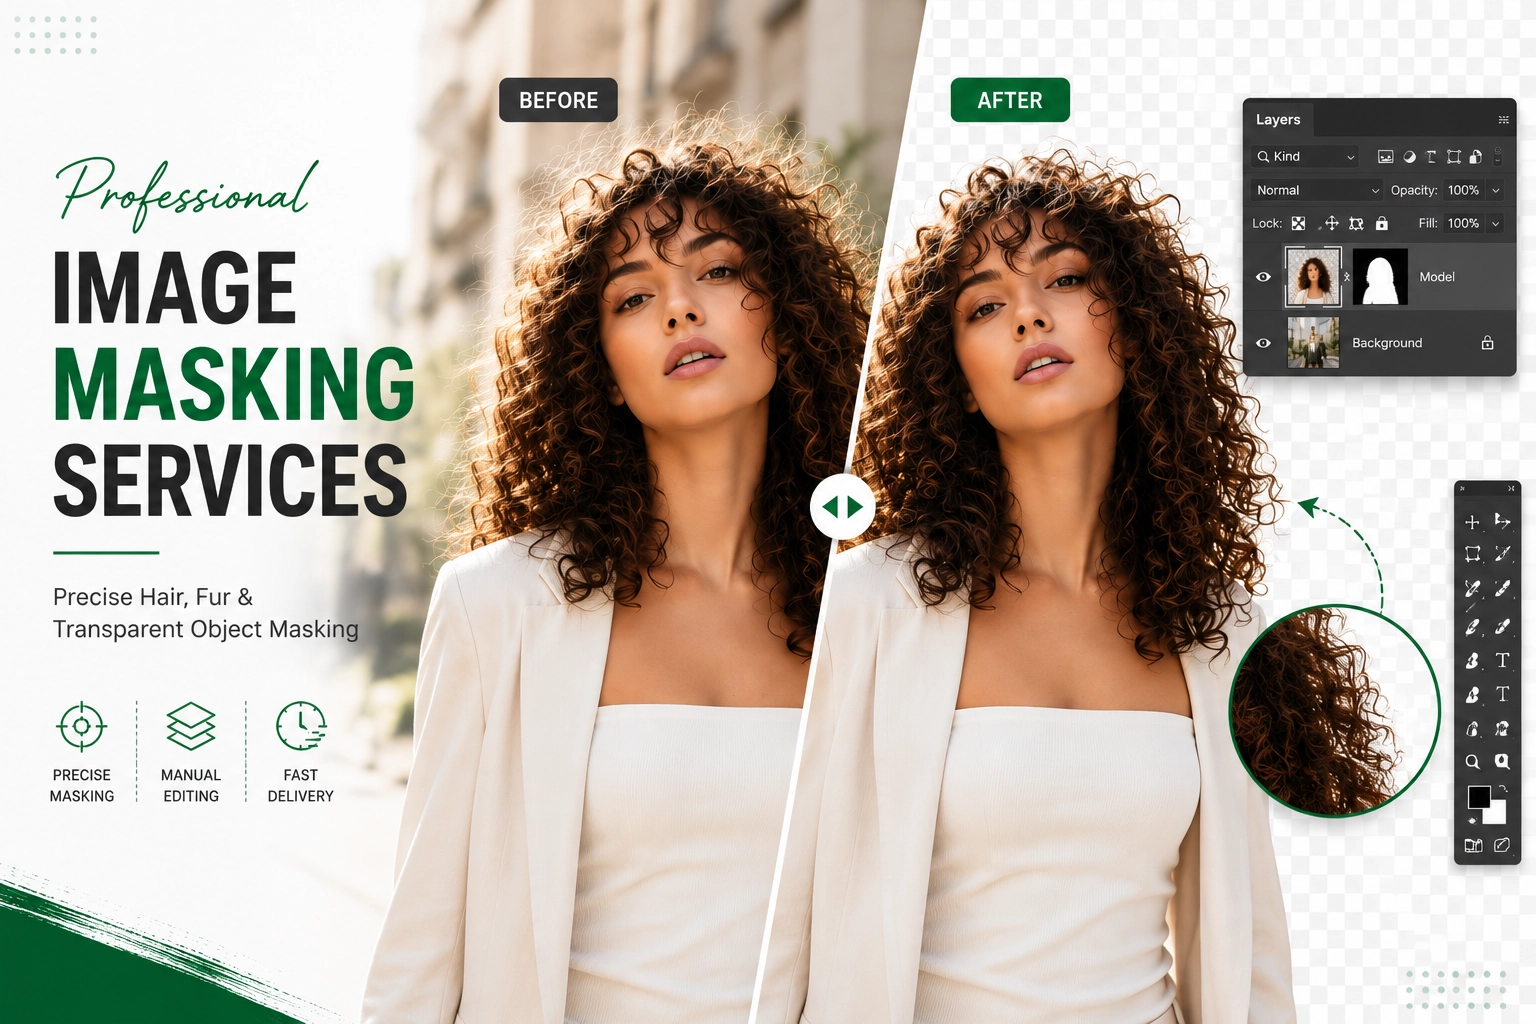
Before we dive into the benefits of outsourcing image masking services, let’s first understand what image masking is. Image masking is a technique used in graphic design and photo editing to remove or isolate specific parts of an image while preserving intricate details that are difficult to capture with standard background removal methods.
Unlike simple clipping paths, image masking is ideal for complex subjects such as hair, fur, transparent fabrics, glass, smoke, and soft edges, where every fine detail matters. It allows editors to separate the foreground from the background while maintaining a clean, natural, and professional look.
Whether you’re an eCommerce business, photographer, fashion brand, or creative agency, image masking helps create high-quality visuals that leave a lasting impression on your audience.
Image masking is a photo editing technique used to create a precise selection around a subject that needs to be isolated from its background. Unlike clipping paths, which work best for objects with hard, defined edges, image masking is designed for subjects with soft or intricate edges, such as hair, fur, transparent fabrics, glass, smoke, or tree branches.
There are different types of image masking techniques, and each one is suitable for specific editing situations. For example, Layer Masking is commonly used for non-destructive editing, while Channel Masking is ideal for subjects with well-defined edges and fine details. Professional editors also combine multiple masking techniques to achieve the most accurate and natural-looking results.
Today, image masking has become an essential part of professional photo editing, especially for fashion photography, product photography, advertising, eCommerce, and commercial image editing. By using the right masking technique, editors can preserve every tiny detail while creating clean, high-quality images that look both realistic and professional.
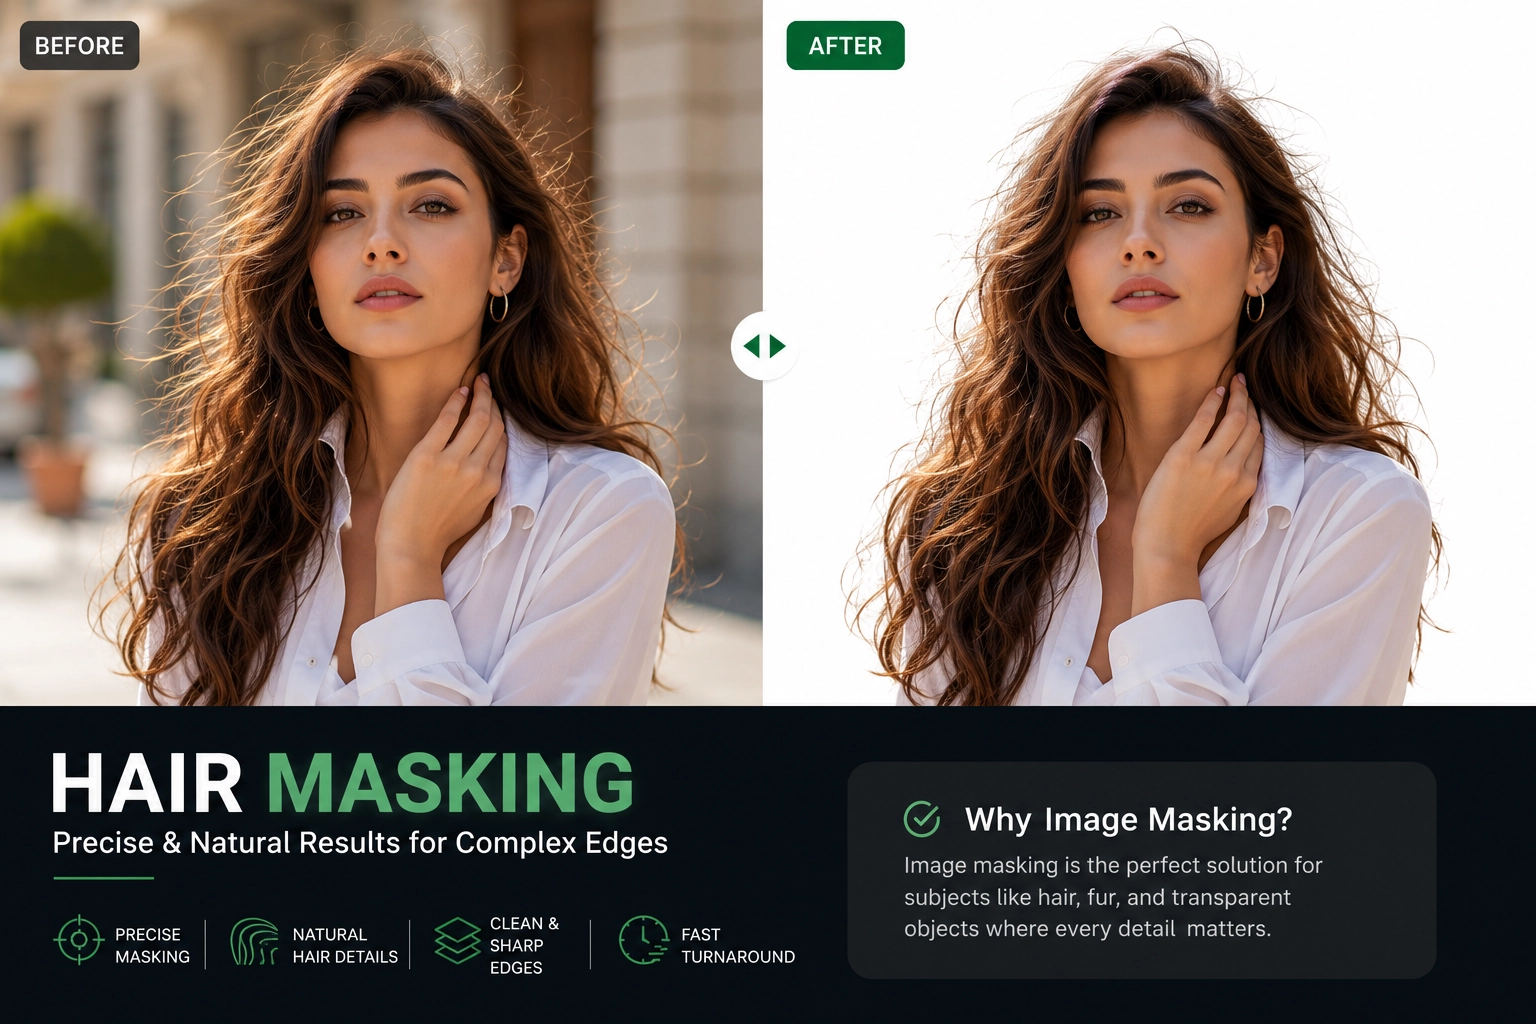
Now that we have a clear understanding of what image masking is, let’s explore the benefits of outsourcing these services. The first and most obvious benefit is the time-saving aspect. Image masking can be a time-consuming process, especially when dealing with complex subjects like hair, fur, transparent objects, or soft edges. By outsourcing this task to a specialized service provider, you can free up your time to focus on other important aspects of your work.
Another significant benefit is the quality of the results. Professional image masking requires precision, experience, and attention to detail. By outsourcing to experts in the field, you can be confident that your images are edited accurately while preserving every fine detail. This level of quality can enhance the overall look of your visuals and create a stronger impression on your customers.
Outsourcing image masking services is also a cost-effective solution. Instead of investing in expensive software, continuous training, and additional in-house staff, you simply pay for the services you need. This gives businesses greater flexibility while keeping production costs under control.
Finally, outsourcing offers scalability and faster turnaround times. Whether you need a handful of images or thousands every month, a professional image masking company has the resources to handle large volumes efficiently without compromising quality or meeting tight deadlines.
Now that we have established the benefits of outsourcing image masking services, let’s explore how it can boost your efficiency. As mentioned earlier, outsourcing this task frees up your valuable time so you can focus on other important aspects of your work. Whether you’re managing client projects, creating new designs, growing your business, or developing marketing strategies, having more time to concentrate on your core activities can make a significant difference.
Outsourcing image masking services also allows you to tap into the expertise of professionals who specialize in this field. They have the knowledge, experience, and latest editing techniques to handle even the most complex masking projects efficiently. As a result, you can take advantage of their skills without having to invest in expensive software, ongoing training, or hiring additional in-house designers.
Another major advantage is the ability to scale your workflow. During busy seasons or large client projects, editing hundreds of images can quickly become overwhelming. By partnering with a reliable image masking service provider, you can handle large volumes of work without sacrificing quality or delaying project deadlines.
Furthermore, outsourcing ensures greater consistency across all your edited images. Professional editors follow established quality control processes to deliver accurate, natural-looking results every time. This consistency helps strengthen your brand image while giving your clients confidence in the quality of your work.
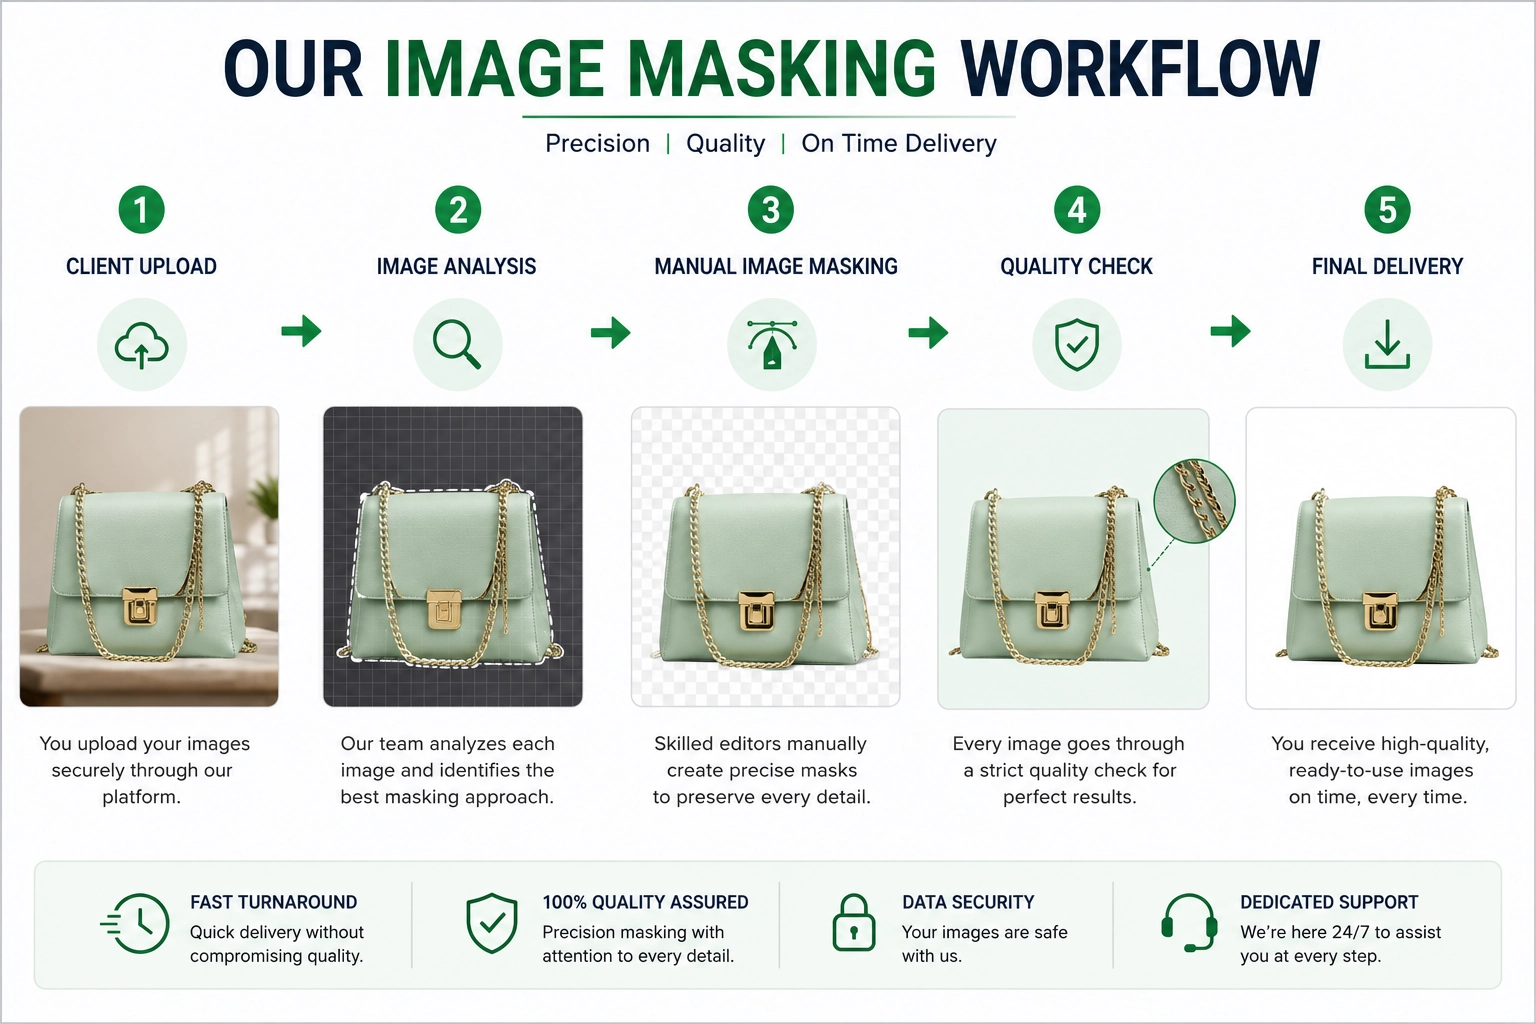
While outsourcing image masking services can be a game-changer for your business, it is essential to consider a few factors when choosing a service provider. Firstly, look for a company with a proven track record in image editing. Take some time to review their portfolio and ensure they have experience working with a wide range of subjects, including hair, fur, transparent objects, and other complex images. This will give you confidence that they can deliver the quality you expect.
Secondly, communication is key. Find a service provider who is responsive, understands your specific requirements, and keeps you updated throughout the editing process. Clear communication helps avoid misunderstandings, ensures smoother collaboration, and leads to better final results.
Finally, consider the security and confidentiality of your images. If you’re sharing client projects or commercial images, it’s important to work with a company that has reliable data protection measures in place. This gives you peace of mind knowing your files are handled securely and professionally.
By taking these factors into account, you’ll be in a much better position to choose an image masking service provider that meets your expectations and supports your business in the long run.
Outsourcing image masking services can be a smart investment for businesses that want to save time, reduce costs, and maintain consistently high-quality images. Instead of spending hours editing complex images yourself, you can rely on experienced professionals who have the skills and tools to deliver accurate, natural-looking results.
Whether you’re a photographer, graphic designer, eCommerce business owner, or marketing professional, outsourcing gives you the flexibility to focus on growing your business while leaving the time-consuming editing work to experts.
At the end of the day, choosing the right image masking service provider is just as important as deciding to outsource. By working with a trusted team that values quality, communication, and data security, you can build a long-term partnership that supports your business and helps you deliver outstanding visuals to your customers.
If you’re looking for accurate, reliable, and affordable image masking services, Mister Clipping Path is here to help. Our experienced team specializes in hair masking, layer masking, transparent object masking, and other complex photo editing services. Whether you need a few images or thousands every month, we’re committed to delivering high-quality results with fast turnaround times and dedicated customer support.
Get in touch today and discover how our professional image masking services can help streamline your workflow and elevate your images.
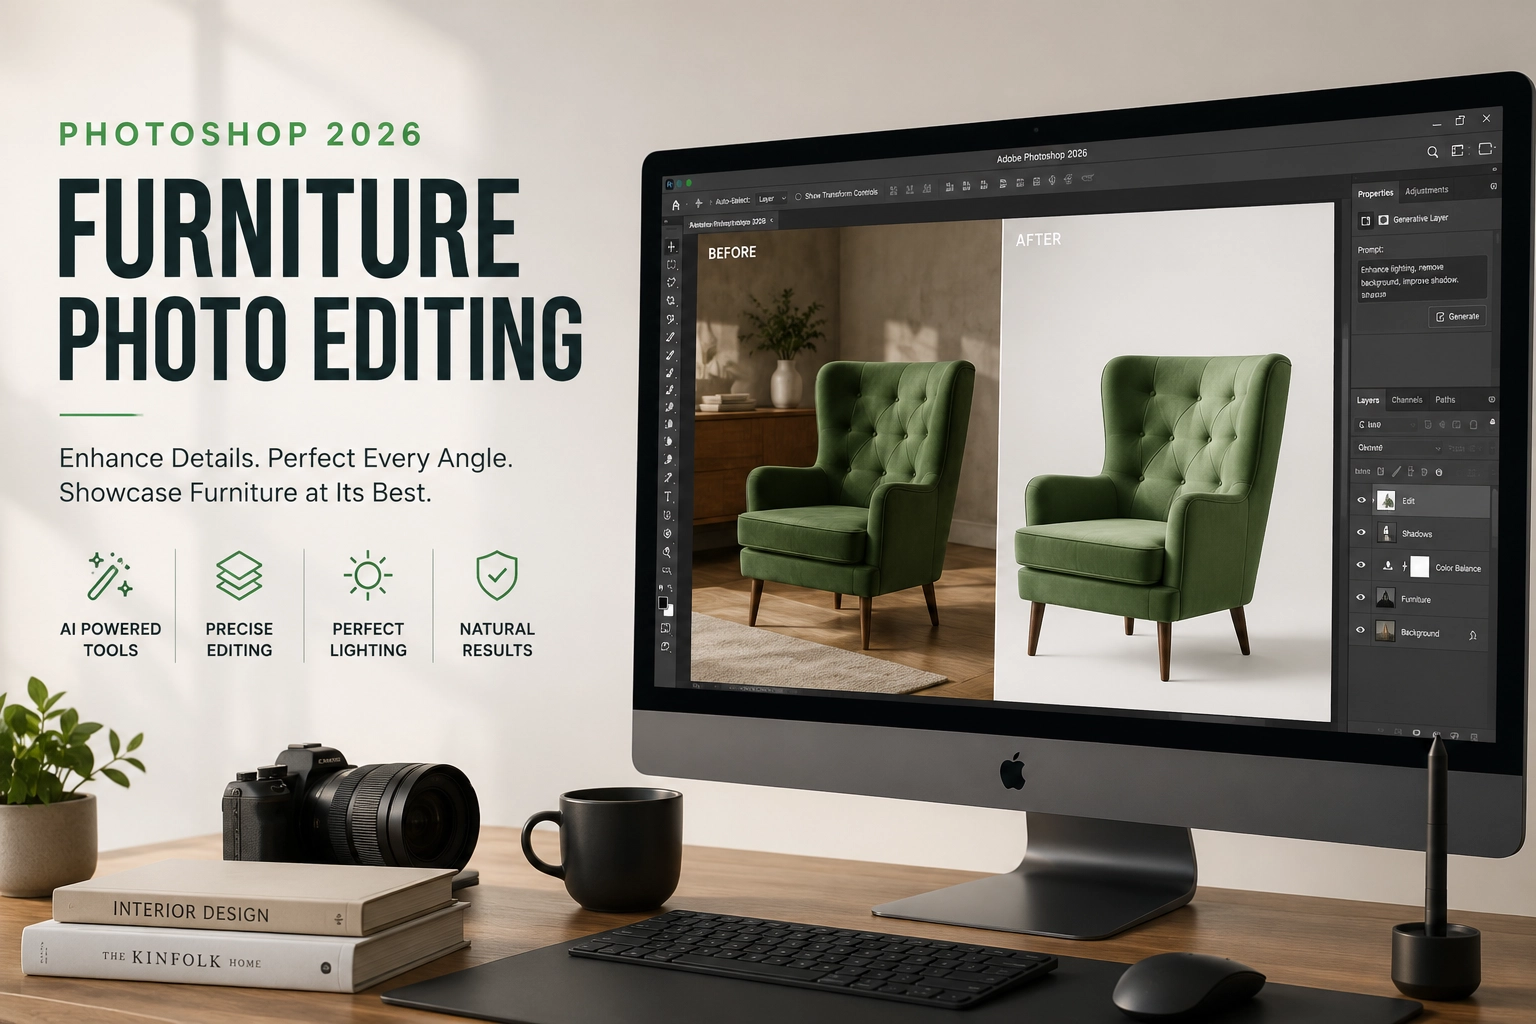
As an online furniture retailer, I understand the importance of showcasing my products in the best possible way. In today’s digital era, where customers rely heavily on visuals before making a purchase, high-quality furniture photos can make or break a sale. It is crucial to capture the attention of potential buyers and create a lasting impression. That’s why investing in professional furniture photo editing is a game-changer.
With Photoshop 2026, professional furniture photo editing has become more efficient than ever. AI-powered tools like the Remove Tool, Generative Fill, Camera Raw, and advanced masking features help editors remove distractions, improve lighting, enhance colors, and create clean, polished product images while preserving realistic textures and details.
When it comes to furniture, customers want to see the intricate details, the texture, and the overall aesthetics. A well-edited photo can bring out these features and make the furniture more appealing to potential buyers. It can also help create a consistent and professional look across your entire product catalog, enhancing your brand image and credibility.
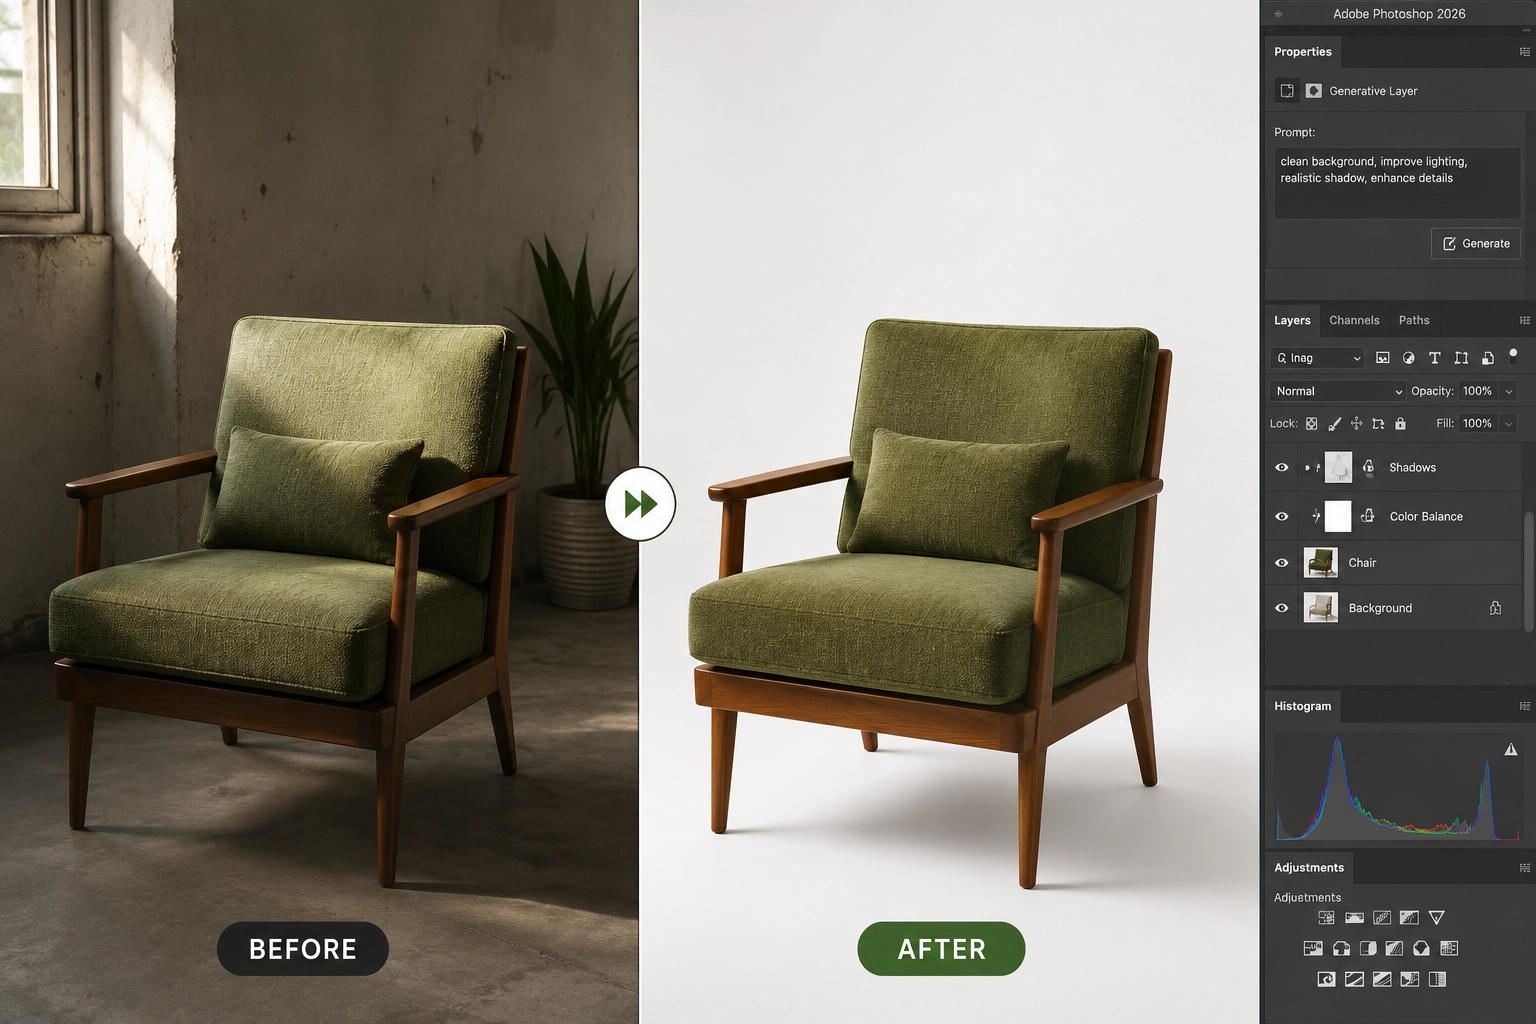
Professional furniture photo editing services offer a wide range of benefits that can significantly impact your business. Firstly, these services help you achieve consistent lighting, accurate color balance, and realistic textures across all your product images. With Photoshop 2026, editors can use advanced tools like Camera Raw, Adjustment Layers, and AI-powered enhancements to create a polished, consistent look while preserving the natural appearance of your furniture. This consistency is crucial for presenting a cohesive brand image and building trust with your customers.
Secondly, professional editors can remove distracting elements from your photos, such as background clutter, unwanted reflections, dust, or minor imperfections. Using Photoshop 2026 features like the Remove Tool and Generative Fill, they can clean up images quickly while maintaining realistic details. This ensures that all attention remains focused on the furniture itself, allowing customers to appreciate its design, craftsmanship, and functionality without distractions.
Furthermore, professional editing can enhance the overall quality of your furniture photos. Skilled editors can fine-tune sharpness, contrast, shadows, highlights, and color accuracy to showcase every detail of your products. They can also retouch imperfections such as scratches, stains, or blemishes, ensuring that your furniture looks flawless, professional, and more appealing to potential buyers.
Professional editing has the power to transform ordinary furniture photos into extraordinary ones. With the right editing techniques, your furniture can appear more vibrant, inviting, and realistic, making it easier for customers to visualize each piece in their own homes. With Photoshop 2026, professional editors can achieve these results more efficiently using AI-powered tools while maintaining realistic textures and natural details.
One of the key ways professional editing can enhance your furniture photos is by improving the lighting. Editors can fine-tune exposure, highlights, shadows, and white balance using Camera Raw and advanced adjustment tools to create a well-balanced and visually appealing image. This helps bring out the true colors, materials, and textures of the furniture, making it more attractive to potential customers.
Another aspect that professional editing can improve is the composition of your photos. Skilled editors can straighten and align furniture pieces, correct perspective distortion, and crop images for a cleaner, more professional presentation. Using Photoshop 2026’s Object Selection Tool and Generative Expand, they can also optimize image framing while preserving the original design and proportions of the furniture.
Additionally, professional editors can apply advanced retouching techniques to remove imperfections or flaws from your furniture photos. With tools like the Remove Tool, Generative Fill, and non-destructive editing workflows, they can eliminate dust, scratches, unwanted reflections, and other distractions while maintaining a natural appearance. This attention to detail significantly enhances the overall quality, appeal, and desirability of your furniture images.
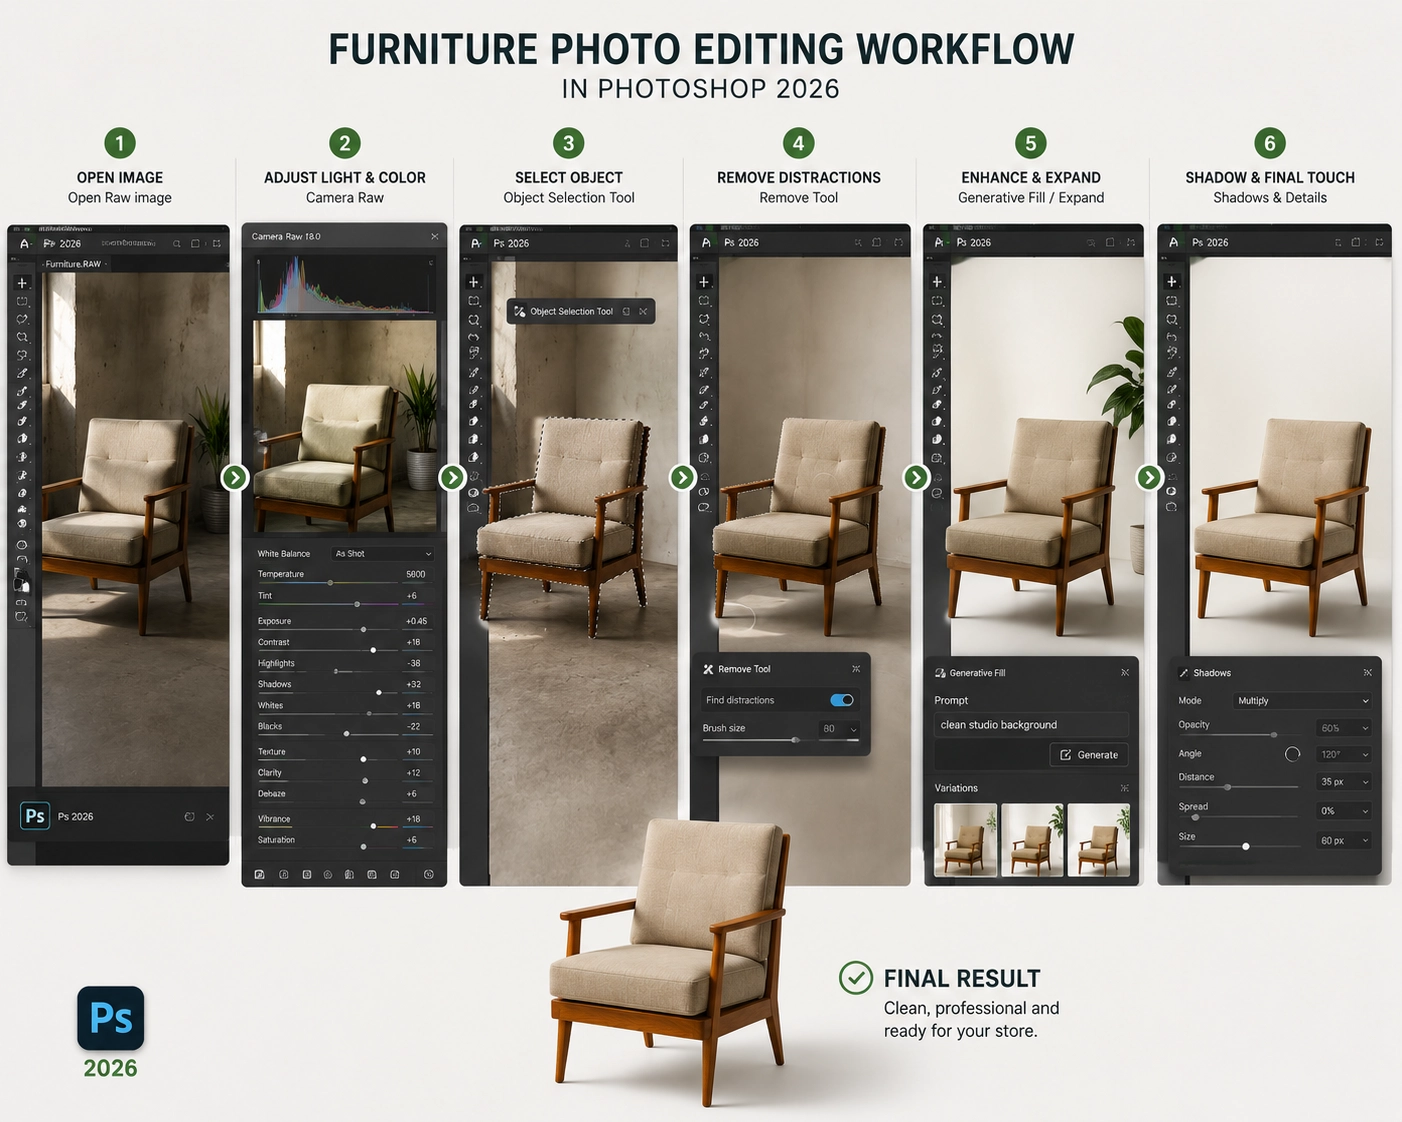
When it comes to choosing a furniture photo editing service provider, there are several factors to consider. Firstly, ensure that the provider has experience editing furniture photos specifically. Look through their portfolio to evaluate the quality of their work and their ability to enhance furniture images while preserving realistic colors, textures, and fine details. A professional team should also be familiar with the latest Photoshop 2026 editing techniques and AI-powered tools.
It is also essential to consider the turnaround time offered by the editing service provider. As an online retailer, you want your edited photos to be ready for upload as quickly as possible. Choose a provider that can deliver high-quality edits within a reasonable timeframe without compromising consistency or attention to detail.
Another crucial factor to consider is the cost of the editing services. While it’s important to stay within your budget, remember that professional editing is an investment in your brand. Look for a service provider that offers the right balance between affordability and outstanding results. It’s also worth considering additional services such as background removal, shadow creation, image resizing, color correction, or lifestyle image enhancement, as these can save you both time and effort.
Finally, read reviews and testimonials from previous clients to evaluate the provider’s reputation, reliability, and customer support. A trusted furniture photo editing company should have positive feedback, a strong portfolio, and a proven track record of delivering consistent, high-quality results.
Investing in professional furniture photo editing services can significantly enhance the visual appeal and marketability of your products. By ensuring consistent lighting and color balance, removing distractions, preserving realistic textures, and enhancing the overall image quality, professional editing can unlock the true potential of your furniture photos. With the advanced capabilities of Photoshop 2026, editors can now achieve faster, more accurate, and non-destructive results using AI-powered tools while maintaining a natural and professional finish.
When choosing a furniture photo editing service provider, consider their experience, turnaround time, pricing, and reputation. A provider with expertise in Photoshop 2026 workflows and furniture image editing can help you create high-quality product photos that capture attention, build customer trust, and increase conversions for your online furniture business.
Unlock the true potential of your furniture photos with Mister Clipping Path. Our experienced team combines skilled manual editing with the latest Photoshop 2026 tools to deliver clean, consistent, and high-quality furniture images. Whether you need background removal, color correction, shadow creation, or complete furniture photo enhancement, we’re committed to helping your products stand out and leave a lasting impression on your customers.
