Blog
Everything thats going on at Mister Clipping Paths is collected here
Photo retouching is an essential aspect of product photography that can significantly improve the overall quality and efficiency of the images. By utilizing retouching techniques, businesses can create visually appealing photos that attract customers and drive sales. In this article, we will explore the various ways in which photo retouching can enhance product photography.
Product photography plays a crucial role in e-commerce, as it serves as the primary visual representation of a product. However, capturing high-quality product images can be a costly and time-consuming process. This is where photo retouching comes into play. By leveraging retouching techniques, businesses can save time and money while achieving exceptional results.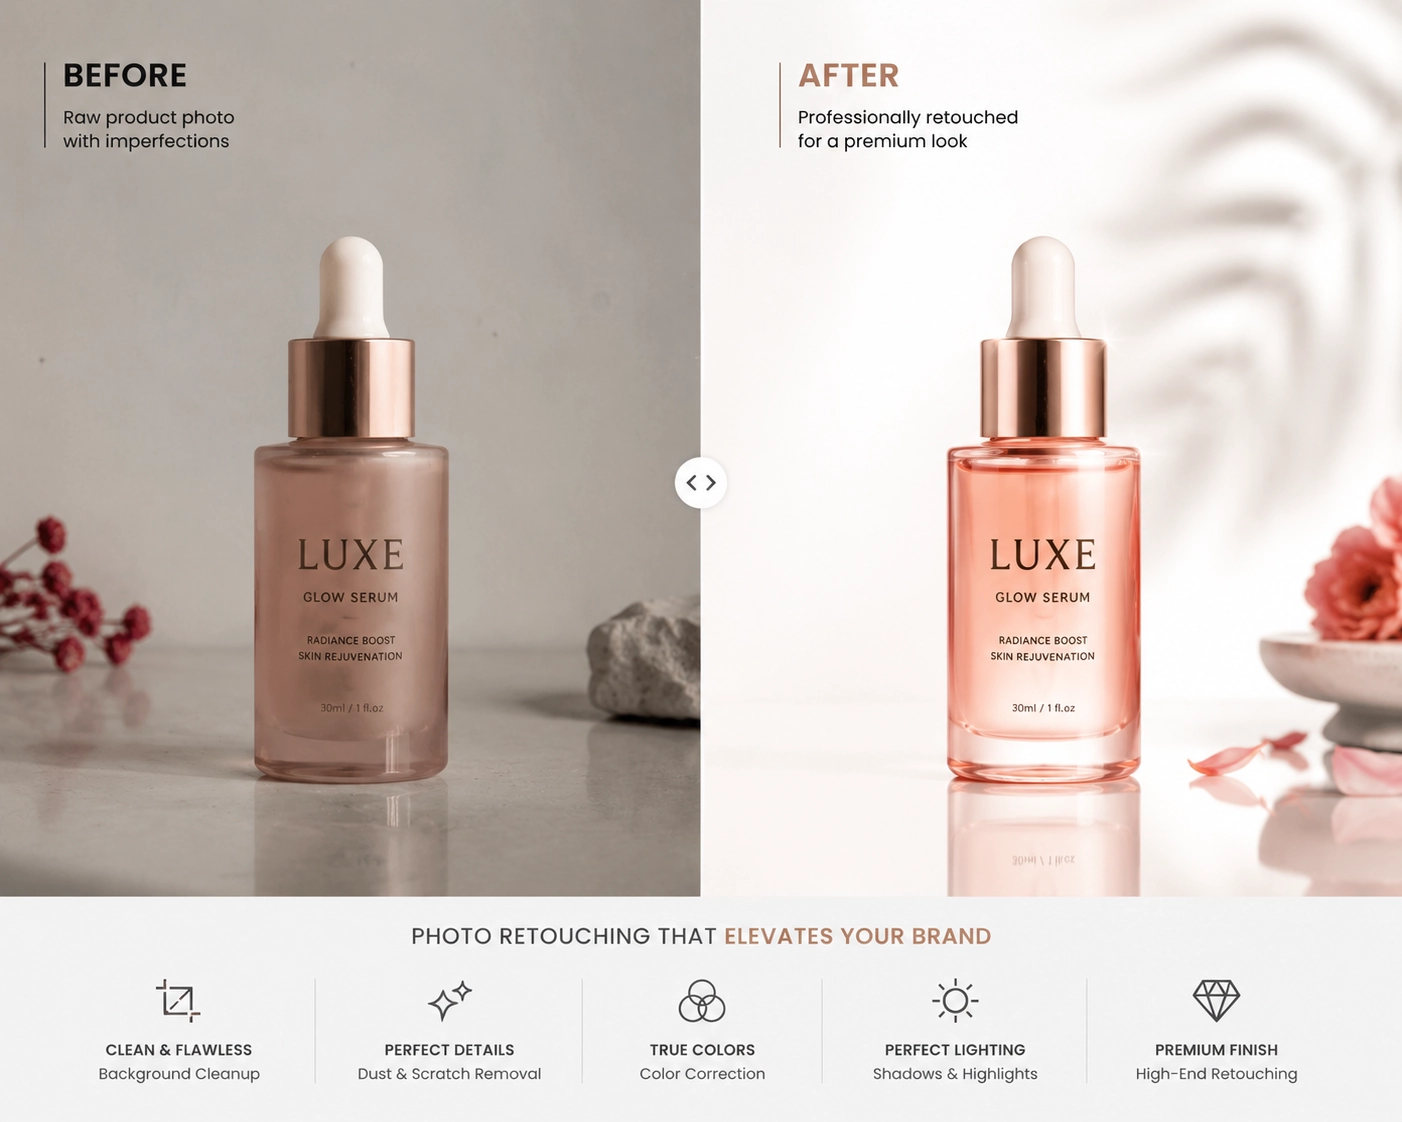
One of the significant challenges faced by e-commerce businesses is the high rate of product returns. Misrepresentation of products often leads to disappointed customers, resulting in costly returns. Photo retouching provides an opportunity to double-check the accuracy of product images, minimizing the chances of returns.
One effective way to improve accuracy is by color matching. Lighting, camera settings, or environmental factors can sometimes distort the color of a product in its photo. By employing color matching techniques during retouching, businesses can ensure 100% accuracy in color representation.
Additionally, retouching allows for updates to be made to product details. If there are any changes in a product’s design or features, such as a button’s location or the removal of a logo, these updates can be applied during the retouching process instead of reshooting the entire image.
Styling plays a crucial role in product photography, but it can be a time-consuming process. Retouching can help streamline the styling workflow and unleash the creative potential of stylists.
For example, when shooting apparel off-body, pinning the garment to a foam board wall can create a more natural shape and shadow. However, this may result in visible pins in the photo. With retouching, these pins can be seamlessly removed, allowing stylists to work faster and without the need to hide every pinhead.
Retouching also enables the removal of creases and imperfections in styling. If a pant leg is too long, it can be folded and pinned up during the shoot and then corrected in post-production. Similarly, unexpected creases from packaging or sitting on a shelf can be removed, saving time and effort.
In product photography, props can play a vital role in improving consistency and output quality. Retouching allows for the use of props to enhance the overall aesthetic of the images.
Props such as product-specific mannequins, shoe stands, or bag hangers can be utilized during the shoot to ensure consistency in positioning and presentation. These props can later be removed in post-production, resulting in a seamless final image.
By employing retouching techniques, businesses can leverage the benefits of props without the need for extensive in-camera adjustments. This enables faster and more efficient product photography, ultimately enhancing the overall quality of the images.
In the digital age, website usability is a crucial factor in attracting and retaining customers. Image editing, including retouching, plays a significant role in optimizing website usability.
Background removal is a fundamental image editing process that creates a clean, white background for product images. This is especially important for selling on marketplaces like Amazon, eBay, and Rakuten. Additionally, background removal reduces file sizes, resulting in faster page loading times.
Cropping, alignment, and compression are other essential image editing processes that contribute to website usability. Consistent cropping and alignment make it easier for customers to browse products and compare them effectively. Compressing images and using progressive JPEGs further improves website loading speed, ensuring a seamless user experience.
Product photography serves as a direct reflection of a brand’s quality and identity. Untidy lacing, loose threads, creases, or dirty backgrounds can negatively impact a brand’s image. Retouching offers an opportunity to clean up temporary imperfections and present products in their best light.
First impressions matter, and product photos often serve as a customer’s initial introduction to a brand. By employing retouching techniques, businesses can differentiate themselves and create a unique visual identity. Subtle changes and enhancements can have a profound effect on the overall perception of a brand.
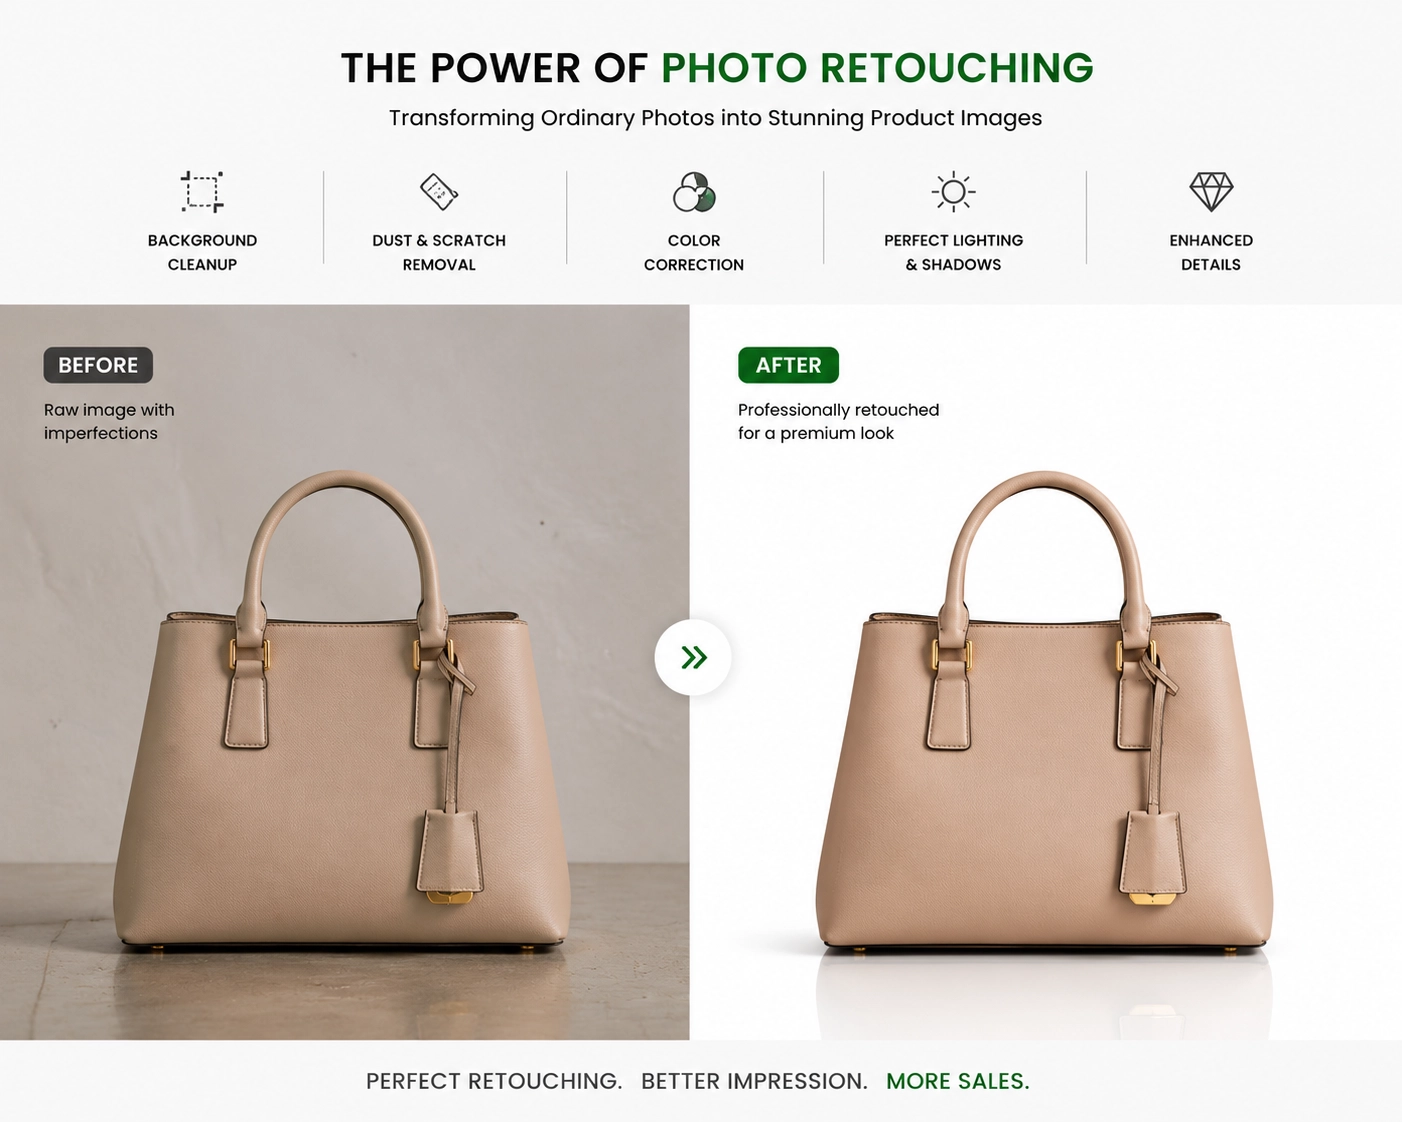
While photo retouching offers numerous advantages, businesses may not have the resources or expertise to handle the process in-house. Outsourcing photo retouching services can provide a cost-effective and efficient solution.
By partnering with a professional retouching service, businesses can access the expertise and experience of skilled retouchers. This ensures high-quality retouching that meets industry standards and elevates the overall quality of product images.
Outsourcing also allows businesses to save time and focus on core activities, such as product development and marketing. Instead of spending valuable time on retouching, professionals can handle the task efficiently, delivering exceptional results within a specified timeframe.
Photo retouching plays a vital role in enhancing the quality and efficiency of product photography. By employing retouching techniques, businesses can reduce returns, streamline styling processes, utilize props, optimize website usability, and brand themselves effectively. Outsourcing photo retouching services can provide a cost-effective solution, ensuring high-quality results and allowing businesses to focus on their core activities.
Investing in photo retouching is a worthwhile endeavor for any business looking to create visually appealing product images that attract customers and drive sales. By utilizing the power of retouching, businesses can elevate their product photography to the next level and stand out in the competitive e-commerce market.
Remember, if you are looking for photo clipping path services, be sure to visit MisterClippingPaths. They are the leading provider of clipping path services in the market, offering exceptional quality and reliability.
In the world of photo editing, there are two powerful techniques that help you isolate subjects from their backgrounds: clipping path and image masking. These techniques are essential for various purposes, such as ecommerce product photography, marketing visuals, and creative designs. While they both serve the same purpose, they rely on different editing approaches to achieve the desired results.
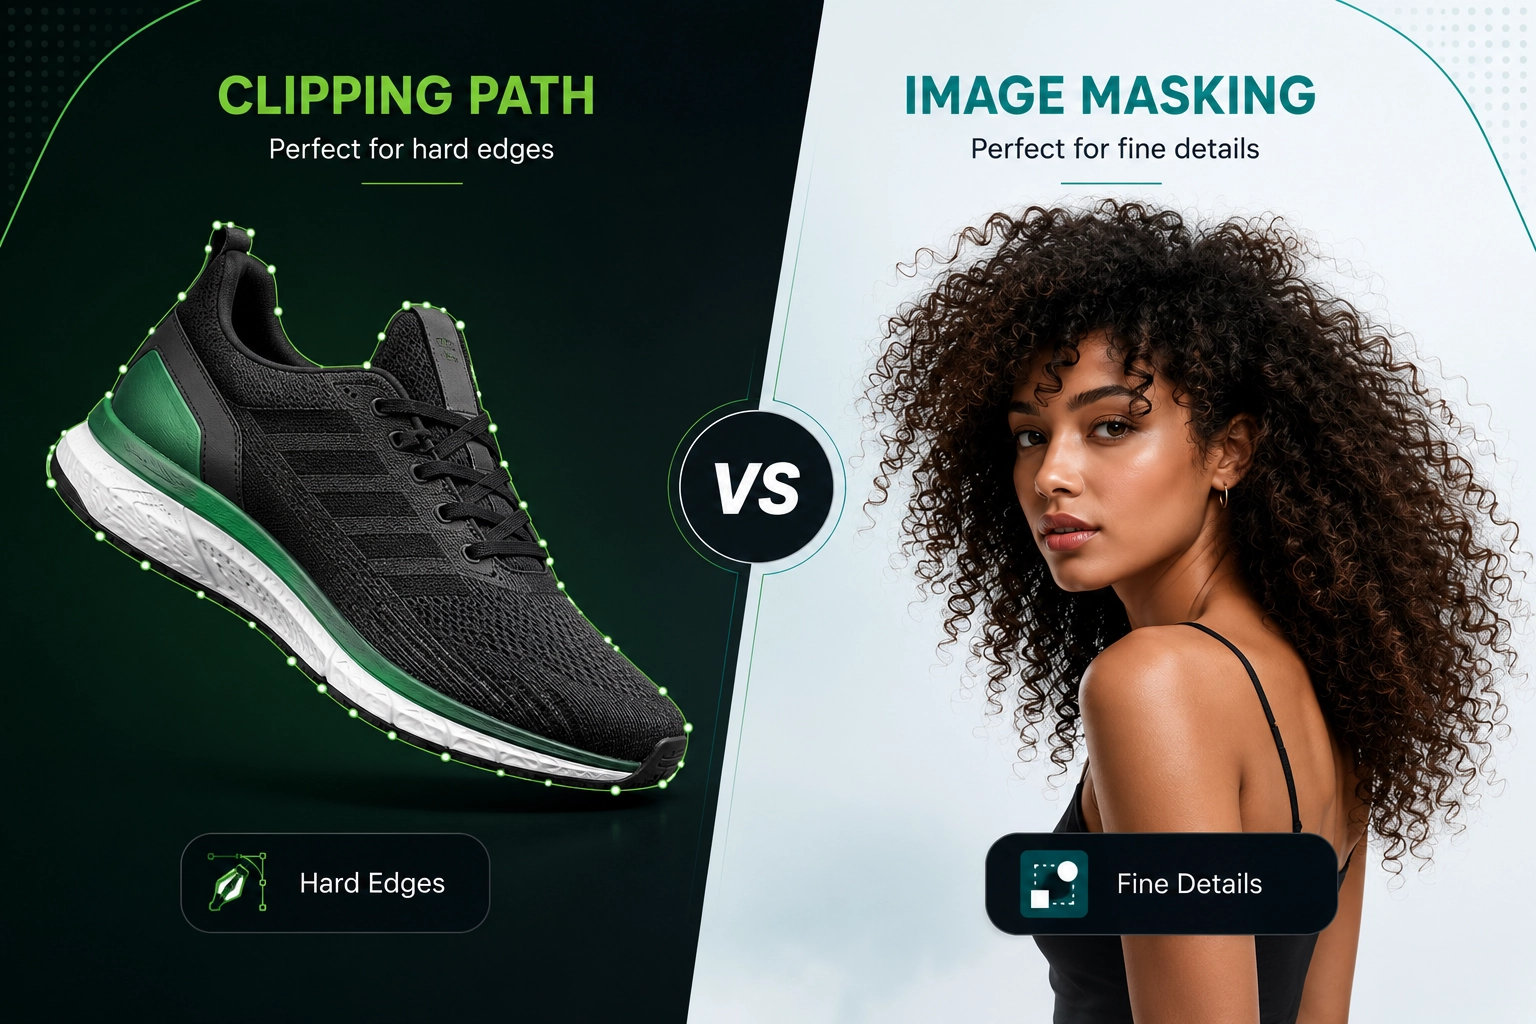
A clipping path is a technique that allows you to remove the background from an image by creating a closed vector shape using the Pen tool in Adobe Photoshop. This technique is most suitable for images with straightforward edges, like boxes, electronics, simple accessories, garments, and ornaments. By selecting the paths that form the vector shape, everything inside the path is selected, while anything outside is left untouched.
Clipping paths require precision and expertise to ensure a realistic and natural-looking result. Even the smallest mistakes can be noticeable to consumers, affecting their perception of your products and potentially impacting sales. Therefore, it is crucial to work with a professional photo editor who can meticulously create accurate clipping paths that enhance the visual appeal of your images.
There are different types of clipping paths that you can utilize based on the complexity of your image:
Single-layer clipping path: This type of clipping path is suitable for images with simple, straight edges. It involves creating a simple path on one layer using the Pen tool. For example, when removing or changing the background for subjects like boxes or simple accessories, a single-layer clipping path is sufficient.
Multilayer clipping path: When your image contains multiple parts that need to be separated, such as in the case of retouching or color correction, a multilayer clipping path is the preferred choice. This advanced technique involves creating separate clipping paths for each part of the image. This allows you to make specific adjustments without affecting other areas. For instance, you can change the color of shoes without altering the shoelaces by using separate clipping paths for each element.
Illustrator clipping path: In addition to Photoshop, Adobe Illustrator also offers its own path and mask tools known as Clipping Masks. These tools enable you to cut out portions of an image into a specific shape, providing alternative options for creating clipping masks.
Image masking is another method used for background removal in photo editing. Unlike clipping path, image masking involves various tools in Photoshop, such as the Background Eraser tool, Magic Eraser tool, and color separation technique. It allows you to adjust specific parts of an image while leaving the rest untouched, providing greater control over the editing process.
Image masking is particularly useful for images with complex lines, such as hair or fur. These intricate details require a more sophisticated approach to achieve a seamless and natural result. By applying masks on layers, photo editors can precisely define which areas of the image should be edited. This non-destructive technique ensures that the original image remains intact, allowing for further adjustments if needed.
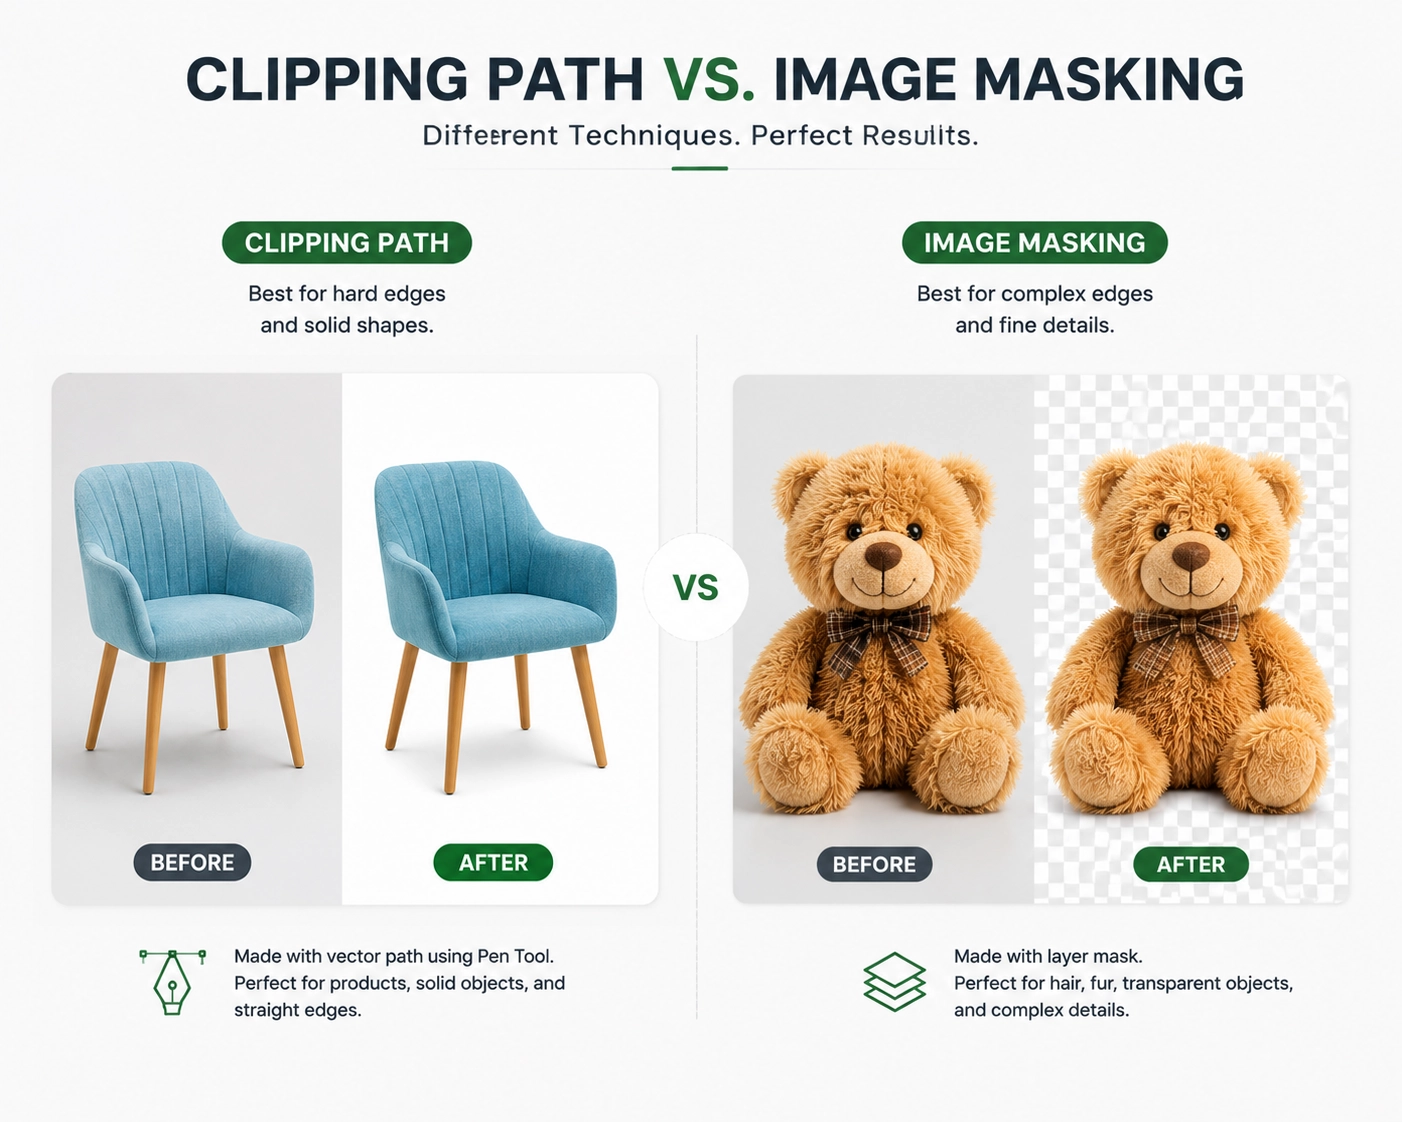
When it comes to choosing between clipping path and image masking, it’s essential to consider the complexity of the image and the desired outcome. While both techniques can achieve background removal, each has its strengths and limitations.
Clipping path is the go-to technique for images with straightforward edges and sharp lines. It excels in isolating subjects that have well-defined contours and minimal complexity. For example, products like boxes, electronic devices, or simple accessories can be effectively edited using clipping paths. The result is a clean-cut image with a sleek appearance.
Clipping path also works well for objects that require a reflection shadow to enhance their visual appeal. By carefully selecting and isolating the subject, photo editors can create a 3D effect and make the product stand out, especially when placed against a clean white background.
Image masking shines when it comes to images with intricate details, such as hair, fur, or soft materials. Unlike clipping path, image masking can seamlessly handle these complex areas, resulting in a more natural and realistic outcome. The technique preserves the fine details and textures, ensuring that the edited image appears as if it was never altered.
For example, a photo editor would employ image masking to remove the background from a product image featuring a Crown Affair scrunchie. By expertly applying masking techniques, the editor can precisely define the outline of the scrunchie, including the softer material and the model’s hair. The result is a refined image that maintains its authenticity.
In some cases, an image may require both clipping path and image masking techniques to achieve the desired outcome. By combining these two methods, photo editors can leverage the strengths of each technique to produce exceptional results.
For instance, a play gym from Lovevery may involve both techniques. The toy’s frame, with its strong lines and straightforward edges, can be easily edited using clipping paths. However, the softer material at the bottom and the baby’s hair would benefit from image masking to ensure a seamless and realistic appearance.
Now that you understand the differences between clipping path and image masking, you might wonder why background removal is necessary in the first place. There are several compelling reasons to consider isolating the subject in your photos:
Reusing visual assets: Background removal allows you to repurpose your product photos for various purposes. Whether it’s fitting your images to different ecommerce platforms, creating ghost mannequins for apparel, designing creative marketing visuals, or more, removing the background expands the versatility of your images.
Cost-effectiveness: Removing the background from existing photos is a more cost-effective solution compared to organizing new photoshoots. Whether you choose to perform the edits yourself or outsource them to professional photo editors, it is significantly more affordable than capturing new product images. Additionally, ordering photo edits in bulk can further reduce costs.
Time-saving: Instead of investing time and resources into organizing a new photoshoot, removing the background from existing photos allows you to quickly create new visuals. This is particularly useful for last-minute campaigns or store listings, allowing you to stay agile and responsive to market demands.
Enhancing DIY photography: Not every photoshoot has the luxury of a spacious or perfectly-lit studio space. Removing the background enables you to overcome potential limitations and create professional-looking product photos even on a smaller budget. It democratizes the photography process, making it more accessible to businesses with limited resources.
Eliminating distractions: Background removal ensures that the focus remains solely on your product. By removing unwanted objects or cluttered backgrounds, you create a clean and visually appealing image that captivates your audience’s attention.
Creating pixel-perfect images: Background removal allows you to mix and match products with removed backgrounds, resulting in sharp and well-lit product groups. This is particularly useful when creating product bundles or gift sets, as demonstrated by vegan skincare and fragrance brand Fais.
In conclusion, both clipping path and image masking techniques are valuable tools for achieving background removal in photo editing. The choice between the two methods depends on the complexity of the image and the desired outcome. By understanding the differences and strengths of each technique, you can make informed decisions that result in visually stunning product photos. Whether you choose to work with professionals or leverage AI-powered tools, background removal opens up a world of possibilities for your visual content.
Unlock the full potential of Photoshop with our comprehensive guide to Content-Aware Fill. Whether you’re a seasoned designer or just starting out, this step-by-step tutorial will help you master this powerful tool and take your editing skills to the next level.
With Content-Aware Fill, you can seamlessly remove unwanted objects, distractions, or imperfections from your images in just a few clicks. Say goodbye to tedious manual retouching, as this intelligent feature analyzes your image and fills the selected area with a natural blend of surrounding pixels. Even with the introduction of AI-powered tools like Generative Fill and the improved Remove Tool in Photoshop 2026, Content-Aware Fill remains an essential feature for precise object removal and professional photo editing.
From removing distracting elements in landscape photos to restoring old photographs and cleaning up product images, the possibilities are endless.
Follow along as we break down the process into easy-to-understand steps, complete with screenshots and expert tips. Learn how to make accurate selections, refine the sampling area, and fine-tune the results for flawless edits. We’ll also address common challenges and provide troubleshooting tips to help you overcome any obstacles.
Ready to unleash your creativity? Let’s dive into our comprehensive guide to Content-Aware Fill in Photoshop and elevate your editing game.
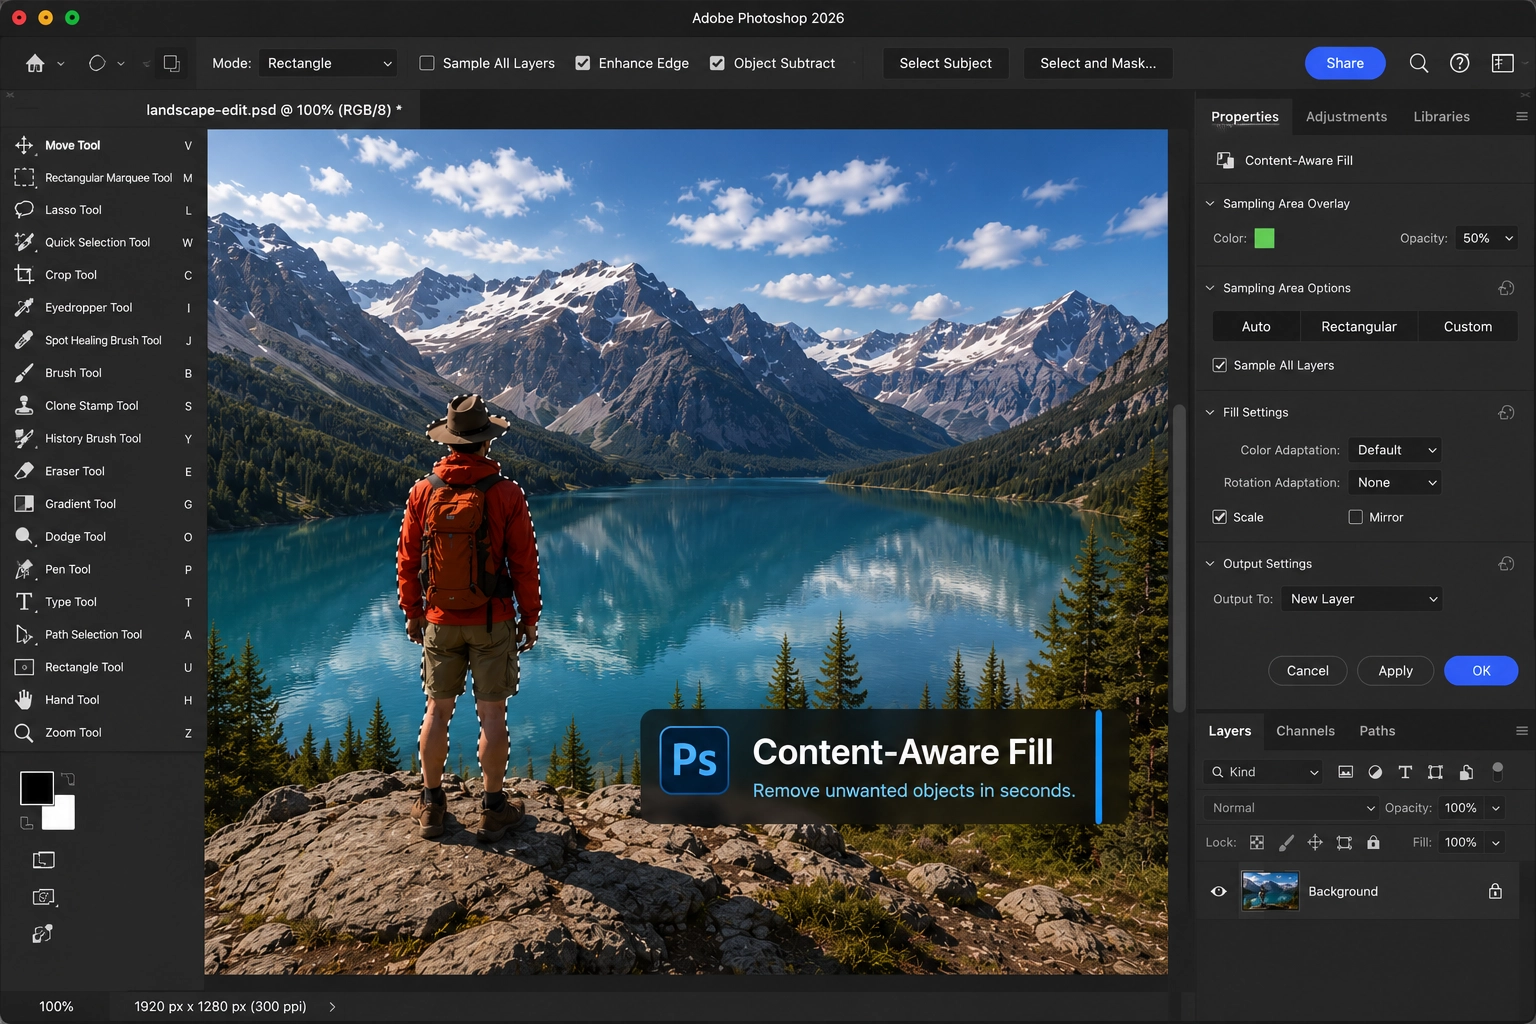
Content-Aware Fill is one of Photoshop’s most powerful editing features, allowing you to remove unwanted objects or fill missing areas seamlessly. It works by analyzing the surrounding pixels and intelligently replacing the selected area with matching textures, colors, and patterns. This feature saves significant time and effort, eliminating the need for tedious manual retouching.
To use Content-Aware Fill, you simply make a selection around the object or area you want to remove or replace. Photoshop then analyzes the surrounding pixels and generates a fill that naturally blends with the rest of the image. In Photoshop 2026, Content-Aware Fill continues to provide precise and reliable results, especially when you need more control than AI-powered tools like Generative Fill or Remove Tool can offer.
One of the biggest advantages of Content-Aware Fill is its ability to intelligently analyze texture, color, lighting, and surrounding details to create realistic edits. This makes it an invaluable tool for a wide range of tasks, from removing distractions in landscape photos and cleaning up product images to retouching portraits and restoring old photographs.
Using Content-Aware Fill in Photoshop offers several benefits that make it an essential tool for photographers, designers, and retouchers. Here are some of its key advantages:
Time-Saving: Content-Aware Fill allows you to remove unwanted objects or fill missing areas in just a few clicks, significantly reducing the time spent on manual retouching.
Seamless Results: Its intelligent algorithm ensures that the filled area blends naturally with the surrounding pixels, producing realistic and professional-looking edits.
Versatility: Content-Aware Fill can be used for a wide range of editing tasks, from removing small distractions to cleaning up complex scenes, making it a valuable addition to any editing workflow.
Non-Destructive Editing: You can output the result to a new layer, preserving the original image and giving you the flexibility to make further adjustments whenever needed.
Easy to Use: With its intuitive interface and straightforward workflow, Content-Aware Fill is accessible to both beginners and experienced Photoshop users.
Greater Control: Even in Photoshop 2026, Content-Aware Fill remains a preferred choice for many professionals because it provides more control over the sampling area and final output than fully automated AI tools.
Now that you understand the concept and benefits of Content-Aware Fill, let’s dive into a step-by-step guide on how to use this powerful tool in Photoshop. Follow these instructions to master Content-Aware Fill and take your editing skills to the next level:
Step 1: Open your image in Photoshop and make sure your image layer is selected. For non-destructive editing, it’s always a good idea to duplicate the original layer before making any changes.
Step 2: Choose the Lasso Tool, Object Selection Tool, or Remove Tool from the toolbar on the left side of the screen. These tools allow you to make accurate selections around the object or area you want to remove or fill.
Step 3: Carefully create a selection around the object or area you want to remove. Include a small amount of surrounding pixels for more natural results. If you make a mistake, use the Undo command or simply deselect and try again.
Step 4: Once your selection is ready, go to:
Edit → Content-Aware Fill
This will open the dedicated Content-Aware Fill workspace, where you can preview the results before applying them.
Step 5: Adjust the Sampling Area if necessary. Photoshop automatically selects the surrounding pixels used to generate the fill, but you can manually add or remove sampling areas for more accurate and realistic results.
Step 6: Review the Fill Settings, including:
These options help Photoshop create a more natural blend depending on the complexity of the image.
Step 7: Under Output Settings, select:
Output To → New Layer
This keeps your edits non-destructive and allows you to make further adjustments if needed.
Step 8: Click Apply and inspect the results. Zoom in and check for any noticeable artifacts or inconsistencies. If necessary, use the Spot Healing Brush, Clone Stamp Tool, or Remove Tool to refine the final image.
Step 9: For larger object removals or complex backgrounds, consider using Generative Fill after applying Content-Aware Fill. In Photoshop 2026, many professionals combine both tools to achieve the most natural and realistic results.
Step 10: Repeat the process for any additional objects or areas you want to remove. Taking your time and making accurate selections will significantly improve the final outcome.
Step 11: Once you’re satisfied with the edits, save your image in the desired format and resolution. It’s also a good idea to keep a backup of the original file in case you need to make further adjustments later.
Congratulations! You have successfully used Content-Aware Fill in Photoshop to remove unwanted objects and create clean, professional-looking edits. With practice and experimentation, you’ll become even more efficient at using this powerful feature in Photoshop 2026.
While the step-by-step guide provides a solid foundation for using Content-Aware Fill, here are some additional tips and tricks to help you get the most out of this powerful tool:
Remember, practice makes perfect. The more you use Content-Aware Fill and experiment with Photoshop’s newer AI-powered tools, the more comfortable and proficient you’ll become at creating clean, professional-looking edits in Photoshop 2026.
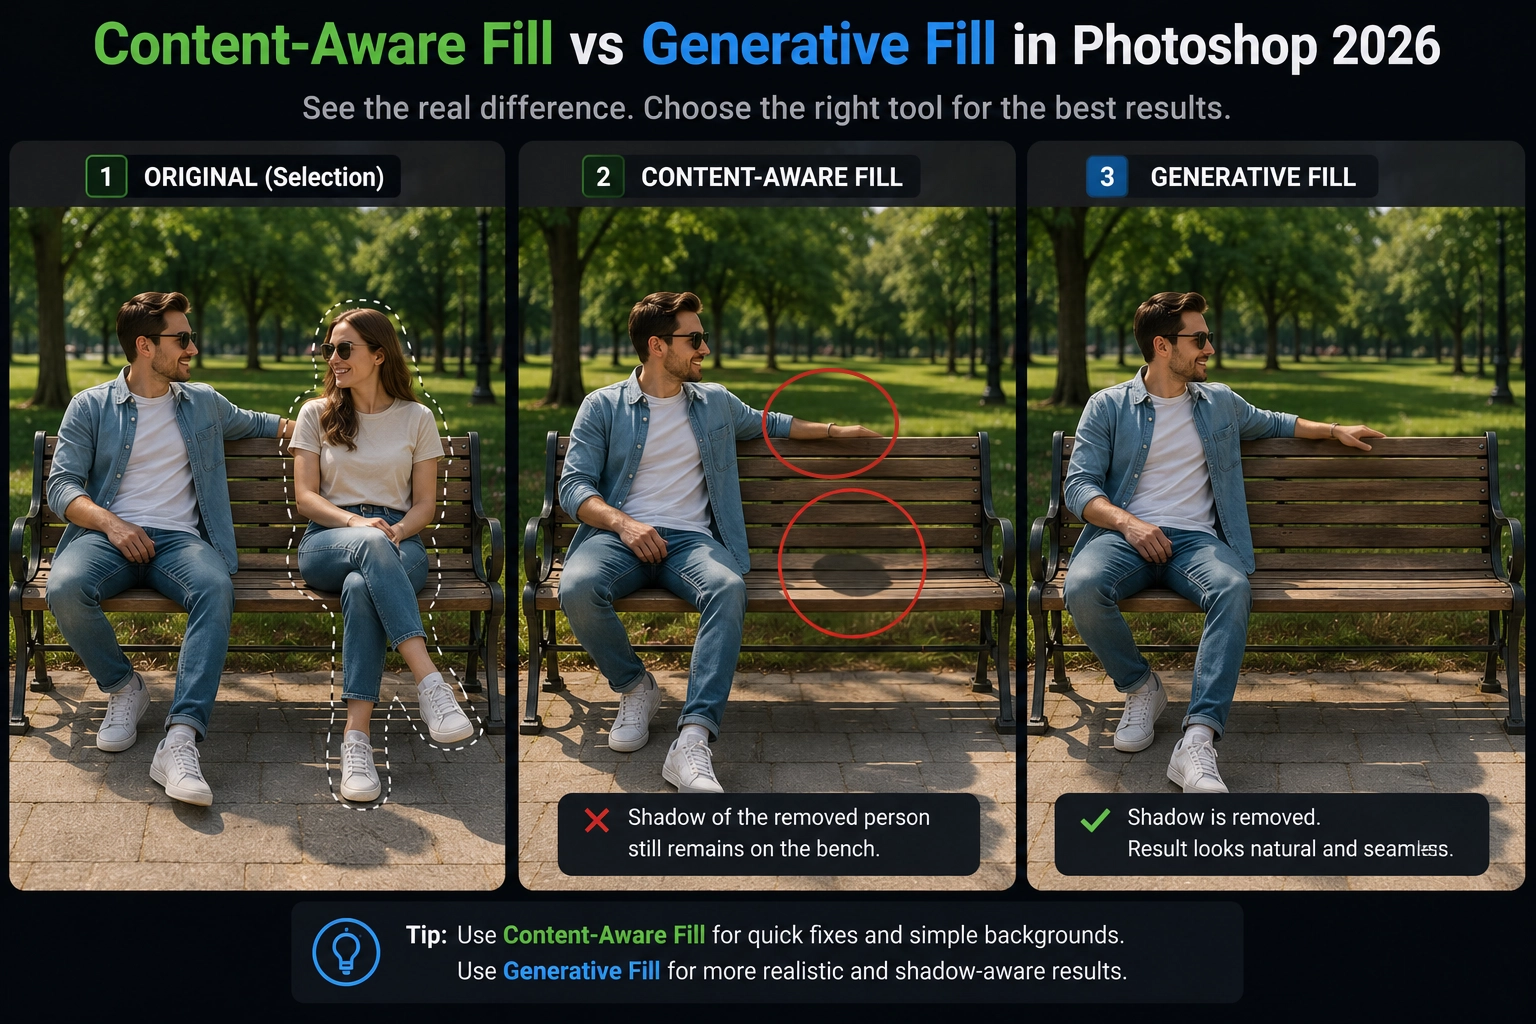
While Content-Aware Fill is a powerful tool, there are some common mistakes that users often make. By being aware of these pitfalls, you can avoid them and achieve better results. Here are some common mistakes to avoid when using Content-Aware Fill:
By avoiding these common mistakes, you can achieve cleaner, more natural-looking results and make the most of Content-Aware Fill in your editing workflow.
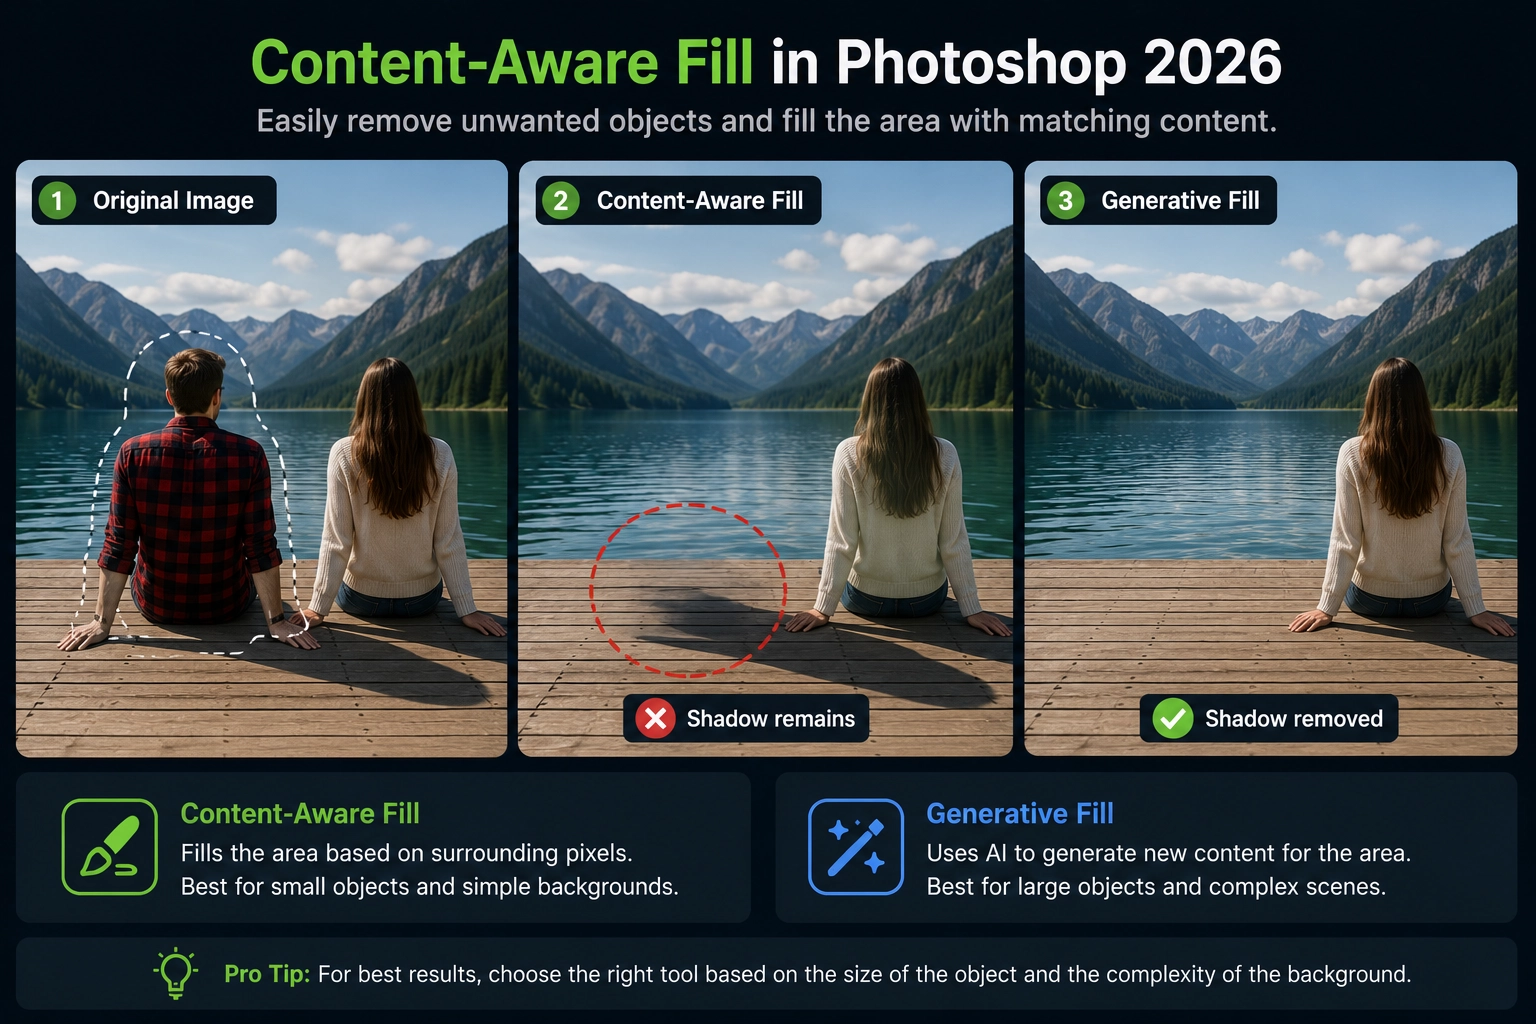
Once you’ve mastered the basics of Content-Aware Fill, you can explore more advanced techniques to further enhance your editing skills. Here are some advanced techniques you can try:
Content-Aware Fill with Multiple Selections:
Instead of making a single selection, try making multiple selections around the object or area you want to remove. Photoshop can analyze different regions and generate more natural fills, especially in complex scenes.
Content-Aware Fill with Layer Masks:
Rather than applying edits directly to the image, use a layer mask to control the filled area. This allows you to refine the results without affecting the original image and provides greater flexibility in your editing workflow.
Content-Aware Fill with Generative Fill:
In Photoshop 2026, many professionals combine Content-Aware Fill and Generative Fill. Use Content-Aware Fill for controlled cleanup and Generative Fill for reconstructing large areas or creating missing details that cannot be recreated from surrounding pixels.
Content-Aware Fill for Creative Edits:
Content-Aware Fill isn’t limited to object removal. Experiment with unusual selections, shapes, or patterns and let Photoshop generate interesting textures and abstract effects for creative projects.
Customizing Content-Aware Fill Settings:
Take advantage of advanced settings such as:
Experimenting with these settings can significantly improve the quality of your results, especially when working with complex textures and patterns.
Combine with Other Retouching Tools:
Professional retouchers rarely rely on a single tool. For the best results, combine Content-Aware Fill with:
When removing large objects, avoid selecting everything at once. Divide the edit into smaller sections and apply Content-Aware Fill gradually. This often produces cleaner and more natural results.
Remember, advanced techniques require experimentation and practice. The more you work with Content-Aware Fill and Photoshop’s AI-powered tools, the more confident and efficient you’ll become at creating professional-quality edits in Photoshop 2026.

While Content-Aware Fill is a powerful tool, it’s not the only option available in Photoshop for removing objects or filling gaps. Depending on the complexity of your edit, you may find one of these alternatives more suitable for the task.
Each of these alternatives has its own strengths and limitations. In Photoshop 2026, many professionals combine multiple tools to achieve the best results. The right choice depends on your specific editing needs, the complexity of the background, and the level of control required.
Content-Aware Fill remains one of the most powerful and versatile editing tools in Photoshop 2026. Whether you’re removing unwanted objects, cleaning up product photos, or retouching landscapes, it offers a fast and effective way to create seamless, professional-looking results.
Although newer AI-powered features like Generative Fill and the Remove Tool have expanded Photoshop’s capabilities, Content-Aware Fill still plays an essential role in professional editing workflows because it provides greater control over the sampling area and final output.
Keep practicing, experiment with different settings, and combine Content-Aware Fill with other Photoshop tools to achieve the best possible results. With patience and creativity, you can eliminate distractions, fix imperfections, and unlock the full potential of your images.
If you’re looking for professional photo editing services, consider contacting Mister Clipping Path. Our team of experienced retouchers specializes in object removal, background editing, image retouching, and high-end photo manipulation services. Whether you need simple edits or complex image enhancements, we’re here to help bring your creative vision to life.
Are you a digital artist looking to take your designs to the next level? In this article, we’ll show you how to create realistic wood textures using Photoshop 2026. Wood textures add depth, warmth, and a natural element to your designs, making them more visually appealing and realistic. Whether you want to create a rustic website background, design product mockups, or add authenticity to a digital painting, learning how to create wood textures in Photoshop can significantly enhance your artwork.
In this step-by-step guide, we’ll cover the tools and techniques you need to create stunning wood textures. From choosing the right colors and adding realistic grain patterns to using modern Photoshop features such as Generative Fill, advanced brushes, and texture-enhancing filters, you’ll learn how to achieve professional-looking results with greater speed and flexibility.
Enhance your digital artistry and bring your designs to life with the beauty and warmth of wood textures. Follow our guide and unlock the full potential of Photoshop 2026 to create captivating and authentic designs that leave a lasting impression.
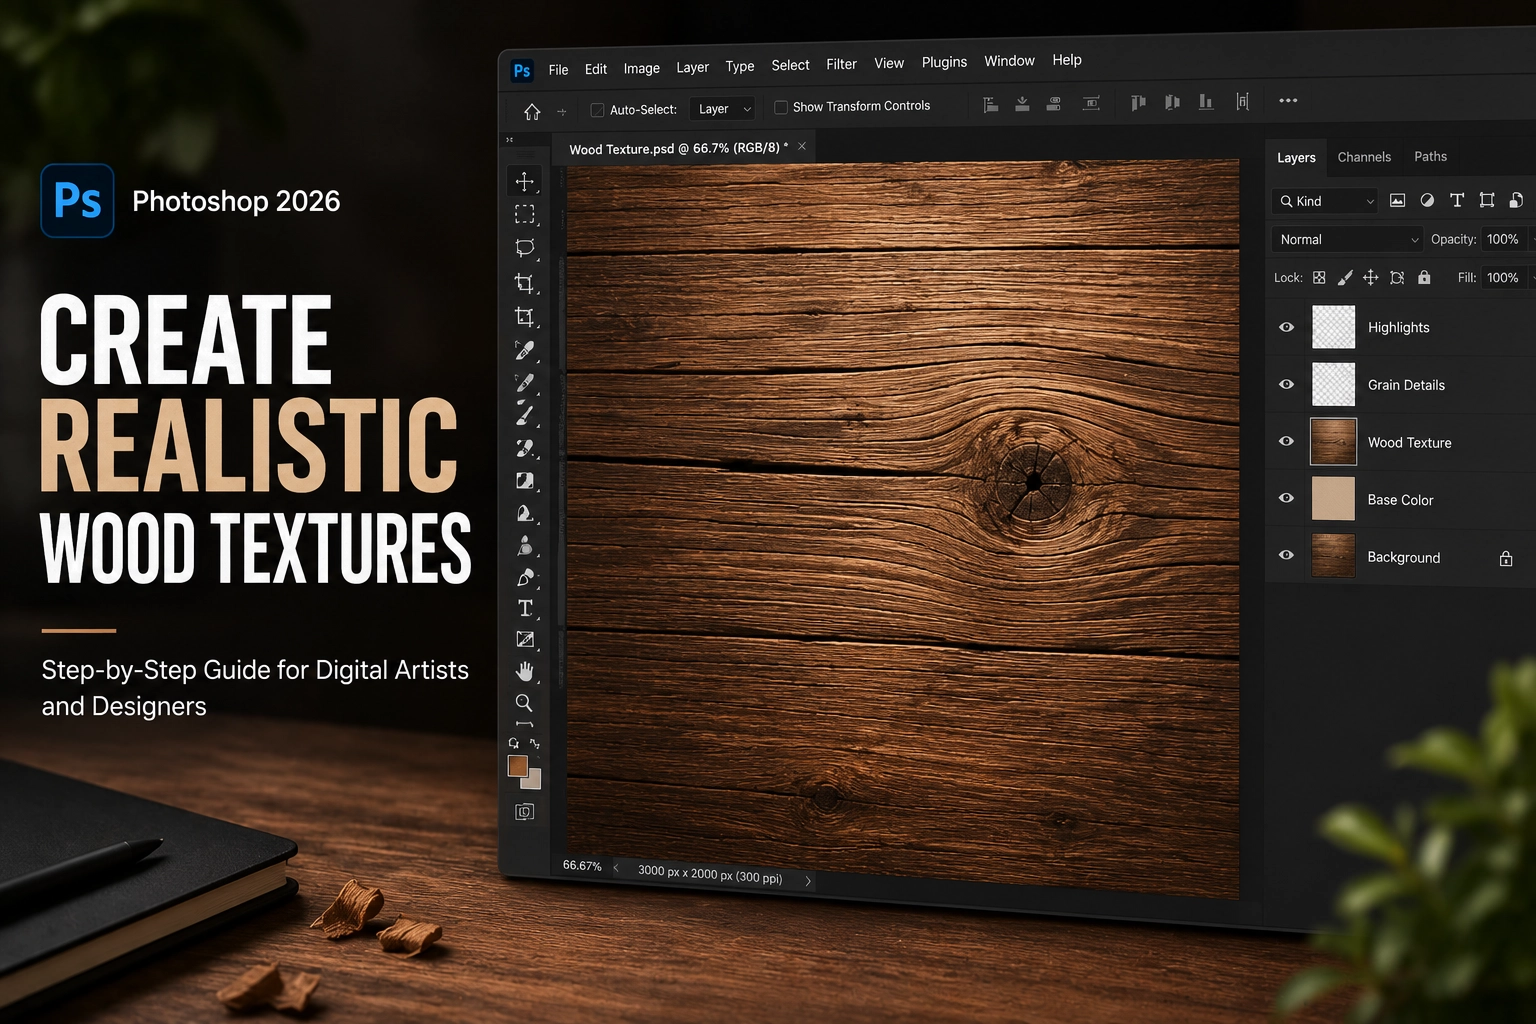
Texture plays a crucial role in digital art by adding depth, realism, and visual interest to your designs. Whether you’re creating digital paintings, graphic designs, product mockups, game assets, or website backgrounds, incorporating textures can elevate your artwork and make it feel more authentic and immersive.
Wood textures, in particular, are highly versatile and can be used in a wide range of creative projects. They can create a sense of warmth, craftsmanship, nostalgia, or rustic charm, depending on the style you’re aiming for. From realistic backgrounds and packaging designs to 3D materials and digital illustrations, wood textures remain a popular choice among designers and artists.
By mastering the art of creating wood textures in Photoshop 2026, you’ll gain a valuable skill that can significantly enhance the quality and realism of your designs.
Before diving into the process of creating wood textures, let’s familiarize ourselves with Photoshop and some of its essential tools. Photoshop 2026 offers a powerful set of features for creating realistic textures, combining traditional painting tools with modern AI-powered capabilities.
To create wood textures, you’ll primarily work with tools such as the Brush Tool, Gradient Tool, Layer Styles, and Blend Modes. The Brush Tool allows you to paint realistic wood grain patterns, while the Gradient Tool helps create smooth transitions between colors and tones. Layer Styles and Blend Modes make it easier to add depth, highlights, shadows, and realistic finishing effects.
In Photoshop 2026, you can also take advantage of features such as Generative Fill, Custom Brushes, and Neural Filters to enhance textures, generate variations, and speed up your workflow. These modern tools provide greater flexibility while still allowing complete creative control over the final result.
Understanding these tools will provide a solid foundation for creating stunning and realistic wood textures. Now, let’s move on to the step-by-step process of crafting wood textures in Photoshop.
Adding Depth and Realism to Wood Textures
Creating authentic wood textures involves more than just painting lines and adding colors. To make your wood textures truly lifelike, it’s essential to incorporate depth, natural imperfections, and subtle variations.
Photoshop offers a wide range of filters and effects that can be applied to your wood textures to enhance their appearance and match your artistic vision.
Use Camera Raw Filter for Fine-Tuning – In Photoshop 2026, the Camera Raw Filter is an excellent tool for refining wood textures. Adjust:
These adjustments can significantly improve the realism and detail of your texture.
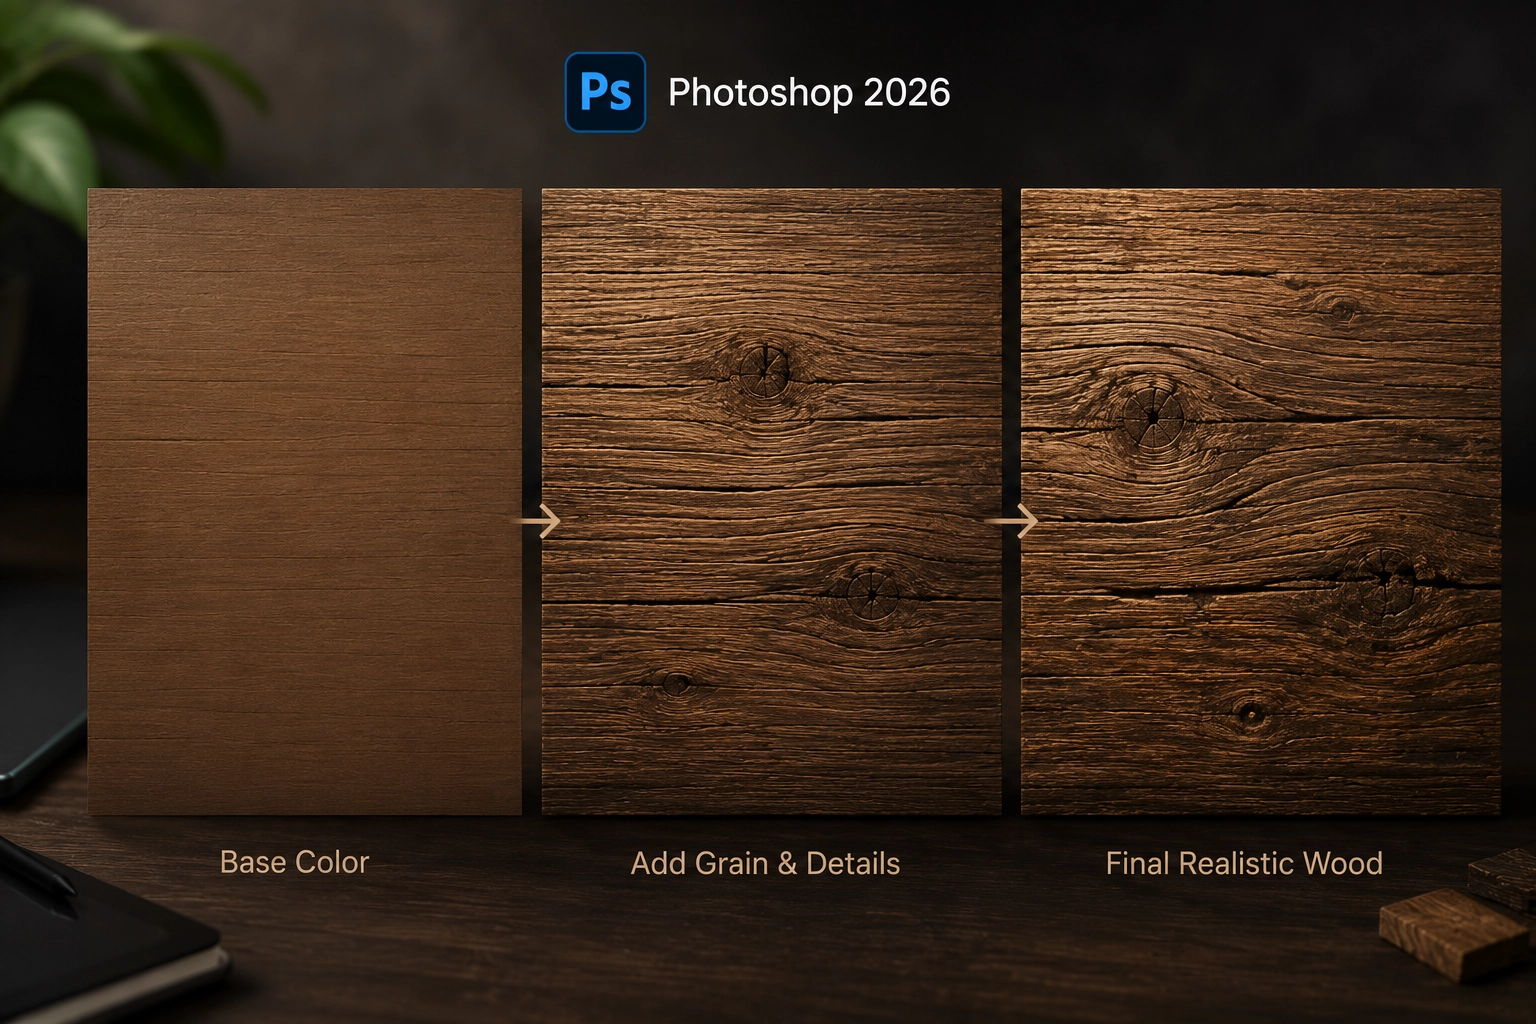
Now that you’ve mastered the art of creating wood textures in Photoshop, it’s time to explore how you can incorporate them into your digital art projects. Here are a few ideas to get you started:
Creating realistic wood textures in Photoshop is a valuable skill that can significantly enhance your digital artwork and design projects. By understanding the importance of texture, mastering Photoshop’s tools and techniques, and paying close attention to details such as lighting, grain patterns, imperfections, and color variation, you can create wood textures that look both realistic and visually compelling.
Photoshop 2026 offers more possibilities than ever before. Traditional techniques like brushes, gradients, blending modes, and texture overlays remain essential, while modern features such as Generative Fill and Smart Filters can help speed up your workflow and inspire new creative ideas.
Keep experimenting with different wood types, lighting conditions, and finishing effects. The more you practice, the more realistic and versatile your textures will become.
Embrace the beauty and warmth of natural wood, and use your new skills to create digital artwork, product designs, website graphics, and 3D projects that truly stand out.
If you’re looking for professional photo editing services, Mister Clipping Path can help bring your creative ideas to life. Our team of experienced designers and retouchers specializes in high-end image editing, retouching, background creation, and digital design services for businesses, photographers, and creative professionals worldwide.
Photoshop has been a transformative tool in the digital art and design world, offering countless creative possibilities for artists, designers, and photographers. Among its many techniques, the Text Portrait Effect remains one of the most visually striking ways to combine typography and imagery into a single composition. In Photoshop 2026, creating text portraits has become even more flexible thanks to improved typography controls, AI-powered selection tools, and non-destructive editing workflows.
The text portrait effect in Photoshop is a creative technique where an image or portrait is filled with text. This text can be a single word, several words, or even an entire paragraph of text. The beauty of this technique lies in its ability to create a unique interplay between the visual and the textual, allowing the image to tell a story while the text adds another layer of meaning and personality.
The text portrait effect is popular among graphic designers, social media creators, and digital artists because it can transform simple portraits into eye-catching visual compositions. Whether you’re creating posters, album covers, marketing graphics, or personal artwork, this technique pushes the boundaries of creative expression and showcases the versatility of Photoshop as a design tool.
With Photoshop 2026, you can further enhance text portraits using modern features such as Smart Objects, advanced layer masking, and AI-assisted tools to refine your compositions more efficiently than ever before.
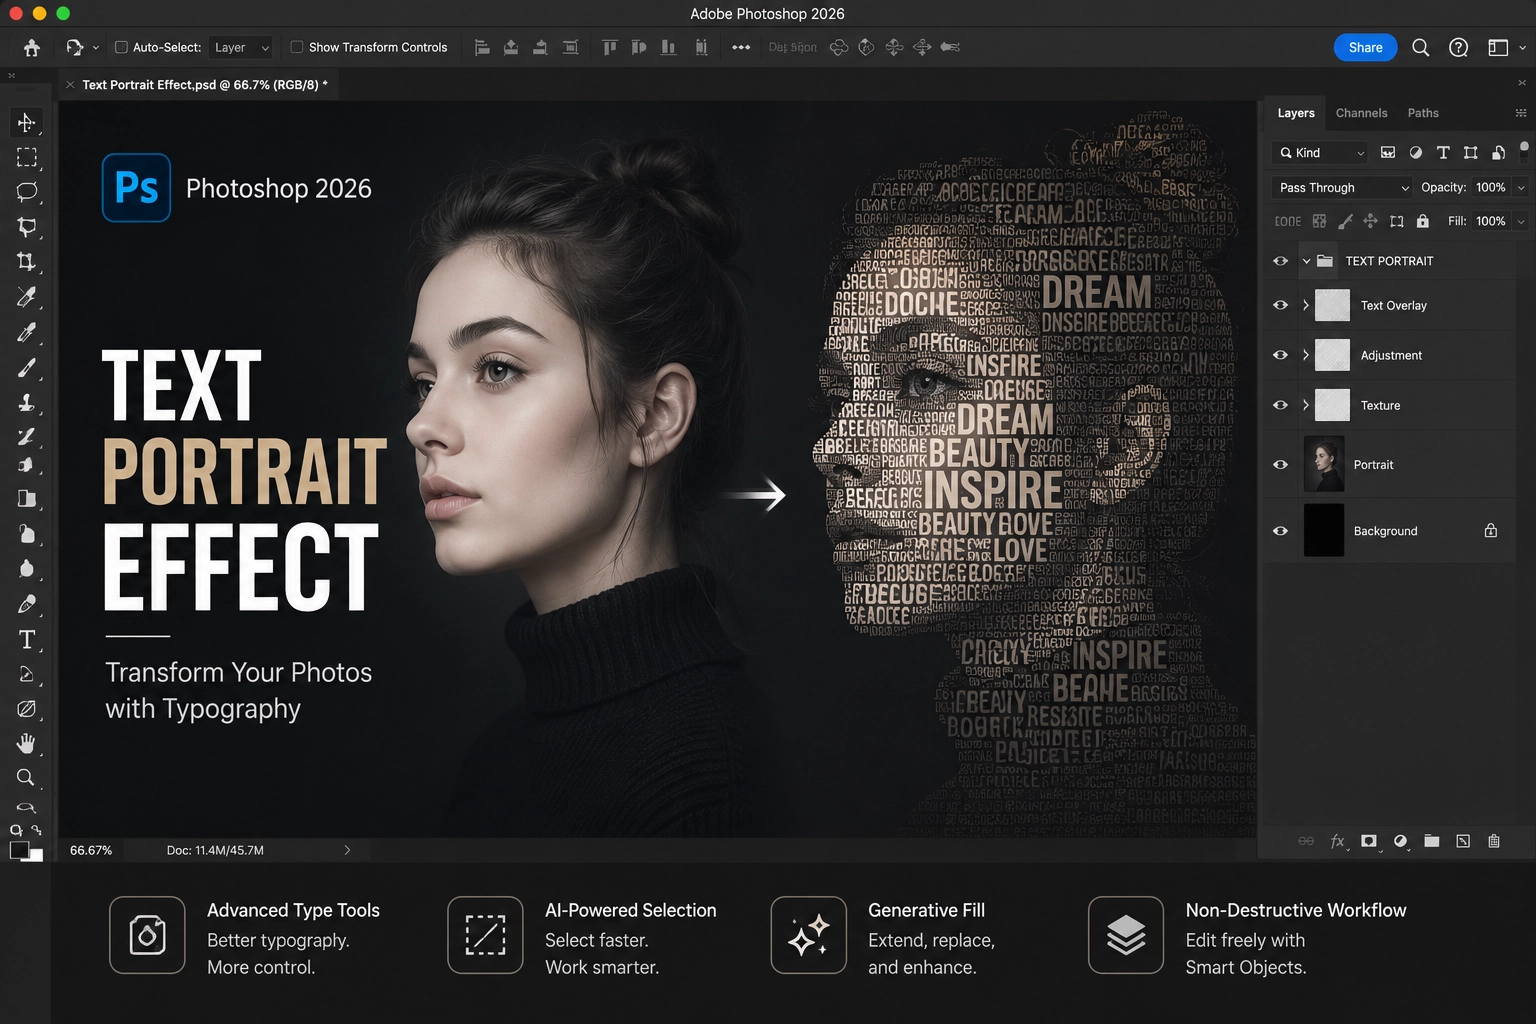
Creativity is at the heart of Photoshop. It’s what separates the ordinary from the extraordinary and allows artists and designers to turn ideas into compelling visual stories. Whether you’re creating digital artwork, social media graphics, marketing materials, or personal projects, Photoshop provides endless opportunities for creative expression.
In Photoshop 2026, creativity goes beyond mastering tools and techniques. Modern features such as AI-assisted selections, Generative Fill, and advanced typography controls can speed up repetitive tasks, giving artists more time to focus on composition, storytelling, and experimentation. However, these tools are designed to enhance creativity, not replace it.
Creating a text portrait effect is a perfect example of combining technical skills with artistic vision. It encourages you to think outside the box by blending typography and imagery in a unique and meaningful way. Every choice, from the portrait selection and font style to text placement and contrast, contributes to the final visual impact.
Creativity in Photoshop also means experimenting without fear of making mistakes. Try different fonts, layouts, blending modes, and masking techniques to discover new possibilities. The more you explore and refine your ideas, the more distinctive and memorable your text portrait designs will become.
Ultimately, the text portrait effect demonstrates how Photoshop can transform simple elements like text and portraits into powerful pieces of digital art that capture attention and communicate emotion.
Creating a text portrait effect in Photoshop might seem challenging at first, especially if you’re new to the software. However, with a few simple techniques and Photoshop 2026’s improved tools, you can create stunning typography portraits with ease.
Step 1: Choose the Right Portrait – Start by selecting a high-resolution portrait with good lighting and strong facial features. Portraits with clear contrast and a simple background generally produce the best text portrait results.
Step 2: Prepare Your Document – Open your image in Photoshop and duplicate the original layer to preserve your source image. Working non-destructively gives you the flexibility to experiment without affecting the original file.
Step 3: Remove or Simplify the Background – If necessary, use Photoshop 2026’s Object Selection Tool or Remove Background feature to isolate your subject and create a cleaner composition.
Step 4: Add Your Text – Select the Type Tool and start adding your desired text. You can use a single word, quotes, song lyrics, names, or even paragraphs depending on the effect you want to achieve.
Step 5: Experiment with Typography – Try different fonts, font weights, spacing, and alignments. Bold fonts often create stronger visual impact, while smaller text blocks can reveal more facial details.
Step 6: Create the Text Portrait Effect – Arrange the text over the portrait and use Layer Masks and Clipping Masks to blend the typography into the image. Adjust the text placement to follow the contours of the face and create a more natural composition.
Step 7: Refine the Composition – Experiment with Blend Modes such as:
Step 8: Add Final Enhancements –
Use Adjustment Layers, such as:
Step 9: Enhance with Smart Objects – Convert your text layers into Smart Objects so you can easily edit typography and apply effects non-destructively.
Step 10: Experiment with AI-Powered Tools – In Photoshop 2026, Generative Fill can help extend backgrounds or create additional design elements around your portrait, while AI-assisted selection tools can significantly speed up your workflow.
Step 11: Save and Export – Once you’re satisfied with the result, save the project as a PSD file for future editing and export your final artwork in your preferred format.
Congratulations! You’ve successfully created a stunning text portrait effect in Photoshop. With practice and experimentation, you’ll develop your own unique style and create typography portraits that truly stand out.
Creating a text portrait effect in Photoshop is an art in itself, and like any art, it can be refined with a few tips and tricks. Here are some techniques to help you create more visually appealing and professional-looking text portraits.
One tip is to play with the opacity of your text layer. By lowering the opacity, you can create a more subtle and nuanced text portrait effect. This can add depth and complexity to your image, making it more visually appealing. In Photoshop 2026, you can also experiment with layer masks and blend modes to achieve smoother and more natural transitions.
Another tip is to experiment with different fonts and font sizes. Different fonts can convey different moods and emotions, and by playing with font sizes, spacing, and alignment, you can create a sense of depth and perspective in your image. Photoshop 2026’s improved typography controls and support for variable fonts give you even more creative flexibility.
Lastly, don’t forget about color. Even though you’re working with text, color can still play a significant role in your composition. By using colors that complement your portrait, you can enhance the visual impact of your text portrait effect. Adjustment Layers and Gradient Maps can also help you fine-tune colors and create a more cohesive final design.
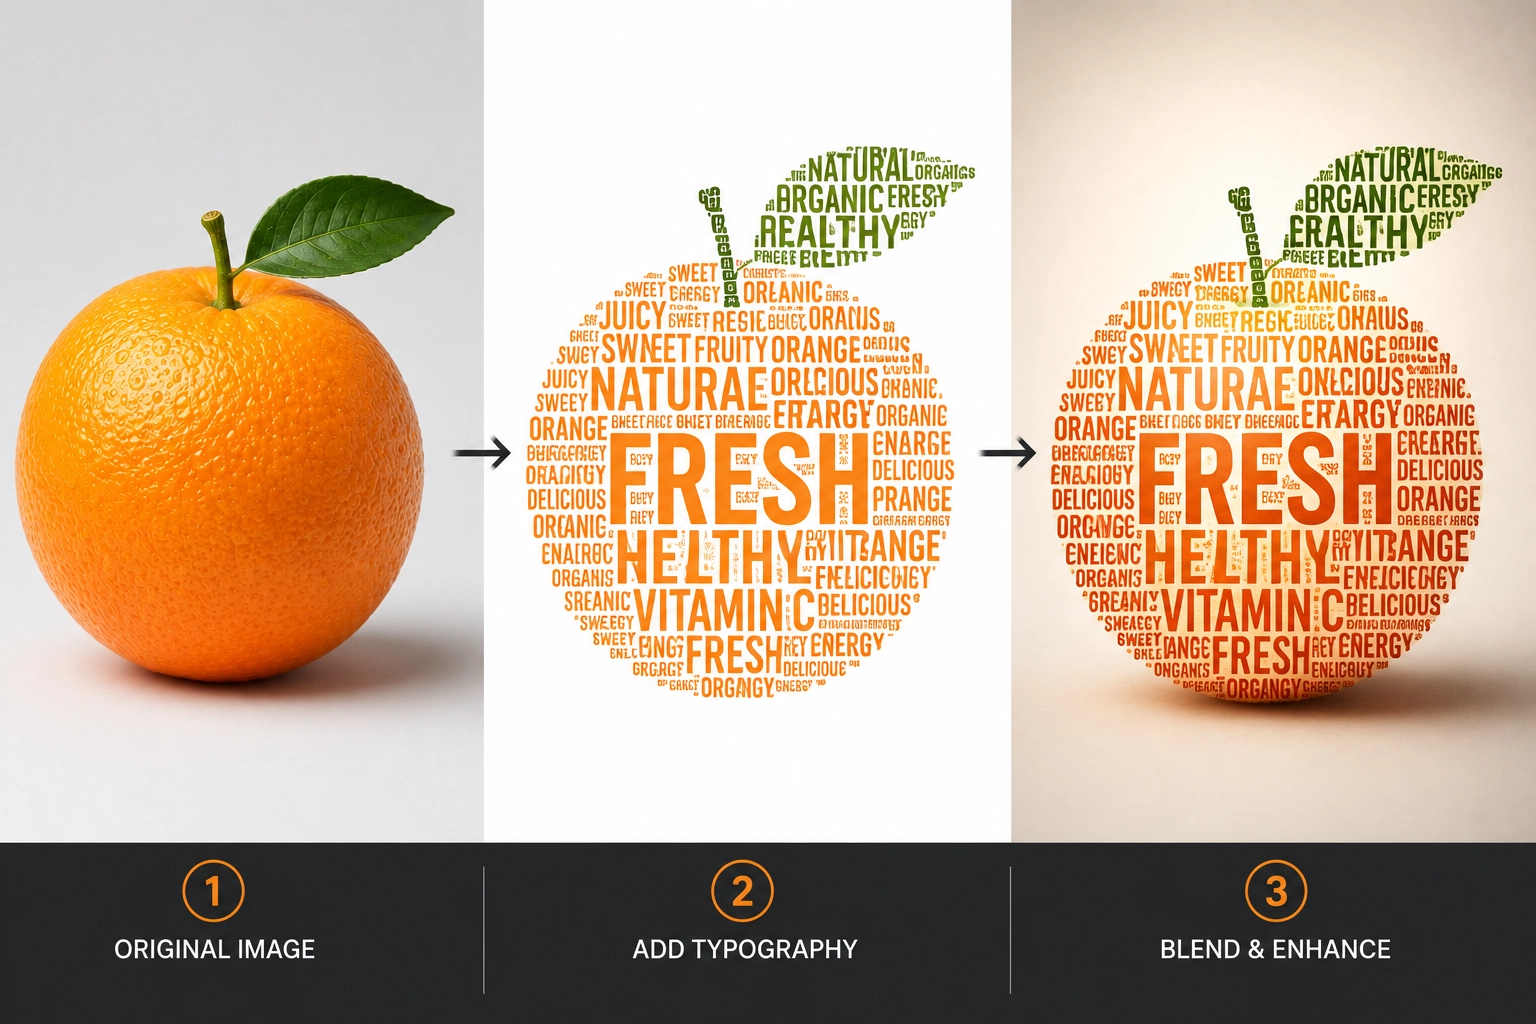
While creating a text portrait effect in Photoshop can be a fun and rewarding process, it’s also easy to make mistakes. Here are some common ones to watch out for.
One common mistake is using too much text. While it’s true that the text portrait effect relies on typography, you don’t want to overdo it. If your image is too cluttered with text, it can distract from the portrait itself and reduce its visual impact. Sometimes, using fewer words and creating more breathing room produces a much stronger composition.
Another mistake is not paying attention to the readability of your text. If your text is too small, too faint, or uses a font that’s difficult to read, it can undermine the effectiveness of your design. In Photoshop 2026, improved typography controls and variable fonts make it easier to adjust size, spacing, and weight, so take advantage of these tools to improve readability.
Lastly, don’t forget about the importance of composition and non-destructive editing. Make sure your text follows the natural shape and contours of the portrait, and avoid awkward placements that break the flow of the image. It’s also a good practice to work with Smart Objects and Layer Masks so you can easily refine your design without starting over.
The text portrait effect in Photoshop remains one of the most creative and visually striking typography techniques in Photoshop 2026. It combines photography, typography, and artistic composition to create unique designs that capture attention and communicate emotion.
Creating successful text portraits requires creativity, experimentation, and attention to detail. While modern features such as AI-assisted selections, Smart Objects, and Generative Fill can make the workflow faster and more flexible, the key to a great text portrait still lies in thoughtful typography and strong composition.
The more you experiment with different fonts, layouts, colors, and blending techniques, the more you’ll discover what’s possible with Photoshop. Don’t be afraid to push creative boundaries and develop your own unique style.
If you’re looking for professional photo editing services, Mister Clipping Path is here to help. Our team of experienced photo editors and retouchers specializes in creative photo manipulation, high-end retouching, and custom Photoshop effects for photographers, agencies, and businesses worldwide. Whether you need a simple edit or a complex creative project, we’re ready to bring your ideas to life.
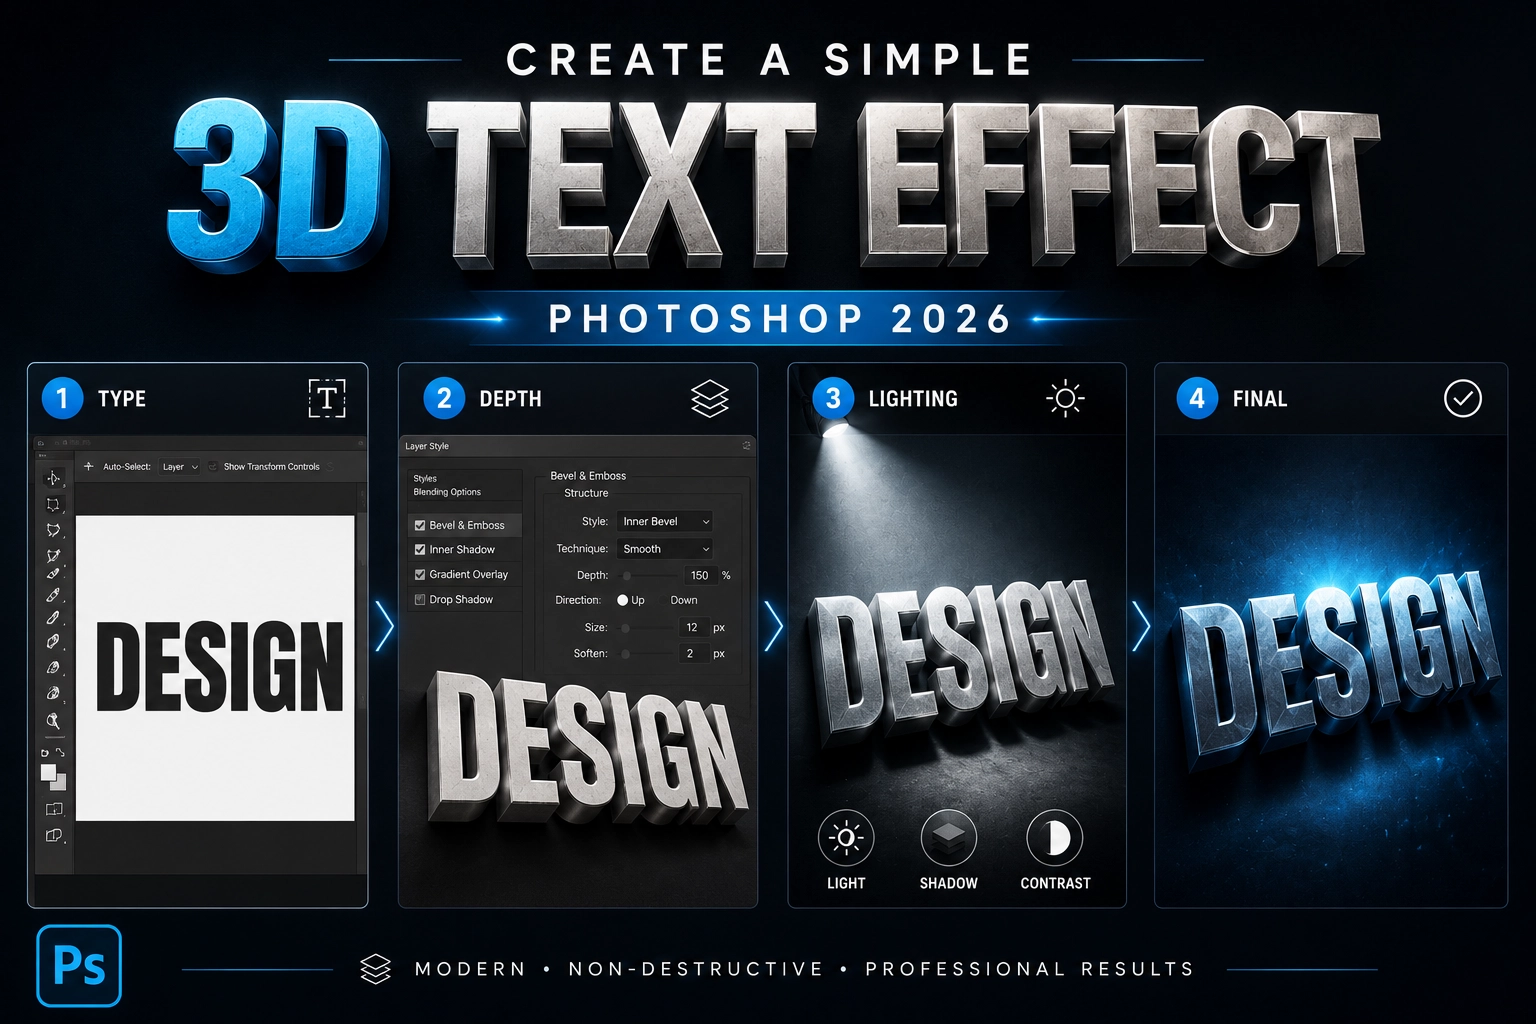
Welcome to the world of 3D Text Effects in Photoshop, where text leaps off the page and captures your attention like never before. Although Photoshop’s dedicated 3D workspace has evolved over the years, creating impressive 3D text effects is still possible in Photoshop 2026 using modern techniques such as Layer Styles, Smart Objects, gradients, and lighting effects.
Creating a 3D text effect in Photoshop is a great way to make your graphic designs stand out. Whether you’re designing social media graphics, YouTube thumbnails, posters, website banners, or marketing materials, adding depth and dimension to your text can make your designs more engaging and visually appealing.
In this guide, we’ll show you how to create a simple yet professional-looking 3D text effect in Photoshop 2026. From building depth and applying realistic shadows to adding textures and color, you’ll learn techniques that can transform ordinary text into eye-catching typography.
As you embark on your journey to mastering 3D text effects in Photoshop, you’ll discover that creating dimensional typography is easier than it may seem. With a bit of creativity and practice, you can create stunning text effects that bring your designs to life.
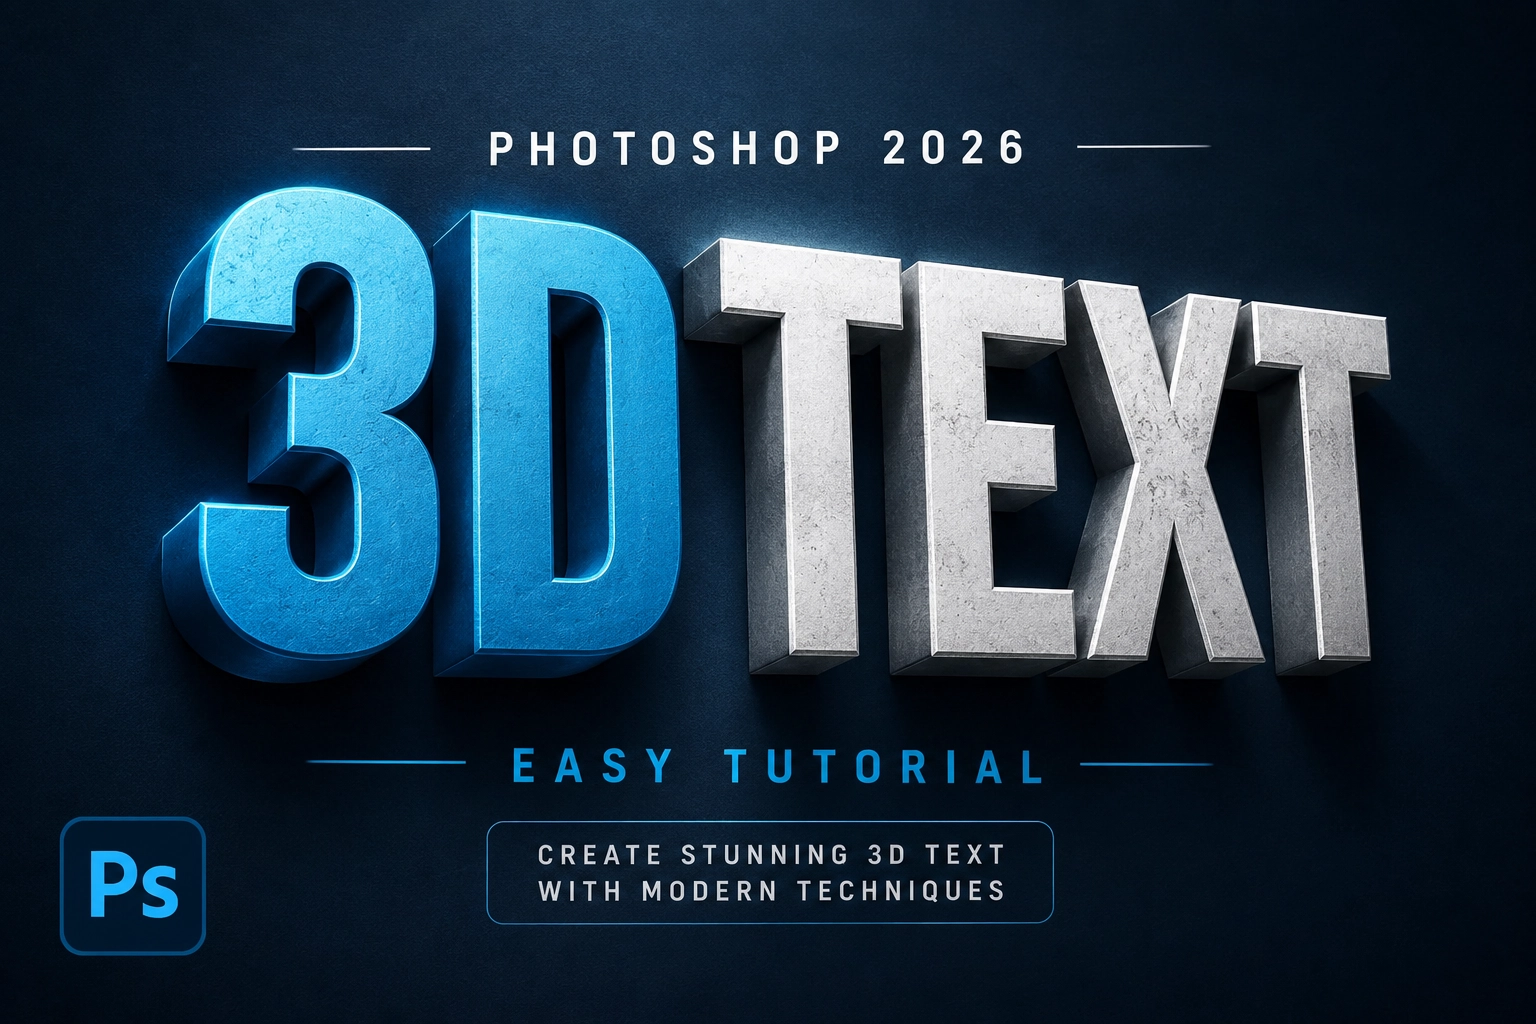
Mastering the 3D Text Effect in Photoshop is an essential skill for any graphic designer, content creator, or digital artist. It not only helps your designs stand out but also gives you a creative advantage in today’s highly competitive design industry.
In today’s digital world, where visual content dominates social media, advertising, and online marketing, the ability to create eye-catching 3D text effects is incredibly valuable. Whether you’re designing YouTube thumbnails, social media graphics, posters, website banners, or promotional materials, realistic 3D typography can help communicate your message more effectively, capture attention, and leave a lasting impression.
Furthermore, mastering 3D text effects in Photoshop can open up new creative and professional opportunities. It can strengthen your portfolio, help you attract more clients, and increase your value as a designer. With Photoshop 2026’s modern tools, such as Smart Objects, advanced layer styles, and AI-assisted workflows, creating professional-looking 3D text effects has become more accessible and flexible than ever before.
Now that you understand the importance of mastering the 3D Text Effect in Photoshop, it’s time to get started. Here’s a step-by-step guide to help you create your first basic 3D text effect using modern Photoshop techniques.
First, create a new document in Photoshop and select the Type Tool from the toolbar. Type your desired text and choose a bold, thick font for the best results, as heavier fonts work particularly well for creating dimensional effects.
Next, convert your text layer into a Smart Object by right-clicking on the text layer and selecting Convert to Smart Object. Then, use a combination of Layer Styles, including Bevel & Emboss, Inner Shadow, and Gradient Overlay, to simulate depth and create a realistic 3D appearance. You can duplicate the text layer and slightly offset it to create additional thickness and depth if needed.
Finally, add realistic lighting and shadows to enhance the effect. Use Drop Shadow, Inner Shadow, and subtle highlights to create dimension and make the text stand out. You can also apply gradients, textures, and adjustment layers to give your 3D text a more polished and professional look.
With Photoshop 2026, these non-destructive techniques offer greater flexibility and are often faster and easier to edit than the older 3D workspace methods.
Lighting and shadows play a crucial role in creating a realistic and compelling 3D Text Effect in Photoshop. They can add depth, contrast, and dimension to your text, making it pop off the page.
In the 3D panel, you can add a new light source by clicking on the ‘Add New Light to Scene’ button. You can adjust the brightness, color, and positioning of the light source to create different lighting effects.
Shadows can be adjusted in the 3D panel as well. You can change the shadow softness, darkness, and distance to create more depth and realism.
Remember, the key to mastering lighting and shadows is experimentation. Don’t be afraid to play around with different settings and see what works best for your design.
Lighting and shadows play a crucial role in creating a realistic and compelling 3D text effect in Photoshop. They add depth, contrast, and dimension to your typography, making it appear more realistic and visually striking.
In Photoshop 2026, you can create realistic lighting effects using a combination of Gradient Overlays, Inner Shadows, Drop Shadows, and subtle highlights. Experiment with the angle, opacity, and blending modes of these effects to simulate different lighting directions and create a convincing sense of depth.
Shadows are equally important for enhancing realism. Adjust the shadow’s distance, size, and opacity to create soft or dramatic effects depending on your design. You can also duplicate the text layer and apply blur effects to create more natural-looking shadows and improve the overall depth of your composition.
For even more realistic results, consider adding subtle textures, reflections, and color variations to your text. Small details in lighting and shadow can dramatically improve the final appearance of your 3D effect.
Remember, the key to mastering lighting and shadows is experimentation. Don’t be afraid to try different settings, blending modes, and layer styles to discover what works best for your design.
Once you’ve mastered the basics, you can start experimenting with more advanced techniques to create even more impressive 3D text effects in Photoshop.
One powerful technique is using the Bevel and Emboss feature in the Layer Style panel. By adjusting the depth, size, contour, and highlight settings, you can create highly detailed and sculpted typography that looks more realistic and professional.
Another advanced technique is using the Displace Filter. This allows you to warp or distort your text so that it follows the contours of another image or texture. It’s an excellent way to create effects such as text on fabric, concrete, metal, or uneven surfaces.
You can also experiment with Gradient Maps, Texture Overlays, and Blending Modes to add additional depth, reflections, and realistic materials to your text. Combining these effects with Smart Objects gives you the flexibility to edit and refine your design non-destructively.
For even more creative possibilities, Photoshop 2026’s Generative Fill can be used to create custom backgrounds, extend compositions, or generate additional design elements around your 3D text, helping you build more dynamic and eye-catching artwork.
These advanced techniques can take your 3D text effects to the next level, so don’t be afraid to experiment, combine different methods, and push your creativity further.
Mastering 3D text effects in Photoshop is a journey of creativity, experimentation, and continuous learning. It’s a valuable skill that can significantly enhance your designs and help you stand out as a graphic designer, content creator, or digital artist.
Remember, the key to mastering this technique is practice and exploration. Don’t be afraid to experiment with different fonts, layer styles, lighting effects, textures, and color combinations. Photoshop 2026 offers more creative possibilities than ever before, and combining traditional techniques with modern features such as Smart Objects and AI-assisted workflows can help you create stunning and professional-looking typography.
Hopefully, this guide has provided you with a solid foundation for creating impressive 3D text effects in Photoshop. Keep practicing, continue experimenting, and before long, you’ll be designing eye-catching 3D typography with confidence and developing your own unique style.
If you’re looking for professional photo editing services, Mister Clipping Path is here to help. Our team of experienced photo editors and designers specializes in high-end image editing, creative photo manipulation, and custom graphic design solutions for businesses, photographers, and agencies worldwide. Whether you need simple edits or complex creative projects, we’re ready to give your designs the professional touch they deserve.
