A Step-by-Step Guide to Content Aware Fill in Photoshop 2024
Introduction
Unlock the full potential of Photoshop with our comprehensive guide to Content Aware Fill. Whether you’re a seasoned designer or just starting out, this step-by-step tutorial will help you master this powerful tool and take your editing skills to the next level.
With Content Aware Fill, you can magically remove unwanted objects or fill in gaps seamlessly. Say goodbye to tedious manual retouching, as this intelligent feature intelligently analyzes your image and replaces or replicates the selected area with a natural blend. From removing pesky distractions in your landscape shots to restoring old photographs, the possibilities are endless.
Follow along as we break down the process into easy-to-understand steps, complete with screenshots and expert tips. Learn how to select the right brush size, refine the selection, and fine-tune the results for flawless edits. We’ll also address common challenges and provide troubleshooting tips to help you overcome any obstacles.
Ready to unleash your creativity? Let’s dive into our comprehensive guide to Content Aware Fill in Photoshop and elevate your editing game.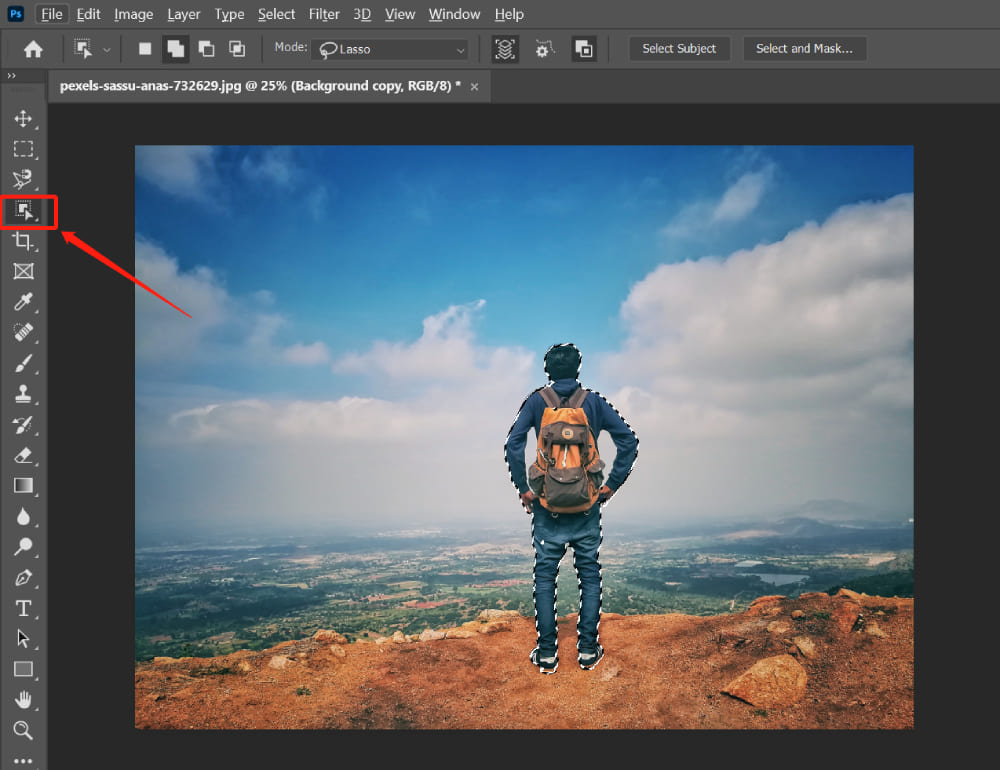
Understanding the concept of Content Aware Fill
Content Aware Fill is a powerful feature in Photoshop that allows you to remove unwanted objects or fill in gaps seamlessly. It works by analyzing the surrounding pixels and intelligently replacing or replicating the selected area with a natural blend. This feature saves you time and effort, as you no longer have to manually retouch each imperfection in your images.
To use Content Aware Fill, you need to make a selection around the object or area you want to remove or fill. Photoshop will then analyze the surrounding pixels and generate a fill that seamlessly blends with the rest of the image. This intelligent algorithm ensures that the final result looks natural and seamless, without any obvious traces of editing.
One of the key benefits of Content Aware Fill is its ability to accurately analyze the image and make intelligent decisions on how to fill the selected area. It takes into account factors such as texture, color, and lighting to create a fill that seamlessly blends with the rest of the image. This makes it an invaluable tool for a wide range of editing tasks, from removing distractions in landscape shots to retouching portraits.
Benefits of using Content Aware Fill
Using Content Aware Fill in Photoshop offers several benefits that make it a must-have tool for any photographer or designer. Here are some of the key advantages:
-
Time-saving: Content Aware Fill allows you to remove unwanted objects or fill in gaps with just a few clicks, saving you valuable time that would otherwise be spent on manual retouching.
-
Seamless results: The intelligent algorithm behind Content Aware Fill ensures that the filled area blends seamlessly with the rest of the image, resulting in a natural-looking final result.
-
Versatility: Content Aware Fill can be used for a wide range of editing tasks, from removing small distractions to filling in large areas. Its flexibility makes it a valuable tool in any editing workflow.
-
Non-destructive editing: Content Aware Fill works on a separate layer, preserving the original image and allowing you to make adjustments or further edits if needed.
-
Easy to use: With its intuitive interface and straightforward steps, Content Aware Fill is accessible to both beginners and experienced users. It doesn’t require extensive knowledge of Photoshop to achieve impressive results.
Step-by-step guide to using Content Aware Fill in Photoshop
Now that you understand the concept and benefits of Content Aware Fill, let’s dive into a step-by-step guide on how to use this powerful tool in Photoshop. Follow these instructions to master Content Aware Fill and bring your editing skills to the next level:
Step 1: Open your image in Photoshop and make sure you have the “Background” layer selected. If you need to make any adjustments or edits to your image, do so before proceeding.
Step 2: Choose the “Lasso Tool” from the toolbar on the left side of the screen. This tool allows you to make selections around the object or area you want to remove or fill. Adjust the brush size using the options at the top of the screen to ensure accurate selection.
Step 3: Carefully draw a selection around the object or area you want to remove or fill. Take your time and be precise, as this will determine the accuracy of the final result. If you make a mistake, you can use the “Undo” command or the “Deselect” option to start over.
Step 4: Once you have made your selection, go to the “Edit” menu at the top of the screen and choose “Fill.” In the dialog box that appears, select “Content-Aware” from the “Use” dropdown menu.
Step 5: Click the “OK” button to apply Content Aware Fill. Photoshop will analyze the surrounding pixels and generate a fill that seamlessly blends with the rest of the image. Depending on the complexity of the selected area, this process may take a few seconds.
Step 6: Zoom in and inspect the filled area. If there are any noticeable artifacts or inconsistencies, you can use the “Spot Healing Brush” or the “Clone Stamp Tool” to further refine the result. Adjust the brush size and hardness as needed to achieve a seamless blend.
Step 7: Repeat the process for any additional objects or areas you want to remove or fill. Take your time and be patient, as the accuracy of your selections and adjustments will greatly impact the final result.
Step 8: Once you are satisfied with the edits, save your image in the desired format and resolution. It’s always a good idea to keep a backup of the original image in case you need to make further adjustments or edits in the future.
Congratulations! You have successfully used Content Aware Fill in Photoshop to remove unwanted objects or fill in gaps in your image. With practice and experimentation, you will become more proficient in using this powerful tool.
Tips and tricks for using Content Aware Fill effectively
While the step-by-step guide provides a solid foundation for using Content Aware Fill, here are some additional tips and tricks to help you get the most out of this powerful tool:
-
Refine your selection: Before applying Content Aware Fill, take the time to refine your selection. Use the zoom tool to get a closer look at the selected area and make any necessary adjustments. A precise selection will result in a more accurate fill.
-
Use the “Preview” option: When using Content Aware Fill, check the “Preview” box in the fill dialog box to see a real-time preview of the result. This allows you to make adjustments and fine-tune the fill before applying it.
-
Experiment with different brush sizes: The brush size you choose when making selections and adjustments can greatly impact the accuracy and quality of the final result. Try different brush sizes to find the one that works best for your specific image and editing task.
-
Combine with other tools: Content Aware Fill works best when combined with other editing tools in Photoshop. Experiment with the “Spot Healing Brush,” “Clone Stamp Tool,” or “Patch Tool” to further refine the filled areas and achieve a seamless blend.
-
Take advantage of keyboard shortcuts: Photoshop offers a range of keyboard shortcuts that can speed up your editing workflow. Familiarize yourself with shortcuts for tools like the “Lasso Tool,” “Undo,” and “Deselect” to save time and improve efficiency.
Remember, practice makes perfect. The more you use Content Aware Fill, the more comfortable and proficient you will become in using this powerful tool.
Common mistakes to avoid when using Content Aware Fill
While Content Aware Fill is a powerful tool, there are some common mistakes that users often make. By being aware of these pitfalls, you can avoid them and achieve better results. Here are some common mistakes to avoid when using Content Aware Fill:
-
Poor selection: One of the most common mistakes is making a sloppy or inaccurate selection. Take your time and be precise when drawing selections, as this will greatly impact the accuracy of the final result. Use zoom tools for a closer look and make adjustments as needed.
-
Overusing Content Aware Fill: Content Aware Fill is a versatile tool, but it’s important not to rely on it too heavily. In some cases, manual retouching or using other editing tools may produce better results. Use Content Aware Fill selectively and combine it with other techniques for the best outcome.
-
Ignoring lighting and texture: Content Aware Fill analyzes the surrounding pixels to create a seamless blend, but it’s important to consider factors like lighting and texture. If the lighting or texture in the selected area differs significantly from the surrounding pixels, the fill may look unnatural. Adjust the lighting or texture using other tools to achieve a better match.
-
Not refining the result: Content Aware Fill provides a good starting point, but it may not always produce a perfect result. After applying the fill, use other tools like the “Spot Healing Brush” or “Clone Stamp Tool” to further refine the filled areas. Pay attention to details and make adjustments as needed.
-
Forgetting to save the original image: It’s always a good idea to keep a backup of the original image before applying Content Aware Fill or any other edits. This way, you can always go back to the original if you need to make further adjustments or start over.
By avoiding these common mistakes, you can achieve better results and make the most of Content Aware Fill in your editing workflow.
Advanced techniques for Content Aware Fill in Photoshop
Once you have mastered the basics of Content Aware Fill, you can explore more advanced techniques to further enhance your editing skills. Here are some advanced techniques you can try:
-
Content Aware Fill with multiple selections: Instead of making a single selection, try making multiple selections around the object or area you want to remove or fill. Photoshop will analyze all the selections and generate a fill that seamlessly blends them together. This technique is useful for complex editing tasks or when dealing with large areas.
-
Content Aware Fill with masks: Instead of applying Content Aware Fill directly to the image, use a layer mask to control the fill. This allows you to make adjustments to the mask and fine-tune the filled areas without affecting the original image. Masks give you more control and flexibility in your editing workflow.
-
Content Aware Fill for creative edits: Content Aware Fill can also be used for creative edits, not just for removing objects or filling gaps. Experiment with making selections in different shapes or patterns, and let Content Aware Fill generate unique fills. This can result in interesting abstract or surreal effects.
-
Customizing Content Aware Fill settings: Photoshop allows you to customize the settings for Content Aware Fill. In the fill dialog box, click on the “Settings” button to access additional options. Experiment with different settings like “Color Adaptation” or “Scale” to achieve the desired result.
Remember, advanced techniques require more experimentation and practice. Don’t be afraid to explore and push the boundaries of what Content Aware Fill can do.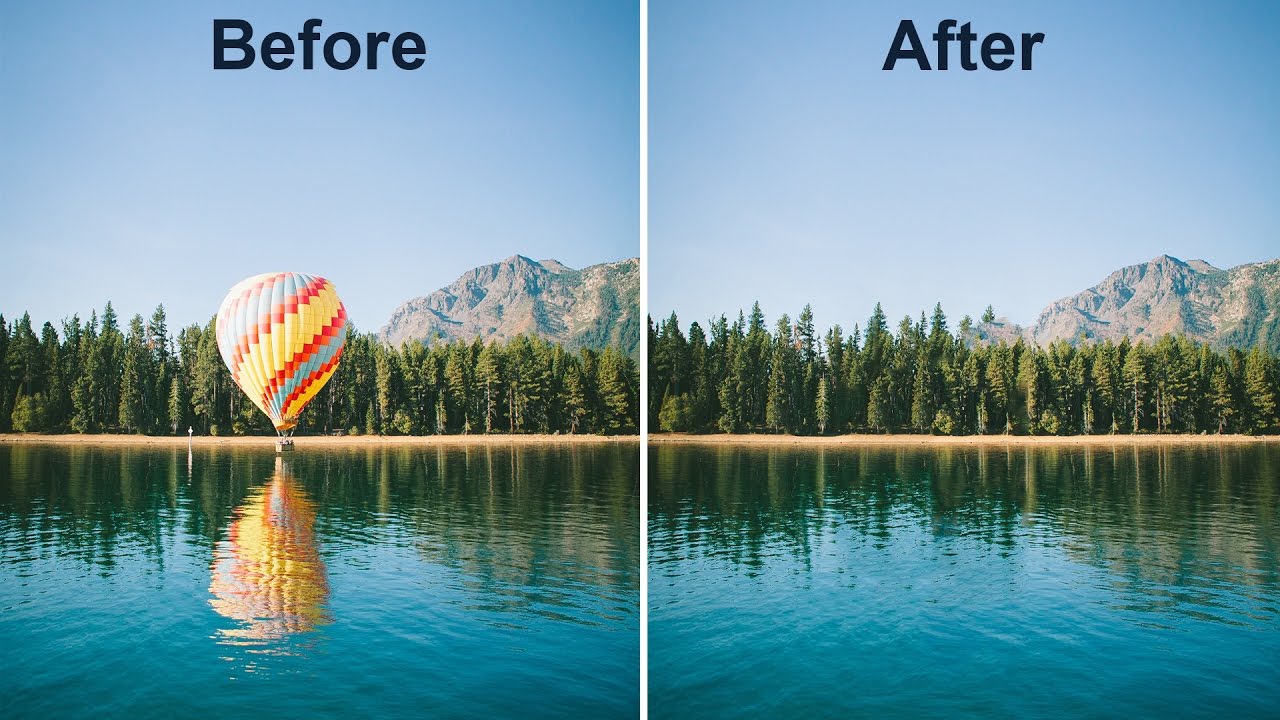
Alternatives to Content Aware Fill in Photoshop
While Content Aware Fill is a powerful tool, it’s not the only option available in Photoshop for removing objects or filling gaps. Here are some alternatives you can consider:
-
Clone Stamp Tool: The Clone Stamp Tool allows you to manually duplicate or clone pixels from one area of an image to another. This tool is useful for precise retouching or when you need more control over the editing process. However, it requires more manual work compared to Content Aware Fill.
-
Patch Tool: The Patch Tool is another alternative for removing objects or filling gaps. It works by selecting a specific area and then blending it with the surrounding pixels. This tool is particularly useful for complex editing tasks or when dealing with irregular shapes.
-
Healing Brush Tool: The Healing Brush Tool allows you to sample pixels from one area of an image and apply them to another area. It automatically blends the sampled pixels with the surrounding pixels for a seamless result. This tool is great for retouching small imperfections or blemishes.
-
Content-Aware Move Tool: The Content-Aware Move Tool allows you to select an object and move it to a different position in the image. Photoshop automatically fills the gap left by the moved object with surrounding pixels. This tool is useful when you want to rearrange elements in your composition.
Each of these alternatives has its own advantages and disadvantages, and the choice depends on the specific editing task at hand. Experiment with different tools to find the one that works best for your needs.
Conclusion
Content Aware Fill is a powerful tool in Photoshop that allows you to remove unwanted objects or fill in gaps seamlessly. By following our step-by-step guide and incorporating the tips and tricks provided, you can master this tool and elevate your editing skills to the next level.
Keep practicing and exploring advanced techniques to further enhance your editing workflow. Combine Content Aware Fill with other tools and experiment with different settings to achieve the desired result. With patience and creativity, you can say goodbye to imperfections and unlock the full potential of your images with Content Aware Fill in Photoshop.
If you are looking for photo editing services then contact misterclippingpaths because they are best photo editing service providers in the market. They have a team of skilled professionals who can help you bring your creative visions to life. Whether you need help with basic photo edits or complex digital art creations, they’ve got you covered.

Leave a Reply
Want to join the discussion?Feel free to contribute!